Kenmore 4292 Installation Instructions
Kenmore 4292 - Elite 36 in. Induction Cooktop Manual
 |
View all Kenmore 4292 manuals
Add to My Manuals
Save this manual to your list of manuals |
Kenmore 4292 manual content summary:
- Kenmore 4292 | Installation Instructions - Page 1
AND SERVICE MUST BE PERFORMED BY A QUALIFIED iNSTALLER. iMPORTANT: SAVE FOR LOCAL ELECTRICAL iNSPECTOR'S USE. READ AND SAVE THESE iNSTRUCTiONS FOR FUTURE REFERENCE. FOR YOUR SAFETY: Do not store or use gasoline or other flammable vapors and liquids in the vicinity of this or any other appliance - Kenmore 4292 | Installation Instructions - Page 2
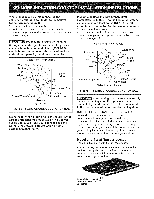
OverheaCdabineSt houldNotExceead MaximumDepthof13"(33cm) AMin. ......._ I g0" (76.2 cm) Min. CI Between the Top of the Cooking Platform and the Bottom of an Unprotected Wood or Metal Cabinet _._ 1 24" (61 cm) Min. when Bottom of Wood or Metal Cabinet is Protected by Not Less Than 1/8" (0.g cm) - Kenmore 4292 | Installation Instructions - Page 3
appliance, so it can be moved if servicing is ever necessary. 4. A suitable strain relief must be provided to attach the flexible armored cable to the junction box. Unpacking Instructions and Maintenance section in the Use and Care Guide. Electrical Connection Connect the flexible armored cable - Kenmore 4292 | Installation Instructions - Page 4
. NOTE TO ELECTRICIAN: The armored cable leads supplied with the appliance are UL-listed for connection to larger gauge household wiring. The Number Location The serial plate is located under the cooktop. When ordering parts for or making inquires about your cooktop, always be sure to include the - Kenmore 4292 | Installation Instructions - Page 5
Call for Service Checklist and operating instructions in your Use and Care Guide. It may save you time and expense. The list includes common occurrences that are not the result of defective workmanship or materials in this appliance. Refer to your Use and Care Guide for Sears service phone numbers - Kenmore 4292 | Installation Instructions - Page 6
Notes 6 - Kenmore 4292 | Installation Instructions - Page 7
LA iNSTALACION Y EL SERVICIO DEBEN SER EFECTUADOS POR UN INSTALADOR CALIFICADO. iMPORTANTE: GUARDE ESTAS iNSTRUCCIONES PARA USO DEL iNSPECTOR LOCAL DE ELECTRICIDAD. LEA Y GUARDE ESTAS iNSTRUCCIONES PARA REFERENCIA FUTURA. PARASU SEGURIDAD: Noaimanece ni utilicegasoiina inflamables en la pro×imidad - Kenmore 4292 | Installation Instructions - Page 8
(33 cm) 30" (76.2 cm) min. de espacio entre la parte super,or de cubierta y la parte inferior de un armario de madera o metal sin protecci6n. _1_ 24" (61 desde el borde delantero del corte haste el borde delantero de la parte superior del armario Ubicaci6n aproximada de la caja de empalmes No - Kenmore 4292 | Installation Instructions - Page 9
los nQmeros de modelos). Nota importante al consumidor Conserve estas instrucciones y el Manual del usuario para referencia futura. INSTRUCCIONES IMPORTANTES DE SEGURIDAD = Aseg_rese de mico antes de utilizar. Ve a la parte sobre Limpieza y Mantenimiento de la Cubierta en este Manual del usuario. 9 - Kenmore 4292 | Installation Instructions - Page 10
Conexi6n Electrica Conecte el cable blindado flexible que se extiende desde la superficie del artefacto hasta la caja de empalmes el retenector utilizando de tensi6n adecuada en el punto en que el cable blindado entra en la caja de empalmes. Realizar luego la conexi6n electrica de la siguiente - Kenmore 4292 | Installation Instructions - Page 11
NOTA AL ELECTRICISTA: Los conductores de cable blindados provistos con este artefacto son aprobados por UL para la conexi6n al alambrado de casa de un calibre mayor. El aislante de los conductores esta calificado para temperaturas m&s altas que las del alambrado de una casa. La capacidad de - Kenmore 4292 | Installation Instructions - Page 12
estufa. Puede que esten Io suficiente calientes para quemar. Antes de Ilamar al servicio Lea la secci6n Lista de Control de Averfas en su Manual del Usuario. Esto le podr& ahorrar tiempo y gastos. Esta lista incluye ocurrencias comunes que no son el resultado de defectos de materiales o fabricaci6n
-
 1
1 -
 2
2 -
 3
3 -
 4
4 -
 5
5 -
 6
6 -
 7
7 -
8
-
9
-
10
-
11
-
12
 |
 |

iNSTALLATiON
AND
SERVICE
MUST
BE
PERFORMED
BY
A QUALIFIED
iNSTALLER.
iMPORTANT:
SAVE
FOR
LOCAL
ELECTRICAL
iNSPECTOR'S
USE.
READ
AND
SAVE
THESE
iNSTRUCTiONS
FOR
FUTURE
REFERENCE.
FOR YOUR SAFETY:
Do
not
store or use
gasoline
or other
flammable
vapors and liquids
in
the
vicinity
of this or any other appliance.
IMPORTANT
INSTALLATION
INFORMATION
= All
electric
cooktops
run off a single phase, three-wire
or four-wire cable, 240/208 volt, 60 hertz, AC only
electrical
supply with ground.
•
Minimum
distance between cooktop and overhead cabinetry
is 30" (76,2 cm).
30" (76.2 cm) min. for
unprotected
cabinet and
24" (61 cm) min. for
cabinet with protected
bottom surface,
** DO NOT obstruct these
areas.
DO NOT apply any sealant
along the perimeter.
The
cooktop
must breath freely,
Cooktop Dimensions
D
Cooktop Cutout
Dimensions
H
4" X 8" (10.2 cm x 20.3 cm)
opening
to route armored
cable
_::::_:.:::::::::::
if a panel is present
r
.
_ oo_:: :z
-
F
\
J-
L
Figure
1
43/8(11.1)
287/8(73.3)
20(50.8)
29#8(75.2)293A(75.6)
203/8(51.8)
20Y2(52.1)
4Y2(11.4)
4V8(11.1)
351A(89.5)
20(50.8)
357/8(91.1)
36(91.4)
203/8(51.8)
20Y2(52.1)
4Y2(11.4)
All dimensions
are stated in inches and (cm).
P/N 318205407
(0807) Rev. A
Allow 2" (5 cm) space below the armored
cable opening to clear the electric cable and
English - pages 1-6
allow space for installation
of the junction box on the wall at the back of the cooktop.
Espafiol-
pages 7-12
Printed
in United
States