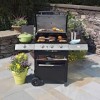
Kenmore 464324009 Use and Care Guide
Kenmore 464324009 - LP Gas Grill Manual
 |
View all Kenmore 464324009 manuals
Add to My Manuals
Save this manual to your list of manuals |
Kenmore 464324009 manual content summary:
- Kenmore 464324009 | Use and Care Guide - Page 1
is for OutdoorUse Only • Read and follow all Safety, Assembly, and Use and Care instructions in this Guide before assembling and cooking with this grill. • Failure to follow all irstructions in this Use and Care Guide may lead to fire or e×plosion, which could result in property damage, personal - Kenmore 464324009 | Use and Care Guide - Page 2
flammable liquids or vapors in the vicinity of this or any other appliance. 2. An LP Tank not connected for use shall not be stored in the vicinity of this or any other appliance. Call Grill Service Center For Help And Parts If you have questions or need assistance during assembly, please call 1-800 - Kenmore 464324009 | Use and Care Guide - Page 3
For Your Safety Grill Service Center Product Record Information Safety Symbols Installation Safety Precautions Kenmore Grill Warranty Use and Care Parts List Parts Diagram Assembly Troubleshooting 2 2 2 2 2 3 4-10 11 12 13-22 23-25 Repair Protection Agreements Congratulations on making - Kenmore 464324009 | Use and Care Guide - Page 4
the appliance or stored cylinder is a hazard due to possible gas release from the safety relief valve. This could lift LP tank up and off of support bracket. Install safety cap onto LP tank where children play. 4 °464324009 LP Cylinder • The LP cylinder used with your grill must meet the following - Kenmore 464324009 | Use and Care Guide - Page 5
during leak test. *Do not use an open flame to check for gas leaks. *Grill must be leak tested outdoors in a well-ventilated area, away from ignition sources such as gas fired or electrical appliances. During leak test, keep grill away from open flames or sparks. •Use a clean paintbrush and a 50/50 - Kenmore 464324009 | Use and Care Guide - Page 6
leak test by turning hand wheel clockwise. Outdoor gas appliance is not intended to be installed in or on a boat. Outdoor gas appliance is not intended to be installed in or on an RV. . Never attempt to attach this grill to the self-contained LP gas system of a camper trailer or motor home. . Do - Kenmore 464324009 | Use and Care Guide - Page 7
grill. ,A, If you have a grill problem see the "Troubleshooting Section". A If the regulator frosts, turn off grill and LP cylinder valve immediately. This indicates a problem control knob OFF, wait 5 minutes for gas to clear and repeat the lighting instructions. 5.To light other burners turn control - Kenmore 464324009 | Use and Care Guide - Page 8
"Sudden drop or low flame" in the Troubleshooting Section. If ignition does NOT occur in gas at LP cylinder. 2.Place lit match near burner. 3.Turnsideburner knob to HI. Be sure burner lights and stays lit. 8.464324009 Turning Grill grill cleaner on plastic parts. Damage to and failure of parts - Kenmore 464324009 | Use and Care Guide - Page 9
knownto create"flashback"problems.The spidersspinwebs,build nestsand layeggs in the grill'sventuritube(s)obstructingthe flow of the Burner Assembly Follow these instructions to clean and/or replace parts of burner assembly or if you have trouble igniting grill, 1. Turn gas off at control knobs and - Kenmore 464324009 | Use and Care Guide - Page 10
Consumes less fuel. Indirect Cooking Instructions • Always cook with the safety is a very important part of enjoying the outdoor cooking internal food temperatures. Chill: Refrigerate prepared foods and leftovers promptly fully cooked meats like hot dogs, grill to 165° F, or until steaming 464324009 - Kenmore 464324009 | Use and Care Guide - Page 11
included with this grill are for food preparatbn, serving, grilling, and leftover storage. The tray, lid and grates are dishwasher safe, making the grill. Remove grate lifter handle once grate is inserted into grill. • Storage: For leftover storage, snap lid on tray and place in refrigerator. NOTE - Kenmore 464324009 | Use and Care Guide - Page 12
80009025 NOT Pictured .. 1 PRODUCT MANUAL, ENGLISH 80018088 18 2 .. 1 PRODUCT MANUAL, SPANISH 80018089 LID 80006983 .. 80008553 80018125 80018432 If you are missing hardware or have damaged parts, please call 1-800-241-7548for replacement. 34 1 COOKING F/SlDEBURNER 80012457 12. 464324009 - Kenmore 464324009 | Use and Care Guide - Page 13
/@ / / / @ \ @ / 464324009'13 - Kenmore 464324009 | Use and Care Guide - Page 14
axleholes.Attachto rightand left leg assemblieswith (4)1/4-20x1-1/2"screws and 1/4-20flange nuts. [] Tightensecurely. MatchHolder 1/4-20Flangenuts Qty.4 Left LegAssembly 1/4-20x1-1/2"Screws Qty.4 YRightLegAssembly Axlehole Front BottomShelf 14 °464324009 - Kenmore 464324009 | Use and Care Guide - Page 15
,wheelspacer,legs,wheelspacerand otherwheel.Attachwith (1)Axlewasherand hitchpin. [] Hammerleg extendersinto rightlegs. WheelSpacer Qty.2 Axle Rod Axle Washer Qty.1 Leg ExtenderFront \ HitchPin Qty. 1 Leg ExtenderRear \ WheelSpacer Wheel WheelSpacer '_ HitchPin / AxleWasher "Cone" side of - Kenmore 464324009 | Use and Care Guide - Page 16
lowerhalfof cart with (4) #8×3/8" self-tap screws. NOTE:Thelowerfront panelis the one that doesnot havetwotop center holesfor handleattachment. !" Back Brace \ \\ #8x3/8" self-tapscrews Qty.8 X LowerFrontPanel 16,464324009 Back of cart - Kenmore 464324009 | Use and Care Guide - Page 17
screws. [] Attachhandleto upperfront panelwith (2) #10-24flange nuts. [] Attachupperfront panelassemblyto cartwith (2) shoulder screws. !" UpperBrace #8x3/8" self-tapscrews Qty.4 #10-24 FlangeNuts Qty.2 shoulderscrews Qty.2 UpperFrontPanel Handle 464324009.17 - Kenmore 464324009 | Use and Care Guide - Page 18
grill headontothe cart. Makesurethe regulatorhoseis hangingoutsidethecart.Attachwith (4) 1/4-20×1/2"screws, 7ramlock washers and 7ramflat washers. Grill Head X 1/4-20xl/2"screws Qty.4 7mmlock washers Qty.4 7mmflat washers Qty.4 7mmflat washers 7mmlock washers 1/4-20x1/2screws 18,464324009 - Kenmore 464324009 | Use and Care Guide - Page 19
sidewallof shelfoversupportbracketson sideof firebox(A) [] Insert(2) 7mm fiber washers and 1/4-20x1/2"screws throughinsidefront of firebox and (2) throughoutsidebackof :Fasciamustbe securelytightenedto fireboxto safelymovegrill !" #8x3/8" self-tapscrews Qty 2 Fascia,RightSide Shelf \ 464324009,19 - Kenmore 464324009 | Use and Care Guide - Page 20
[] Hooksidewall of sideburnershelf oversupportbracketson sideof firebox(A). [] Insidefireboxinsertfiber washers and 1/4-20x1/2"screws as shown (B). [] Attach(4) efCt FAaUsTcIiaON:Fasciamustbe securelytightenedto fireboxto safelymovegrill. Left Fascia T #8x3/8" self-tapscrews Qty.2 20 '464324009 - Kenmore 464324009 | Use and Care Guide - Page 21
to electrodeasshown (D). [] Placegrateontosideburnershelf (E). [] Presscontrolknobontosideburnervalvestem (F). Bezel Sideburner D ® SideburnerValve BurnerClip Sideb Grid Correctly assembled burner-to-valve engagement ControlKnob #8-32X3/8"SS Screw Qty.2 WingNut Qty.1 464324009,21 - Kenmore 464324009 | Use and Care Guide - Page 22
Heat Shield [] Attach heat shield to fire box with (2) #8=3/8' self=tap screws. Lid removed for clarity Heat Shield #8x3/8" self-tapscrews Qty.2 22' 464324009 - Kenmore 464324009 | Use and Care Guide - Page 23
Away [] Placecookinggratesonto graterests. [] Insertendsof SwingAwaypivot wireinto holesin sides of grill lid. Insertendsof SwingAway leg wire intoholesin sidesof firebox. NOTE:Pivotand ignitorslot with positiveend (+)facing outward.Screw ignitorcaponto ignitor. Pivot Wire Grate 464324009,23 - Kenmore 464324009 | Use and Care Guide - Page 24
Grate Lifter, Storage Tray and Lid [] Hang Grate Lifter onto tool hook. [] When using Storage Tray and Lid, place on right side shelf. When not using, store indoors. Lid Tray Tool Basket [] Hooktoolbasketintofront panel. GrateLifter ToolBasket 24,464324009 - Kenmore 464324009 | Use and Care Guide - Page 25
CAUTION Failureto installgreasecup clip and cup will cause hot greaseto drip from bottom of grill with risk of fire or property damage. GreaseCup GreaseCu LP Tank [] LP tank correctly may allow gashose to be damagedin operationr, esultinginthe riskof fire. LPTank TankThumbscrew 464324009,25 - Kenmore 464324009 | Use and Care Guide - Page 26
•Toomuchgreasebuildupin burnerarea. •Turnoff gas at LP cylinderor at sourceon die down.After fire is outand grill is cold,remove burnerand inspectfor spidernestsor ,and other surfaces. Troubleshooting Burner(s)will not light . •Replacewith a newAA-sizealkalinebattery. 26 '464324009 REVO0 - Kenmore 464324009 | Use and Care Guide - Page 27
Troubleshooting (continued) Burner(s)will ectionof Use and Care. Suddendrop in gas flow or low flame. •Out of gas, •Excessflow valvetripped. •Vaporlock at let fire burnout,After grill cools,removeandcleanall parts. Flashback... •Burnerand/orburnertubes -overtube(s)with wirebrush. 464324009,27 - Kenmore 464324009 | Use and Care Guide - Page 28
Troubleshooting - Electronic Ignition SECTIONI Nosparksappearat anyelectrodeswhen controlknobturnedto _" ; no ignitionsystemand lookfor arcingbetweenoutputwires and grill frame. •If sparksare removemoisture. •Inspectelectrodesfor cracks. •Replacecrackedor brokenelectrodes. 28 '464324009 - Kenmore 464324009 | Use and Care Guide - Page 29
464324009'29 - Kenmore 464324009 | Use and Care Guide - Page 30
30 '464324009 - Kenmore 464324009 | Use and Care Guide - Page 31
464324o03019 - Kenmore 464324009 | Use and Care Guide - Page 32
troubleshooting and home solutions advice: alnage ho ,e iiiiiiiiiiiiiiiiiiiiii iiiiiiiiiiiiii iiiiiiiiiiiiiiiiiiiii: iiiiiiiiiiiiiiiiiiiiii iiiiiiiiiii iiiiiiiiiiiiiiiiiiiiii ...i.i.i.i.i.i..i.i.i.i.i.i.i.i.i..i.i.i.i.i.i.i.... For repair- in your home - of all major brand appliances
-
 1
1 -
 2
2 -
 3
3 -
 4
4 -
 5
5 -
 6
6 -
 7
7 -
8
-
9
-
10
-
11
-
12
-
13
-
14
-
15
-
16
-
17
-
18
-
19
-
20
-
21
-
22
-
23
-
24
-
25
-
26
-
27
-
28
-
29
-
30
-
31
-
32
 |
 |

Use
and
Care Guide
LiquidPropaneGasGrill
KenmoreModelNo.4t5.t6537900
®
This Grill is for OutdoorUse Only
•
Read and follow all
Safety, Assembly,
and
Use and Care instructions in this
Guide
before assembling
and cooking
with
this
grill.
•
Failure
to follow
all irstructions in this
Use and Care Guide
may
lead
to
fire or
e×plosion, which could
result
in property
damage, personal injury or death.
•
Safety
•
Parts
•
Use and Care
•
Assembly
Assembly
Questions?
Call t-800-241-7548
Tools
needed
for
assembly:
Adjustable wrench (not provided)
Screwdriver (not provided)
7/16"
Combination wrench (not provided)
SAVETHESEiNSTRUCTiONS!
Sears,
Roebuck
and
Co.,
Hoffman
Estates,
IL
60179
(92008Sears, RoebuckandCo., All Rights Reserved
Printedin China
U.S.A.
464324009,80018088,10-15-08