Kenmore 60572 Use and Care Guide
Kenmore 60572 - 3/4 HP Food Waste Disposer Manual
 |
View all Kenmore 60572 manuals
Add to My Manuals
Save this manual to your list of manuals |
Kenmore 60572 manual content summary:
- Kenmore 60572 | Use and Care Guide - Page 1
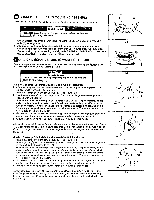
® FOOD WASTE DISPOSERS Installation, Care & Use Manual TOOLS AND MATERIALS YOU WILL NEED: Stott0d Screwdriver, Adjustable Pl(ers, P{umber'_Putty, ElectricalTape TOOLS, MATERIALS, AND ACCESSORIES YOU MAY NEED: PhiIlips Screwdriver, Drain Auger, 3/8" Electricat Cl_mp Connector,Wire Nuts (2), Secorld - Kenmore 60572 | Use and Care Guide - Page 2
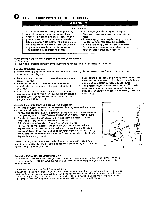
disposer dlsche.rgeto ¢enterllne lit waste p pO enter ng we (Dimension "F" muet be greater ther_t!4" 1oprevent etendlr_g water]n dlsposer,l Model bul firmly into sink drain bole to seat evonty 5-1 for part identtflcallon. installed,) t If you _re repfec, lng 8n extstlng disposer, go to Instruction - Kenmore 60572 | Use and Care Guide - Page 3
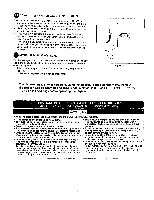
FROM INSll3E DISPOSEIq Attach Dishwaahsr Drain Connector It your dtshwesi'ter drain hose is 7/8" diameter, g_, to Instruction 9. If your dishwasher drain hose is nol 718" diameter, you must attach a distlwashor drain cenRector to the diehwa.sher drain Inlet Follow the iTtstallalion IrlStrliCtions - Kenmore 60572 | Use and Care Guide - Page 4
. . Disconnect power before installing or sorvicing de. poser, for eli models tistec} in this manual) Disposer Circu|t !, Connect Disposer tO Eloctrlcel 8upplytGtound Ollpooer Followthese Instruct!one to direct disposer is properly grounded. Once the Circuit you ore using ls grounded al the service - Kenmore 60572 | Use and Care Guide - Page 5
ring tracks (see Figure t0-2). (MAKE SURE ALL THREE MOUNTING TABS ARE LOOKED OVER RIDGES.] Disposer will now h_ng by ttserf, O ATTACH DISCHARGE TU BE TO WASTE DRAIN LINE Determine appropriate Installation based upon new tr'retallation or plumbing configuration: Two. Bolt Discharge Tube or One.Bolt - Kenmore 60572 | Use and Care Guide - Page 6
from lower portion Of disposer 2, Apply _feca! to disposer wt_ereit carl be easily read, Figura12.l The disposer Installation il complete. Using the stopper, fill the link with water. Remove the ¢tcppcr, turn d_=po¢¢r cn, _nd ¢h©ck und¢," €tnk for leak€, R¢_d ALL SAFETY INSTRUCTIONS on the next - Kenmore 60572 | Use and Care Guide - Page 7
¢harL for mode! reference,) ,, 1. Read Important safety Instructions contained in the Inmallation, Care & Usa manual, 2, Remove stopper from sink opening and place food w_ste tnto dlsposer grind chamber, Do not pack chamber with waste, Plade stopper back in stnkopening, Run a strong flow of cold - Kenmore 60572 | Use and Care Guide - Page 8
KENMORE FOOD WASTE DISPOSER WARRANTY Model 6010 Model 6011 Model 11012 Model 6013 Model 60552 Model 1105_4 Model 80556 One Year Full Warranty One Year Full Warranty One Year Full Warranty One Year Full Warranty Three Yur Full Warranty Seven Year Full Warranty Nine Year Full Warranty Model 8055g
-
 1
1 -
 2
2 -
 3
3 -
 4
4 -
 5
5 -
 6
6 -
 7
7 -
8
 |
 |

®
FOOD WASTE
DISPOSERS
Installation, Care & Use Manual
TOOLS AND MATERIALS YOU WILL
NEED:
Stott0dScrewdriver,Adjustable
Pl(ers,
P{umber'_Putty,
Electrical
Tape
TOOLS, MATERIALS,
AND ACCESSORIES
YOU MAY NEED:
PhiIlipsScrewdriver,
Drain Auger,
3/8" Electricat
Cl_mp
Connector,Wire
Nuts (2),
Secorld 1 1/2" Drain
Trap,
Hammer, Hacksaw,
Water Hose Cramp, Pipe Wrench.
Co;'p¢r
Ground Wire, DI=hw¢=h=r br_In
Connoc',I_,n
Kit, Air
G_tp,Electr(ca{
On/Off
Switch,
Drain
Tube Extension
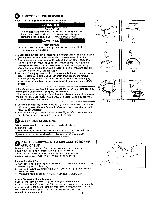
Reid
through the entire
Instillation,
Care
& UIB manual before
InttiIIIng
the dis-
polar.
Determine which of the toolm,
materlalB,
and t¢¢eiiorlel
you will need
befor! you begin. Make
tou!!
you have
all
rleceu=ry
dlepoiet
patte
before Install-
Ing the dlapoler
(lee
part
identification
diagram below).
r
O
A
H
I
B
F
0
''
K
0
#1
#2
Mout_tlng
Asiembly
DIspoler
A;
Stopper
_
MourIIlng
Q_t_.k_ti,_pl_sh
B_trf!_
S: Sink FIs(lgo
I
I,_w_r Mountm_ Rlrlg
C
F!b_r
O_tlket
J
13I_l_w_tmCt
Irdo!
#_
EMo,An'_lng_qu,g
L
Wron_;_'_e_te
_Q__
{3 Snap
RII,g
#2
....
,ira
_
/
:-_
P
_ ': ._.-0
)
Two-Bolt
Dl/¢hlrge
W S_(I(2)
O;
OiilChil_'gl}_bil
I I,I'Y
Dlam
}
Q;
O_km
One-Bolt
Discharge
O
Oist;h(_rOtf
_klbo
(i
1/2"
Diam)
P
Frtang()
SAFETY
SYMBOLS
Dange¢
ir;dic,qtos
_n
immin6ntlyh_zardou_
_tu_l(on
which,
If not
avold_d_
will
rg_u(t
in do_t_h or
_oriou_
!njury
[_I=WARNINOJ
Warning
Ir_dicatos
potentially
hazardous
situalion
which,
If not
avoided,
cotJlrJ
result
;n
dealh
or
Sc+riOU,_
h_jury.
C6utton
indicates
a
polentiaIIy
hl_zardous
Bilu_tion
which,
ff not a_olded,
mt_y resutt
ir_ minor
or
modera.Ie
I_iut
Y
Part
NO
r316&
,
02,_,_t