Kenmore 6962 Installation Instructions
Kenmore 6962 - 600 7.0 cu. Ft. Capacity Electric Dryer Manual
 |
UPC - 883049149578
View all Kenmore 6962 manuals
Add to My Manuals
Save this manual to your list of manuals |
Kenmore 6962 manual content summary:
- Kenmore 6962 | Installation Instructions - Page 1
/ Indice DRYER SAFETY ...INSTALLATION INSTRUCTIONS ...Tools and Parts ...Location Requirements ...Electrical Requirements ...Electrical Connection ... la instalacion ...23 NUMEROS DE SERVICIO ...CONTRAPORTADA SERVICE NUMBERS ...BACK COVER DRYER SAFETY Your safety and the safety of others are - Kenmore 6962 | Installation Instructions - Page 2
INSTALLATION INSTRUCTIONS • • A grounded electrical outlet located within 2 ft (61 cm) of either side of the dryer. See "Electrical Requirements." A sturdy floor to support the total weight (dryer and load) of 200 Ib (90.7 kg). The combined weight of a companion appliance should also be considered. - Kenmore 6962 | Installation Instructions - Page 3
dryer. • • Electrical To properly install your dryer, you must determine the type of electrical connection you will be using and follow the instructions of electric shock. Check with a qualified electrician or service representative or personnel if you are in doubt as to whether the dryer is - Kenmore 6962 | Installation Instructions - Page 4
the strain relief. The strain relief should have a tight fit with the dryer cabinet and be in a horizontal position. 5 6 Now complete installation following instructions of electrical connection: 4-wire (recommended) !. 2. 3. 4. 5. 6. Terminal block cover External ground connector Center, silver - Kenmore 6962 | Installation Instructions - Page 5
Electrical Connection Options If your home has: And you will be connecting to: A UL listed, 120/240 volt amp., dryer power supply minimum, 30 cord* A fused disconnect or circuit breaker box* A UL listed, 120/240 volt amp., dryer power supply minimum, 30 cord* 3-wire direct A fused disconnect or - Kenmore 6962 | Installation Instructions - Page 6
3 wire connections. Direct wire cable must have 5 ft (1.52 m) of extra length so dryer can be moved if needed. Strip 5 in. (12.7 cm) of outer covering from end relief screws. Insert tab of terminal block cover into slot of dryer rear panel. Secure cover with hold-down screw. 3-wire connection: - Kenmore 6962 | Installation Instructions - Page 7
wire even with outer covering. Shape ends of wires into a hook shape. 4. 5. Tighten strain relief screws. Insert tab of terminal block cover into slot of dryer rear panel. Secure cover with hold-down screw. Optional 3-wire connection Use for direct wire or power supply cord where local codes do not - Kenmore 6962 | Installation Instructions - Page 8
products are recommended. DURASAFE TM vent products can be purchased from your local Sears store or Sears Service Center. For more information, call 1-800-4-MY-HOME ®(1-800-469-4663). 1. 2. 3. 4. Dryer Elbow Wall Exhaust hood 5. 6. 7. 8. Clamps Rigid metal or flexible metal vent Vent length - Kenmore 6962 | Installation Instructions - Page 9
• Over-The-Top Installation: Part Number 26-49900 Periscope Installation (For use with dryer vent to wall vent mismatch): Part Number 26-49901 - Less than 5 in. ( close-clearance installations are shown. Refer to the manufacturer's instructions. etJJ Determine vent length. The maximum length of the - Kenmore 6962 | Installation Instructions - Page 10
a wrench to finish turning the legs until the diamond marking is no longer visible. Place a carton corner post under each of the 2 dryer back corners. Stand the dryer up. Slide the dryer on the corner posts until it is close to its final location. Leave enough room to connect the exhaust vent. Once - Kenmore 6962 | Installation Instructions - Page 11
to level the dryer again after it is moved into its final position. 7. 8. 9. Read your "Dryer User Instructions." Wipe the dryer drum interior thoroughly (10.2 cm) clamp. Move dryer into final position. Do not crush or kink vent. Make sure dryer is level. (On gas models) Check to be sure there are - Kenmore 6962 | Installation Instructions - Page 12
mensajes importantes todos los mensajes de seguridad= de seguridad en este manual yen su electrodomestico. Este sfmbolo le llama la atencion sobre peligros de metal que se pueden comprar en su tienda Sears o en el centro de servicio tecnico Sears de su Iocalidad. Para mas informaci6n, Ilame por - Kenmore 6962 | Installation Instructions - Page 13
• Un contacto con conexi6n a tierra ubicado a unos 2 pies (61 cm) de cualquiera de los lados de la secadora. Vea "Requisitos electricos". Un piso resistente para soportar la secadora con un peso total (secadora y carga) de 200 Ibs (90,7 kgs). Asimismo se debe considerar el peso de otro artefacto - Kenmore 6962 | Installation Instructions - Page 14
Conexibn el_ctrica Si el contacto de pared luce como _ste: Para instalar su secadora adecuadamente, usted debe determinar el tipo de conexi6n electrica que va a usar y seguir las instrucciones que aquf se proveen para el caso. • Si los c6digos locales no permiten la conexi6n de un conector para - Kenmore 6962 | Installation Instructions - Page 15
Cable de suministm eI_ctrico Cableado directo Pemigre de Incendio Use un cabte de suministro 30 amperes con aprobacion Use un protector Descenecte cene×iones emectrice nuevo de UL, UL, Uti_iee alambres Use un protector PeHgro de Incendio de cobre s6_ido de ancho 10° de cables con aprobaci@_ - Kenmore 6962 | Installation Instructions - Page 16
Opciones para la conexi6n el_ctrica Si su casa tiene: Y usted va a conectar con: Un corddn de suministro electrico para aprobado de UL, de 120/240 secadora, voltios minimo y 30 amperios* Cable directo de 4 hilos Un desconectador con fusible o una caja de disyuntor* Un cord6n de suministro secadora, - Kenmore 6962 | Installation Instructions - Page 17
3= Conexi6n de 4 hilos: Cable directo IMPORTANTE: Se necesita una conexi6n de alambre de cuatro hilos para las casas rodantes y para los casos en que los c6digos locales no permitan el use de conexiones de 3 hilos. El cable de conexi6n directa debe tener 5 pies (1,52 m) extra de largo para poder - Kenmore 6962 | Installation Instructions - Page 18
Conexibn de 3 hilos: Cordbn de suministro el6ctrico Conexibn de 3 hilos: Cable directo Use cuando los c6digos locales permitan la conexi6n del conductor de tierra del gabinete al hilo neutro. Use cuando los cbdigos locales permitan la conexi6n del conductor de tierra del gabinete al hilo - Kenmore 6962 | Installation Instructions - Page 19
pulg. (10,2 cm) y abrazaderas. Los productos de ventilaci6n DURASAFF Mson recomendables. Los productos de ventilaci6n DURASAFF M pueden adquirirse en la tienda de Sears o el Centro de servicio de Sears de su Iocalidad. Para mas informaci6n, per favor Ilame al 1-800-4-MY-HOME ® (1-800-469-4663). 19 - Kenmore 6962 | Installation Instructions - Page 20
• La salida de la secadora no debe conectarse en ningOn ducto de escape de gas, chimenea, pared, techo o el espacio oculto de un edificio. No use una capota de ventilaci6n con pestillo magnetico. Instalaciones tipicas de escape Las instalaciones tipicas tienen la ventilaci6n en la parte posterior - Kenmore 6962 | Installation Instructions - Page 21
Previsiones especiales para las instalaciones rodantes en casas El ducto de escape debera sujetarse firmemente en un lugar no inflamable de la estructura de la casa rodante y no debe terminar debajo de la casa rodante. El ducto de escape debe terminar en el exterior. 1 1, Instalacidn posterior y - Kenmore 6962 | Installation Instructions - Page 22
El estilo de capota de ventilaci6n continuaci6n) es aceptable. angular (que se ilustra a 1. 2. 3. Vea el cuadro de la Iongitud del ducto de escape que vaya de acuerdo con su tipo de capota de ventilaci6n para fijarse en las longitudes maximas del ducto de escape que usted puede usar. Los sistemas - Kenmore 6962 | Installation Instructions - Page 23
Revise la nivelaci6n de la secadora. Verifique primero de lado a lade y luego del frente hacia atras. 1. Revise para cerciorarse de que todas las piezas esten instaladas. Si hay alguna pieza extra, vuelva a revisar todos los pasos para ver cual se omiti6. Verifique si tiene todas las herramientas. - Kenmore 6962 | Installation Instructions - Page 24
the replacement parts, accessories and owner's manuals that you need to do-it-yourself. For Sears professional installation of home appliances ancl items : 1"888"SU'HOGARSM SEARS 3979976 © Sears, Roebuck and Co. TM SM • ® Registered Trademark / Trademark / Service Mark of Sears, Roebuck and Co.
-
 1
1 -
 2
2 -
 3
3 -
 4
4 -
 5
5 -
 6
6 -
 7
7 -
8
-
9
-
10
-
11
-
12
-
13
-
14
-
15
-
16
-
17
-
18
-
19
-
20
-
21
-
22
-
23
-
24
 |
 |

27 IN. (69 CM) ELECTRIC DRYER
INSTALLATION INSTRUCTIONS
INSTRUCCIONES
DE INSTALACION
PARA
LA
SECADORA
ELECTRICA
DE 27 PULG. (69
CM)
Table of Contents
/
Indice
DRYER SAFETY
...........................................................
1
INSTALLATION
INSTRUCTIONS
...............................
2
Tools
and Parts
.........................................................
2
Location
Requirements
...........................................
2
Electrical
Requirements
............................................
3
Electrical
Connection
................................................
4
Venting
Requirements
..............................................
8
Plan Vent
System
......................................................
8
Install
Vent
System
.................................................
10
Install
Leveling
Legs
...............................................
10
Level Dryer
..............................................................
11
Connect
Vent
..........................................................
11
Complete
Installation
..............................................
11
SERVICE
NUMBERS
.............................
BACK COVER
SEGURIDAD
DE LA SECADORA
............................
12
INSTRUCCIONES
DE INSTALACION
.....................
12
Herramientas
y piezas
...........................................
t2
Requisites
de
lecalizaci6n
....................................
t
2
Requisites
el6ctricos
.............................................
t
3
Cenexi6n
el6ctrica
.................................................
15
Requisites
de
ventilaci6n
.......................................
t
9
Planificacion
del sistema
de ventilacion
...............
20
Instalaci6n
del sistema
de ventilacion
...................
22
Instalacion
de las patas niveladoras
.....................
22
Nivelacion
de la secadora
.....................................
23
Conexion
del ducto
de escape
.............................
23
Complete
la instalacion
.........................................
23
NUMEROS
DE SERVICIO
...........
CONTRAPORTADA
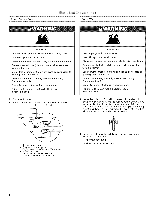
DRYER SAFETY
Your
safety
and
the safety
of others
are very
important.
We
have
provided
many
important
safety
messages
in
this
manual
and
on your
appliance.
Always
read
and
obey
all safety
messages.
This is the safety
alert symbol.
This symbol
alerts you to potential
hazards
that can kill or hurt you and others.
All safety
messages
will follow the safety
alert symbol
and either the word "DANGER"
or
"WARNING."
These
words
mean:
You can be killed or seriously
injured
if you don't immediately
follow
instructions.
You can be killed or seriously
injured
if you don't follow
instructions.
All safety messages
will tell you what the potential
hazard
is, tell you how to reduce
the chance
of injury, and tell you what can
happen
if the instructions
are not followed.
3979976