Kenmore 7748 Installation Instructions
Kenmore 7748 - 30 in. Gas Range Manual
 |
View all Kenmore 7748 manuals
Add to My Manuals
Save this manual to your list of manuals |
Kenmore 7748 manual content summary:
- Kenmore 7748 | Installation Instructions - Page 1
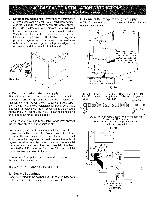
installer, service agency or the gas supplier. OVERALL DIMENSIONS 25 3/4" Refer to your serial plate for applicable agency certification o ALL RANGES CAN TiP iNJURY TO PERSONS COULD RESULT ® iNSTALL ANTI-TIP DEVICE PACKED WiTH RANGE • SEE iNSTALLATiON iNSTRUCTiONS Note: For appliances installed - Kenmore 7748 | Installation Instructions - Page 2
using a programmable timing operation. FOR MODELS WITH SELF-CLEAN FEATURE: • Remove broiler pan, food and other utensils before self-cleaning the oven. Wipe up excess spillage. Follow the cleaning instructions in the Use & Care Guide. • Unlike the standard gas range, THIS COOKTOP IS NOT REMOVABLE - Kenmore 7748 | Installation Instructions - Page 3
Drill Bit (5/32" Masonry Drill Bit if installing in concrete) For gas supply connection: • Pipe wrench For burner flame range itself. If range is ever moved to a different location, the anti-tip brackets must also be moved and installed with the range. Instructions are provided for installation - Kenmore 7748 | Installation Instructions - Page 4
with the gas supply line. If the LP/Propane conversion kit has been used, follow instructions provided with the kit for converting the pressure regulator to LP/Propane use. The LP kit can be found on the back side of the range (some models). Care must be taken during installation of range not to - Kenmore 7748 | Installation Instructions - Page 5
Install an external manual gas shut-off valve to gas supply line in an accessible location outside of the range. Be sure you know where and how to shut off the gas supply to the range. b) Install the current carrying rating of the cord in amperes be equivalent to or greater than the branch circuit - Kenmore 7748 | Installation Instructions - Page 6
. Burner Caps and Burner Grates: Grounding instructions The power cord of this appliance is polarized. Preferred Not, Under Your range is shipped with the Burner Heads . Burner Heads MUST have a Burner Cap installed to insure proper ignition and gas flame size. Note: The Burner Grounding Type - Kenmore 7748 | Installation Instructions - Page 7
Check for proper flame, and allowthe burner to cycle once. Reset controls to off. c) If your model is equipped with a waist-high broiler, set oven to BROIL. See Use & Care Guide for operating instructions. d) Within 60 seconds the broil burner should ignite. Check for proper flame. Reset controls to - Kenmore 7748 | Installation Instructions - Page 8
. Replace oven bottom. Oven Burner Tube 13. After installation is complete, make sure all controls are left in the OFF position. Care, Cleaning and Maintenance Refer to the Use & Care Guide for cleaning instructions. If removing the range is necessary forcleaning or maintenance, shut off gas supply
-
 1
1 -
 2
2 -
 3
3 -
 4
4 -
 5
5 -
 6
6 -
 7
7 -
8
 |
 |

INSTALLATION
AND
SERVICE
MUST
BE PERFORMED
BY
A QUALIFIED
INSTALLER.
IMPORTANT:
SAVE
FOR
LOCAL
ELECTRICAL
iNSPECTOR'S
USE.
READ
AND
SAVE
THESE
INSTRUCTIONS
FOR
FUTURE
REFERENCE.
if
the
information
in
this
manual
is
not followed
exactly,
a fire
or
explosion
may
result
causing
property
damage,
personal
injury
or
death.
FOR
YOUR
SAFETY:
--
Do not
store
or use
gasoline
or other
flammable
vapors
and
liquids
in
the vicinity
of
this
or
any
other
appliance.
--
WHAT
TO DO IF YOU
SMELL
GAS:
-
Do not try to
light
any
appliance.
•
Do not touch
any
electrical
switch;
do
not
use
any
phone
in your
building.
-
Immediately
call
your
gas
supplier
from
a neighbor's
phone.
Follow
the gas
supplier's
instructions.
-
If
you
cannot
reach
your
gas
supplier,
call
the
fire
department.
--
Installation
and service
must
be
performed
by a qualified
installer,
service
agency
or
the
gas
supplier.
Refer to your serial plate for
applicable
agency certification
o
ALL
RANGES
CAN
TiP
iNJURY
TO PERSONS
COULD
RESULT
®
iNSTALL
ANTI-TIP
DEVICE
PACKED
WiTH
RANGE
•
SEE iNSTALLATiON
iNSTRUCTiONS
Note:
For
appliances
installed
in the
State
of Massachusetts
see page
2.
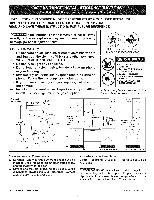
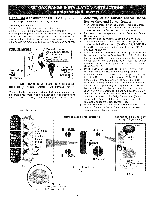
OVERALL
DIMENSIONS
25 3/4"
FRONT
VIEW
Minimum to
,, Cabinets
on
Either Side
of Range.
SI E
1_-13"_1
Maximum Depth
!_
for Cabinets
Above Range Top.
Jl_rJL_l,L
Jl_PJL_l,L
_,----25"
30"
_l
0" Clearance
Below
Cooking
Top
and
at
Rear
of Range.
Clearances
and
Dimensions
1.
Location--Check
location
where
the rang#_
will
be
installed.
Check for
proper
electrical
and gas supply,
and the stability
of the floor.
2.
Dimensions
that
are
shown
must
be used.
Given
dimensions
provide
minimum
clearance.
Contact
surface
must
be solid
and level.
Provide
Proper
Fuel
Type
Before
Proceeding:
Your
range
is
preset
to operate
on
natural gas.
DO NOT attempt to convert this range to LP/
Propane settings without the proper LP/Propane
conversion
kit provided with the range or obtained from yourdealer.
Follow
all instructions
provided with the LP Conversion
Kit.
p/n 316259338
(0607)
EN
Espadol
- Paginas
9-16