Kenmore 7751 Use and Care Guide
Kenmore 7751 - Elite 30 in. Gas Range Manual
 |
View all Kenmore 7751 manuals
Add to My Manuals
Save this manual to your list of manuals |
Kenmore 7751 manual content summary:
- Kenmore 7751 | Use and Care Guide - Page 1
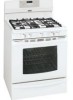
E L IT E ® .an e gas Models, Modelos 790.7751", 7752", 7753", 7754* * = color number, nOmero de color www.sears.com Sears Roebuck and Co., Hoffman Estates, IL 60179 U.S.A. pin 316544101 Rev B (0901) - Kenmore 7751 | Use and Care Guide - Page 2
Protection Agreements 6 Before Using Your Range 7 Range Features 8 Before Setting Oven Controls Service 41=42 Recipes for Slow Cook 43 Sears Service back cover Kenmore Elite Appliance Warranty One Year Limited Warranty When installed, operated and maintained according to all instructions - Kenmore 7751 | Use and Care Guide - Page 3
supplier from a neighbor's phone. Follow the gas supplier's instructions. ,, if you cannot reach your gas supplier, call the fire department. -- Installation and service must be performed by a qualified installer, servicer or the gas supplier. - All ranges can tip. • Injury to persons could result - Kenmore 7751 | Use and Care Guide - Page 4
range if it is to be stored or discarded. IMPORTANT--ELECTRIC IGNITION MODELS manual. service without breaking due to sudden change in temperatures. Check the manufacturer's recommendations for cooktop use. IMPORTANT INSTRUCTIONS INSTRUCTIONS FOR CLEANING YOUR RANGE Clean the range Care Guide. Before - Kenmore 7751 | Use and Care Guide - Page 5
for your model, contact your local L,P, gas provider for assistance. The L.P. Conversion Kit will be provided with this range and is located on the left lower REAR (back side) panel of the range. Before installing the kit be sure to follow the L.P. Installation Instructions carefully. Personal - Kenmore 7751 | Use and Care Guide - Page 6
phone support from a Sears representative on all products. Think of us as a "talking owner's manual". [] call Sears Canada at 1-800-361-6665. Sears Installation Service For Sears professional installation of home appliances, garage door , Su nuevo producto Kenmore®esta disefiado y fabricado - Kenmore 7751 | Use and Care Guide - Page 7
for the double burner see the General Care & Cleaning section. a. Be sure to follow the installation instructions before installing and using your new range. b. Remove all packing tape from cooktop area. Remove all Burner Caps and Burner Heads. c. Discard all packing material located under - Kenmore 7751 | Use and Care Guide - Page 8
Features Your Elite Gas Range Features Include: 1. Electronic Oven Control with Timer. 2. Glass Touch Sensitive Large 1 piece Oven Door Handle (styles & colors may vary with model). 19. Full width Oven Door (styles & colors vary with model). 20. Warmer Drawer with Handle & Warmer Drawer Rack. 21. - Kenmore 7751 | Use and Care Guide - Page 9
rack onto the guides on the oven walls. Tilt the front of the rack upward and slide the rack back into place.This range has a total or 2 1 or 2 ii.i........... iii¸iJiii!:i::::: Flat Handle Oven Rack Fig. 3 Your range may be equipped with one or more of the oven rack types shown; a Porcelain coated - Kenmore 7751 | Use and Care Guide - Page 10
1 Fig.2 Before Setting Surface Controls Control Locations of the Gas Surface Burners _i- (For models with a Deep Well Cooktop-See Fig. 3) Ther SIMMER and center positions on the cooktop. The POWER or Double (some models) Burners are best used for bringing large quantities of liquid rapidly - Kenmore 7751 | Use and Care Guide - Page 11
knobs do not have to be set at a particular setting. Use the guides and adjust the flame as needed. DO NOT cook with the surface control the pan. Fig. 2 Double Burner (some models): The versatile Double ring burner offers a complete range of gas surface settings from the same burner location. At - Kenmore 7751 | Use and Care Guide - Page 12
Surface Cooking • Care & Seasoning of the Griddle • Using the Griddle Care & Seasoning of the Griddle (Optional accessory) Before first use: • Wash Griddle in hot soapy water. Rinse and then dry completely. Apply a thin coat of vegetable oil to the entire surface (front and back of griddle). Preheat - Kenmore 7751 | Use and Care Guide - Page 13
will be turned ON (The Bread Proof indicator light will glow steady indicating the Bread Proofing feature in ON (See Fig. 5 & bread dough preparation instructions on this page). To return to standard Warmer Drawer settings touch pad at least once. Note: For best results, preheat the Warmer Drawer - Kenmore 7751 | Use and Care Guide - Page 14
Drawer and follow the Warmer Drawer and Bread Proof Control setting instructions at the top of this page. Fig.1 Rack in right glide lever (See Fig.2). 4. Pull the drawer away from the range, Right Glide To Replace Warmer (Warm & Ready TM) Drawer: 1. servicing the Warmer Drawer, Fig. 3 14 - Kenmore 7751 | Use and Care Guide - Page 15
of the oven as described below. Detailed instructions for each feature and function follow later in this Use & Care Guide. COOKTIME-Use to enter the length of keys to select the feature that best fits your food item. *some models CLOCK-Use to set the time of day. ii.i........... iii¸iCiii::: STOP - Kenmore 7751 | Use and Care Guide - Page 16
clock has been preset at the factory for the 12 hour operation. When the range is first plugged in, or when the power supply to the range has been interrupted, the clock in the display will flash (See Fig. 1). INSTRUCTIONS To set the clock (example below for 1:30): 1. Press (f_"). "CLO" will appear - Kenmore 7751 | Use and Care Guide - Page 17
oven control is left on for more than 11 hours and 59 minutes. The oven can be programmed to override this feature for Continuous Baking. INSTRUCTIONS PRESS DISPLAY To set the control for Continuous Energy Saving features: Bake or 12 Hour 1. Press and hold _si_o_frf_or 6 seconds or until the - Kenmore 7751 | Use and Care Guide - Page 18
the oven door and prevents most oven controls from being turned ON. It does not disable the clock, Timer or the interior oven light. INSTRUCTIONS To activate the Oven Lockout feature: 1. Press and hold s_ for 3 seconds. 2. After 3 seconds a beep will sound, Loc will appear and "DOOR LOCKED" will - Kenmore 7751 | Use and Care Guide - Page 19
the pad in the future. To store a typical cookie recipe: (example for baking at 375°F for 9 minutes and to shut-off automatically): INSTRUCTIONS PRESS DISPLAY 1. Arrange interior oven racks. If needed, Preheat* the oven to the desired set temperature. Place cookies on cookie sheet(s). Place - Kenmore 7751 | Use and Care Guide - Page 20
Setting Oven Controls • Preheat for Electric Ranges Setting Preheat For the best baking performance . F', the default oven set temperature, will appear in the display (See Fig. 1). (See BAKE instructions for changing oven set temperature.) 3. Press _"_. "PRE" and "BAKE" will appear in the display - Kenmore 7751 | Use and Care Guide - Page 21
. The oven can be programmed to bake at any temperature from 170°F to 550°F (The sample shown below is for 350°F). INSTRUCTIONS PRESS DISPLAY To set the Bake Temperature to 350°F: 1. Arrange interioroven racks and placefood in oven. 2. Press ___, 350 ° will automatically appear in the - Kenmore 7751 | Use and Care Guide - Page 22
after cooking for the desired amount of time you select. INSTRUCTIONS PRESS DISPLAY To program the oven to begin baking immediately and 2 Fig. 3 Note: After the Cook Time feature has been activated, press to review the time remaining. Once Cook Time has started baking, a long beep will sound - Kenmore 7751 | Use and Care Guide - Page 23
control the Delay Start feature. The automatic timer of the DELAY START feature will turn the oven ON and OFF at the times you select. INSTRUCTIONS PRESS DISPLAY To program the oven for a Delay Start and to shut off automatically (example for baking at 375°F for 50 minutes and starting at - Kenmore 7751 | Use and Care Guide - Page 24
Setting Oven Controls • Setting Broil (Gas Range) The _roilj_ pad controls the Broil feature. When suit for doneness. If the food you are broiling is not listed in the table, follow the instructions provided in your cookbook and watch the item closely. Use the Searing Grill for meats and steaks - Kenmore 7751 | Use and Care Guide - Page 25
heat the oven from top to bottom to give more evenly browned foods. Refer to Fig. 3 for foods to cook in each category. INSTRUCTIONS PRESS DISPLAY To set the Food Convection Roast feature (example for meats to cook at 350°F): 1. Arrange interioroven racks and placefood in oven. 2. Press - Kenmore 7751 | Use and Care Guide - Page 26
. When using 3 racks, place in positions 1, 3 & 5 when using 3 racks (See Fig. 1). 4. Cakes will have better results when baked using the C_k_ keypad. INSTRUCTIONS PRESS DISPLAY To set the oven for Convection Bake and temperature to 350°F: 1. Arrange interior oven racks and place food in oven - Kenmore 7751 | Use and Care Guide - Page 27
in the display. Convection Convert MUST be used with a Convection Bake keypad. Cook Time or Delay Start functions may be added. INSTRUCTIONS Using Convection Convert feature to adjust oven temperature from a Bake recipe (example below when setting oven for 350°F): 1. Arrange interioroven racks - Kenmore 7751 | Use and Care Guide - Page 28
Setting Oven Controls • Using the Meat Probe (some models) Using and Setting Meat Probe Checking the internal temperature of your food is the most effective way of insuring that your food has been properly - Kenmore 7751 | Use and Care Guide - Page 29
, but you should know that cooking it to only 140°FI60°C means some food poisoning organisms may survive." (Source: Safe Food Book, Your Kitchen Guide, USDA Rev. June 1985.) The lowest temperature recommended by the USDA is 145°FI63°C for medium rare fresh beef. Setting the oven to automatically - Kenmore 7751 | Use and Care Guide - Page 30
settings of a Cook Time or a Delay Start. Some tips you should review for best possible results using Slow Cook feature: • Completely thaw all frozen Cook feature recipes provided in the back of this Use & Care Guide. INSTRUCTIONS PRESS DISPLAY To Program the Oven to begin baking with the Slow - Kenmore 7751 | Use and Care Guide - Page 31
KEYPADS should not be used once the Sabbath feature is activated. INSTRUCTIONS PRESS DISPLAY To Program the Oven for 350°F, Begin Baking and continue to step 6. Refer to the Cook Time or Delay Start instructions for more information. Remember the oven will shut down after completing a Cook - Kenmore 7751 | Use and Care Guide - Page 32
For further assistance, guidelines for proper usage, and a complete list of models with the Sabbath feature, please visit the web at http:\\www.star be used after cooking has finished using Cook Time or Delay Start. INSTRUCTIONS PRESS To set Warm & Hold: 1. Arrange interior oven racks and place - Kenmore 7751 | Use and Care Guide - Page 33
. Move birds to another well-ventilated room. DO NOT line the oven walls, racks, bottom or any other part of the range with aluminum foil. Doing so will destroy heat distribution, produce poor baking results and cause permanent damage to the oven interior (aluminum foil will melt - Kenmore 7751 | Use and Care Guide - Page 34
number keypads _2_5_.0_. During the Self-Cleaning cycle, the outside of the range can become VERY HOT to the touch. DO NOT leave small children unattended air or steam to escape. The oven may still be VERY HOT. INSTRUCTIONS PRESS DISPLAY To start an immediate Self=Cleaning cycle or to set a - Kenmore 7751 | Use and Care Guide - Page 35
Self=Cleaning • Setting Flex Clean or Delay Flex Clean INSTRUCTIONS When the Self-Clean cycle is done: 1. The time of day, "HOT", "DOOR LOCKED" and "CLEAN" . To set for Delay Flex-Clean 12-24 hours in advance see the instructions to set the control for the 24 hour time of day display mode. 35 - Kenmore 7751 | Use and Care Guide - Page 36
higher or lower than the recommended temperature. The baking results should help you to decide how much of an adjustment is needed. INSTRUCTIONS PRESS DISPLAY To adjust the oven temperature higher: 1. Press _ak_ for 6 seconds (See Fig. 1). 2. To increase the temperature use the number keypads - Kenmore 7751 | Use and Care Guide - Page 37
Removing & Replacing Lift-Off Oven and the Door Care Instructions in the General Care & Cleaning section. Wash soiled areas with hot, soapy water and a clean cloth. DO NOT immerse the door in water. DO NOT clean the oven door gasket. On Self-Cleaning models the oven door gasket is made of a woven - Kenmore 7751 | Use and Care Guide - Page 38
General Care & Cleaning • Removing & Replacing Lift-Off Oven Door • DoorCare Instructions • Care & Cleaning of Stainless Steel (some models) Door Hinge locations with oven door fully open Fig. 1 Removing & Replacing the Lift-Off Oven Door The door is heavy. For safe, temporary storage, lay - Kenmore 7751 | Use and Care Guide - Page 39
will prevent improper ignition and an uneven flame. Refer to the following instructions: THE COOKTOP IS NOT REMOVABLE. Do not attempt to remove or lift and Burner Heads in place whenever the gas Burners are in use. To Clean the Burner Grates (all models) =The Burner Grates are dishwasher safe and - Kenmore 7751 | Use and Care Guide - Page 40
. For proper flow of the gas and the burner ignition ALWAYS keep . The oven lights may also be manually operated by pressing the d,O,'-_ pad. The range back in). Holder 6. The clock will then need to be reset. To reset, see Setting the Clock and Timer in this Use & Care Guide. Please Note: Models - Kenmore 7751 | Use and Care Guide - Page 41
Care & Cleaning section for complete instructions. Range power cord is disconnected from outlet (electric ignition models only). Be sure cord is securely plugged into the outlet. Electrical power outage (electric ignition models only). Burners can be lit manually. See Setting Surface Controls. ii - Kenmore 7751 | Use and Care Guide - Page 42
Common Problems ( spatters. If broiling often, clean on a regular basis (some models). Oven Door is open. Close the oven door before starting to Adjusting Your Oven Temperature. Controls are not set properly. Follow instructions in Self-Cleaning section. Self-Cleaning cycle was interrupted. Stop - Kenmore 7751 | Use and Care Guide - Page 43
Recipes for Slow Cook Slow Cook Turkey Breast 1 turkey breast 2 cups chicken broth 1 medium onion, sliced 2 teaspoons minced garlic 1 teaspoon salt ½ teaspoon pepper In a roasting pan, place turkey breast meat-side up. Rub salt and pepper under the skin, and inside the cavity. Pour chicken broth - Kenmore 7751 | Use and Care Guide - Page 44
[i For the replacement parts, accessories and owner's manuals that you need to do-it-yourself. You, -4663 (Canada) Ca,I anytime, day or night To purchase a protection agreement on a product serviced by Sears: 1-800-827-6655 (U.S.A.) 1-800-361-6665 (Canada) Para pedir servicio de reparaci6n
-
 1
1 -
 2
2 -
 3
3 -
 4
4 -
 5
5 -
 6
6 -
 7
7 -
8
-
9
-
10
-
11
-
12
-
13
-
14
-
15
-
16
-
17
-
18
-
19
-
20
-
21
-
22
-
23
-
24
-
25
-
26
-
27
-
28
-
29
-
30
-
31
-
32
-
33
-
34
-
35
-
36
-
37
-
38
-
39
-
40
-
41
-
42
-
43
-
44
 |
 |

E
L
I
T
E
®
.an
e
gas
Models, Modelos
790.7751",
7752",
7753", 7754*
* = color number, nOmero de color
www.sears.com
Sears Roebuck and Co., Hoffman Estates, IL 60179 U.S.A.
pin 316544101 Rev B (0901)