Kenmore 7755 Installation Instructions
Kenmore 7755 - Elite 30 in. Dual Fuel Range Manual
 |
View all Kenmore 7755 manuals
Add to My Manuals
Save this manual to your list of manuals |
Kenmore 7755 manual content summary:
- Kenmore 7755 | Installation Instructions - Page 1
applicable agency certifications Provide Proper Fuel Type Before Proceeding: Your range is preset to operate on Natural Gas only. important Note to the Consumer = Keep these instructions with your Use & Care Guide for future reference. = As when using any appliance generating heat, there are certain - Kenmore 7755 | Installation Instructions - Page 2
CSA Standard 022.1, Canadian Electrical Code, Part 1, and local code requirements. Install only per installation instructions provided in the literature package for this range. This range has been design certified by CSA International. As with any appliance using gas and generating heat, there are - Kenmore 7755 | Installation Instructions - Page 3
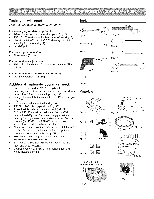
screws are supplied with range - Fig. 13) and masking tape (Fig. 14). Pipe joint sealant that resists action of LP/Propane gas (Fig. 15). Gas line manual shut-off valve (Fig. 16). 1/2" NPT 90 ° black pipe elbow (Fig. 17). A new flexible metal appliance conduit (1/2" N PT x 3/4" or 1/2" I.D.) must - Kenmore 7755 | Installation Instructions - Page 4
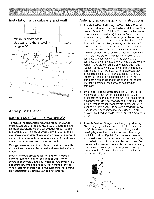
is to be provided, the risk can be reduced by installing a range hood that projects horizontally a minimum of 5" beyond the bottom of the beyond cabinet front by 1/2" minimum. All openings in the wall or floor where the range is to be installed must be sealed. 11" Back Wall I This shaded floor - Kenmore 7755 | Installation Instructions - Page 5
is ever moved to a different location, the anti= tip brackets must also be moved and installed with the range. Instructions are provided for installation in wood or cement fastened to either the floor or wall. When installed to the wall, make sure that screws completely - Kenmore 7755 | Installation Instructions - Page 6
Power Supply Cord Kit RISK OF FIRE OR ELECTRICAL SHOCK MAY OCCUR IF AN INCORRECT SIZE RANGE CORD KIT IS USED, THE INSTALLATION INSTRUCTIONS ARE NOT FOLLOWED OR STRAIN RELIEF BRACKET IS DISCARDED. This appliance may be connected by means of a power supply cord. Only a power supply cord kit rated at - Kenmore 7755 | Installation Instructions - Page 7
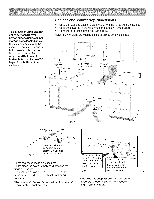
Range 1-1/8" Dia. Knockout (See Chart) Mounting Plate \ 7/8" Dia. Hole (See Chart) Wiring instructions (4-wire connection - See fig. 33) Before wiring the range review wire (Green) lead with the eyelet to the frame of the appliance with the ground screw using the same hole in the frame where the - Kenmore 7755 | Installation Instructions - Page 8
See Fig. 30). Grounding instructions connections ONLY) (for 3-Wire A ground strap is installed on this range which connects the center below. connection connection = follow = follow Steps Steps Before wiring the range, review the suggested power source location drawings in Fig. A & B. If - Kenmore 7755 | Installation Instructions - Page 9
4. (4-Wire Permanent Connection ONLY} Connectthe ground wire lead (Green) to the frame of the appliance using the ground screw & plate as shown in Fig. 36. Be sure to install using Flare Adaptor Fig. 37 bacok! range oo ) Flexible Appliance Conduit (9 .........A...d. aptor Shutoff Black Pipe Off 9 - Kenmore 7755 | Installation Instructions - Page 10
11 inches. Leak testing of the appliance shall be conducted according to the instructions in Step E. Seal the wall appliance must be isolated from the gas supply piping system by closing its individual manual below. Plug the range into the wall receptacle. Before servicing, disconnect electrical - Kenmore 7755 | Installation Instructions - Page 11
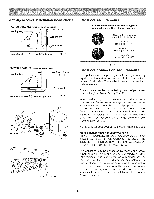
appliance conduit and power cord if necessary to insure that the range slides into cabinet opening properly. Be sure to check level of the range OFR 4. Remove the burner control knob. at a particular setting. Use the guides and adjust the flame as needed. DO NOT cook with the surface control knob - Kenmore 7755 | Installation Instructions - Page 12
and check gas connections for leaks. See anti-tip instructions for proper anti-tip anchoring instructions. Before you call for service Refer to the Use & Care Guide for cleaning instructions. If removing the range is necessary for cleaning or maintenance, shut off the gas supply. Disconnect the - Kenmore 7755 | Installation Instructions - Page 13
EL DISPOSITIVO ANTIVUELCO INCLUIDO CON LA ESTUFA. • VEA LAS INSTRUCCIONES DE INSTALACION. Si no se sigue estrictamente la informaci6n de este manual, se puede producir un incendio o una e×plosi6n causando dahos materiales, lesiones corporales o fatales. PARA SU SEGURIDAD: = No almacene ni use - Kenmore 7755 | Installation Instructions - Page 14
3280 (anteriormente denominada Normas Federales para la Construcci6n y Seguridad de Viviendas M6viles, Titulo 24, HUD (Parte 280) o, cuando tales normas no corresponden, se deben cumplir las Normas para Instalaciones en Casas Prefabricadas, ANSl/NCSBCS A225.1 o los c6digos locales. El dise_o de - Kenmore 7755 | Installation Instructions - Page 15
Herramientas y Materiales Necesarios (Cuan do tra baje con herramientas use lentes protectores): Herramientas Para los tomillos niveladores y soporte antivuelco: • Llave ajustable o pinzas ajustables (Fig. 5). • Llave de tuerca de 1/4" y 5/16" o destomillador de punta plana (Fig. 6). Taladro - Kenmore 7755 | Installation Instructions - Page 16
que proteja horizontalmente un minimo de 5" mas alia de la parte inferior de los armarios. Dimensiones del gabinete y de la cubierta marco delantero del horo debe extenderse pot Io menos 1/2"m as all a de la parte delantera del gabinete. Se deben sellar todas las aberturas de la pared o del piso - Kenmore 7755 | Installation Instructions - Page 17
la pared donde se colocara el lado izquierdo o derecho de la estufa. Si la parte trasera de la estufa sera colocada contra la pared o a no mas de 1-1/ 4" marque la ubicacion de los agujeros de los tornillos en la pared. Si la parte trasera de la estufa esta a mas de 1-1/4" de la pared cuando ya esta - Kenmore 7755 | Installation Instructions - Page 18
Instrucciones de Instalaci6n para el Soporte Antivuelco ASEGURE EL SOPORTE (MONT_UEENLAPAREOD ENELPIISO) Para "=_l I_'==1=1/4" M,_X. . Montaje en la pared Requerimientos El ctricos Tipos de tomacorrientes murales el6ctricos trifilares o tetrafilares y orientaci6n recomendada de montaje en la - Kenmore 7755 | Installation Instructions - Page 19
1-3/8 pulg. Figura 29 Retire la cubierta de acceso para instalar el cable de alimentaci6n. Vuelva a colocar la cubierta despu_s de la instalacibn. Parte trasera de la estufa Figura 30 Instrucciones para el Cableado (Conexi6n Tetrafilar - Ver Fig. 33) Antes del cableado de la estufa, revise los - Kenmore 7755 | Installation Instructions - Page 20
Pasos de InstalaciCn de la Estufa O Instrucciones para conexiCn trifilar (para instalaciones existentes SOLAMENTE =Consulte la Fig. 34): 1. Siga las instruccionesde instalacion del fabricante suministradas con el sujetacable e instale (Ademas vea las Figs. 29, 30 y 31). 2. Inserte los - Kenmore 7755 | Installation Instructions - Page 21
Pasos de InstaJaci6n de la Estufa hacia el tablero de bornes (Siga las ubicaciones de los alambres que se muestran en la Fig. 35). NOTA IMPORTANTE: NO AFLOJE las conexiones de tuerca instaladas en la fabrica que aseguran el cableado de la estufa en el tablero de bornes. Se puede producir una falla - Kenmore 7755 | Installation Instructions - Page 22
estufa (consulte la Fig. 37). 2.) Instale unavalvula externa de cierre del gas (manual) en la tuberia de suministro del gas en una ubicaci6n de f&cil acceso, fuera ) de la tuberia. El regulador de presi6n se encuentra en la parte trasera inferior izquierda de la estufa (Ver Fig. 37). Para instalar - Kenmore 7755 | Installation Instructions - Page 23
Pasos de Instalaci6n de la Estufa Lea los detalles de la cone×i6n electrica indicados a continuaci6n. Enchufe la estufa en el tomacorriente mural. Antes de reparar, desconecte el suministro el_ctrico en el disyuntor, fusible o cord6n el_ctrico. iPOR FAVOR LEA ATENTAMENTE! Para seguridad personal, - Kenmore 7755 | Installation Instructions - Page 24
Regule el ajuste"LO" (BAJO) de la v_lvula del quemador superior (para v_lvulas de flujo lineal solamente) Prueba para verificar si los ajustes de "LO or LOW" deben ser a.justados (posicion frontal derecha SOLAMENTE): . Empuje hacia adentro y dele vuelta a la perilla hacia (lite) hasta que el
-
 1
1 -
 2
2 -
 3
3 -
 4
4 -
 5
5 -
 6
6 -
 7
7 -
8
-
9
-
10
-
11
-
12
-
13
-
14
-
15
-
16
-
17
-
18
-
19
-
20
-
21
-
22
-
23
-
24
 |
 |

iNSTALLATiON
AND
SERVICE
MUST
BE
PERFORMED
BY
A QUALIFIED
iNSTALLER.
iMPORTANT:
SAVE
FOR
LOCAL
ELECTRICAL
iNSPECTOR'S
USE.
READ
AND
SAVE
THESE
iNSTRUCTiONS
FOR
FUTURE
REFERENCE.
• ALL
RANGES
CAN
TiP
•
INJURYTO
PERSONS
COULD
RESULT
•
iNSTALL
ANTi=TIP
DEVICE
PACKED
WiTH
RANGE
•
SEE
iNSTALLATiON
iNSTRUCTiONS
I_
if
the
information
in
this
I
manual
is
not
followed
exactly,
a fire
or
I
explosion
may
result
causing
property
I
damage,
personal
injury
or death,
j
FOR YOUR
SAFETY:
m
Do not store or use
gasoline
or other
flammable
vapors
and liquids
in the
vicinity
of
this
or
any
other
appliance.
=
WHAT
TO DO iF YOU
SMELL
GAS:
•
Do not try
to
light any appliance.
•
Do
not
touch
any
electrical
switch;
do
not
use
any
phone
in
your
building.
•
Immediately
call your
gas
supplier
from
a neighbor's
phone.
Follow
the gas
supplier's
instructions.
•
if
you
cannot
reach
your
gas
supplier,
call
the
fire
department.
=
Installation
and
service
must
be
performed
by
a qualified
installer,
service
agency
or
the
gas
supplier.
Clearances
and
Dimensions
Location:
Check location where
the
range will be
installed. Check
for
proper
electrical
and
gas
supply,
and
the
stability of
the
floor.
Dimensions
that
are shown
must
be used. Given
dimensions
provide
minimum
clearance.
Contact
surface must be solid
and
level.
Refer to
your
serial
plate for applicable
agency certifications
Provide
Proper
Fuel Type
Before
Proceeding:
Your
range
is preset
to
operate
on
Natural Gas only.
important
Note
to the
Consumer
= Keep these
instructions
with your Use & Care Guide
for
future reference.
= As when using any appliance
generating
heat, there are
certain
safety precautions
you should follow.
These are
listed in the Use & Care
Guide., read
it
carefully.
•
Be sure your range
is
installed and grounded
properly
by a qualified
installer
or service technician.
Make sure the wall coverings
around the range can
withstand
the heat generated
by the range.
To eliminate
the need to reach over the surface
elements
or burners, cabinet
storage space directly
above the range should be avoided.
important
Notes
to the
installer
= Read all instructions
contained
in these installation
instructions
before installing range.
Remove all packing
material from the oven
compartments
before connecting
the gas and electrical
supply to the range.
Observe all governing
codes and ordinances.
Be sure to leave these instructions
with the consumer.
48-1/2"
maximum
36+1/8 ''
f
.....
\
door
closed
maximum
door
p/n 316454918
(0807)