Kenmore 8804 Installation Instructions
Kenmore 8804 - 5.8 cu. Ft. Electric Dryer Manual
 |
View all Kenmore 8804 manuals
Add to My Manuals
Save this manual to your list of manuals |
Kenmore 8804 manual content summary:
- Kenmore 8804 | Installation Instructions - Page 1
® I stallati I structi instrucci I instal Sears, Roebuck and Co., Hoffman Estates, IL 60179 U.S.A. P/N 134941300 (0708) - Kenmore 8804 | Installation Instructions - Page 2
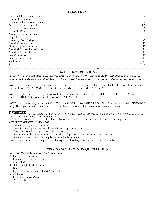
Leave these instructions near the Dryer after installation for future reference. NOTE: The electrical service to the Dryer must conform with local codes and ordinances and the latest edition of the National Electrical Code, ANSI/NEPA 70, or in Canada, the Canadian electrical code C22.1 part 1. NOTE - Kenmore 8804 | Installation Instructions - Page 3
fused with 30 amp. time delay fuses or circuit breakers. Use separately fused circuits for washers and dryers, and DO NOToperate a washer and a dryer grounding terminal or lead to ground appliance in accordance with local codes and of your dryer. Failure to follow these instructions can create - Kenmore 8804 | Installation Instructions - Page 4
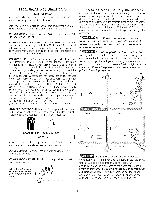
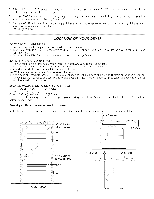
the cabinet or the bottom of the dryer. Directional exhausting can be accomplished by installing Exhaust Kit, P/N 131456800, available through your parts distributor. Follow the instructions supplied with the kit. EXHAUST DUCT LOCATING DIMENSIONS I/ I _'}_ k. SAME AS OTHER SIDE ./" 5 718" /_,31 - Kenmore 8804 | Installation Instructions - Page 5
equal to or less than 1/2 psig (3.45 kPa). LOCATION OF YOUR DRYER DO NOT INSTALL YOUR DRYER: I. In an area exposed to dripping water or outside appliance shall be installed in the same closet as the Gas dryer. 3. Your dryer needs the space around it for proper ventilation. DO NOT install your dryer - Kenmore 8804 | Installation Instructions - Page 6
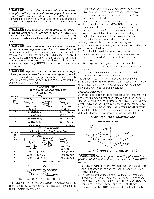
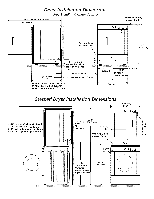
Dryer Installation Dimensions Free=Standing & Under Counter 48.5" To clear open door (123.19cm) to clear knobs (70.49cm) 28.5 to clear door handle (72.39cm) q (68.58cm) (34.29cm) Stacked Dryer Installation Dimensions T 9 (68.58cm) 27.0" 1 28.25" to front of cabinet(71.76cm) 28.75" to clear - Kenmore 8804 | Installation Instructions - Page 7
not support combustion. Metal ducting must be 4 inches (10.16 cm) in diameter with no obstructions. Rigid metal duct is preferred. 2. If dryer is Title 24 CFR-Part 32-80) or when such standard is not applicable, with American National Standard for Mobile Homes. The dryer is designed under - Kenmore 8804 | Installation Instructions - Page 8
Window Door Reversal Instructions Figure 1 1.0pen door and remove four (4) plugs in the door opening opposite the hinges. Retain all parts for uses later, unless otherwise noted. (Figure 1) Note: Use care in removing plugs in not scratching paint on the front panel. Figure 4 5. Remove two (2) door - Kenmore 8804 | Installation Instructions - Page 9
Figure 11 12. Reassembly outer door to inner door assembly. (Figure 11) 13. Install four (4) screws securing hinge to door assembly in the new location, take note to place hinge in correct orientation. 14. Install four (4) screws into holes that had secured the hinge. 15. Remove striker and discard - Kenmore 8804 | Installation Instructions - Page 10
if you are in doubt as to whether the appliance is properly grounded. For a arounded, cord-connected dryer: This appliance MUST be properly grounded. Electrical shock can result if tile dryer is not properly grounded. Follow the instructions in this manual for proper grounding. Do not use an - Kenmore 8804 | Installation Instructions - Page 11
4- WIRE SYSTEM USA ELECTR/CDryer l 1. Remove the screws securing the terminal block access cover and the strain relief mounting bracket located on the back of the dryer upper corner. 2. Install a U.L approved strain relief in the entry hole of the mounting bracket. Finger tighten the nut only at - Kenmore 8804 | Installation Instructions - Page 12
the dryer is turned on, the safety switch will shut the burner off. If this happens, turn the timer to "OFF" and wait 5 minutes before making another attempt to light. 6. If your dryer does not operate, please review the "Avoid Service Checklist" located in your Use and Care Guide before calling - Kenmore 8804 | Installation Instructions - Page 13
Nacional, ANSI/NFPA 70 o en Canada CSA C22.1 C6digo El_ctrico Canadiense, Parte 1. NO TA: La alimentaci6n de gas para la secadora debera cumplir con las instrucciones. Para su seguridad, siga las instrucciones contenidas en este manual a fin de reducir a un minimo los riesgos de incendio o - Kenmore 8804 | Installation Instructions - Page 14
REQUERIMIENTOS DE INS TALA CION PRELIMINARES Herramientas y materiales necesarios para la instalaci6n: 1. Destornillador Phillips 2. Pinzas universales 3. Nivel de gota 4. Destornillador para tornillo de cabeza plana o recta 5. Cinta para ductos 6. Ducto metalico rigido o flexible de 4" (10,2 cm) 7. - Kenmore 8804 | Installation Instructions - Page 15
Risque d'incendie- Une sOcheuse_ linge produit de la charpie combustible. Si el escape de la secadora no se dirige al exterior, alqunas pelusas finas seran sopladas hacia el recinto donde se efect0a el lavado. La acumulaciOn de pelusas en cualquier lugar de la casa, puede crear un peligro para la - Kenmore 8804 | Installation Instructions - Page 16
puede hacerse al lado derecho o izquierdo Pulgadas (cm) Parte Parte Parte del gabinete o en la parte inferior de la secadora. En lassecadoras a gas, el una de 60 pulg2 (387 cm2) LS I -- 3" (7,6 cm) desde la parte inferior y superior de la puerta. El tubo del escape de la secadora debe ser - Kenmore 8804 | Installation Instructions - Page 17
con las perillas (70.49cm) 28.5 Pare no topar con la manija de la puert (72.39cm) --i--'-_- Para no topar con los e×tractores de la parte posterior y de la base 27.0" (68.58cm) Dimensiones Apiladas De la Instalaci6n T De! Secadora (68.58cm) _- 27.0" 28.25" A! frente del gabinete (71.76cm - Kenmore 8804 | Installation Instructions - Page 18
secadora DEBE ser instalado hacia el exterior (El escape debe colocarse en la parte exterior y no debajo de la casa mOvil.) Debe usarse ducto de extremo final asegurado en contra de la estructura de la casa mOvil. MODEL OS A UTONOMOS CON CONSOLA SUPERIOR DIMENSIONES PARA LA INSTALAC!ON DESEMBALAJE - Kenmore 8804 | Installation Instructions - Page 19
Instrucciones para carnbiar la apertura de la Puerta sin Ventana: Figure 1 1. Abra la Puerta y quite los 4 tapones de enfrente a donde se encuentra la bisagra. Conserve todas las piezas para utilizarlas posteriormente, a menos que se especifique Io contrario. (Figura 1 ). Nota: Tenga cuidado al - Kenmore 8804 | Installation Instructions - Page 20
tornillos a traves del panel interior de la Puerta y apretandolos en los pernos de la manija. (Figura 12). 19. Tomando la puerta firmemente de la parte superior, coloquela cerca del hueco y asegurese de alinear el agujero superior de la bisagra con el agujero superior del Panel Frontal. Una vez que - Kenmore 8804 | Installation Instructions - Page 21
de manera correcta. Si la secadora no esta debidamente puesta a tierra se puede producir un choque el_ctrico. Siga las instrucciones indicadas en este manual para la puesta a tierra en forma correcta. No use un cord6n de extensi6n con estasecadora. Algunos cordones de extension no pueden soportar - Kenmore 8804 | Installation Instructions - Page 22
de montaje del anclaje del cordon, situado en la esquina superior de la parte trasera de la secadora. 2. Instale un anclaje de cable aprobado por el de montaje del anclaje de cable situado en la esquina superior en la parte trasera de la secadora. Instale un anclaje de cable aprobado por el U.L., - Kenmore 8804 | Installation Instructions - Page 23
linea de suministro de gas a la tuberia de 3/8" (0,96 cm) ubicada en la parte trasera de la secadora (ver paginas 6 y 7). Utilice un reductor de I/2" (1,27 cm la seccion "Lista de Control de Averias" que se encuentra en su Manual del Usuario, antes de Ilamar para obtener servicio. 7. Conserve estas - Kenmore 8804 | Installation Instructions - Page 24
the replacement parts, accessories and owner's manuals that you need to do-it-yourself. For Sears professional installation of home appliances and items and electronics, call or go on-line for the location of your nearest Sears Parts & Repair Service Center 1-800-488-1222 (U.S.A.) 1-800-469-4663
-
 1
1 -
 2
2 -
 3
3 -
 4
4 -
 5
5 -
 6
6 -
 7
7 -
8
-
9
-
10
-
11
-
12
-
13
-
14
-
15
-
16
-
17
-
18
-
19
-
20
-
21
-
22
-
23
-
24
 |
 |
I
I
stallati
structi
®
instrucci
instal
I
Sears,
Roebuck
and
Co., Hoffman
Estates, IL
60179
U.S.A.
P/N 134941300
(0708)