Kenmore 9742 Use and Care Guide
Kenmore 9742 - 30 in. Electric Range Manual
 |
View all Kenmore 9742 manuals
Add to My Manuals
Save this manual to your list of manuals |
Kenmore 9742 manual content summary:
- Kenmore 9742 | Use and Care Guide - Page 1
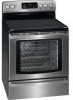
® Electric =an e Estufa el6ctrica ii Models, Modelos 790.9742* * = color number, nOmero de color _IIIII,YI? ...i.i..i www.sears.com Sears Roebuck and Co., Hoffman Estates, IL 60179 U.S.A. pin 316902001 (0904) - Kenmore 9742 | Use and Care Guide - Page 2
Range Warranty 2 Product Record 2 iMPORTANT SAFETY INSTRUCTIONS 3-4 Protection Agreements 5 Range Features bulbs, and bags. 4. A service technician to instruct the user in correct product installation, operation or maintenance. 5. A service technician to clean or maintain this product - Kenmore 9742 | Use and Care Guide - Page 3
Code ANSI/ NFPA No. 70 latest edition and local electrical code requirements. Install only per installation instructions provided in the literature package for this range. Ask your dealer to recommend a qualified technician and an authorized repair service. Know how to disconnect the power to the - Kenmore 9742 | Use and Care Guide - Page 4
are suitable for cook top service without breaking due to the as recommended in this manual. Improper installation of these liners may result in risk of electric shock, or fire range. Move birds to another welt-ventilated room. iMPORTANT INSTRUCTIONS FOR CLEANING YOUR RANGE , Clean the range - Kenmore 9742 | Use and Care Guide - Page 5
support from a Sears representative on all products. Think of us as a "talking owner's manual". [] Power surge protection against electrical Canada at 1-800-361-6665. Sears Installation Service For Sears professional installation of home appliances, garage Su nuevo producto Kenmore®esta diseSado - Kenmore 9742 | Use and Care Guide - Page 6
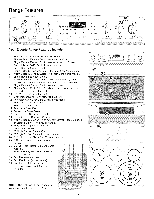
Features (9 Your Electric Range Features include: 1. Electronic Oven Control with Kitchen Timer. 2. ). 13. Self-Cleaning Oven interior. 14. Self-Clean Door Latch. 15. Adjustable Oven Rack(s). 16. Convection Fan & Cover. 17. Large 1 piece Oven Door Handle. 18. Full width Oven Door with Window. - Kenmore 9742 | Use and Care Guide - Page 7
Racks To remove, pull the rack forward until it stops. Lift up front of rack and slide out. To replace, fit the rack onto the guides on the oven walls. Tilt the front of the rack upward and slide the rack back into place. Arranging Oven Racks ALWAYS ARRANGE OVEN RACKS - Kenmore 9742 | Use and Care Guide - Page 8
cooking process. NOTE: Please read detailed instructions for ceramic glass cooktop cleaning in the Call checklist sections of this Use & Care Guide. NOTE: Radiant elements have a limiter that allows spoon holders or plastic wrappings on top of the range when it is in use. These items could melt - Kenmore 9742 | Use and Care Guide - Page 9
the dark band on the control knob (LO to 4). Use the marks as a guide and adjust the control knob from LO to 4 as needed (see illustration below).The salt and pepper shakers, spoon holders or plastic wrappings on top of the range when it is in use. These items could melt or ignite. Potholders, - Kenmore 9742 | Use and Care Guide - Page 10
Notes: Pressing the Triple Element button only will NOT operate the Triple Element. The control knob must be set in the Dual or Triple range as shown in Fig. 3. See Recommended Settings for Radiant Elements on the previous page. Fig. 1 Fig. 2 Fig. 3 Triple Radiant heating areas on ceramic smooth - Kenmore 9742 | Use and Care Guide - Page 11
element will be clearly marked if this feature is available on your range (See Fig. 1). If equipped with the Turbo Boil TM feature, place the cookware on the left front surface element and follow the instructions "To Operate a Single Radiant Element" in the Settings Surface Controls section. i! TM - Kenmore 9742 | Use and Care Guide - Page 12
features and functions of the oven as described below. Detailed instructions for each feature and function follow later in this Use & Care Guide. CONV ROAST i Use to select the Convection Roast feature• CONV CONVERTi Use to select the Convection Convert feature• CONV BAKE i Use to select the - Kenmore 9742 | Use and Care Guide - Page 13
hour operation. When the range is first plugged in, or when the power supply to the range has been interrupted, the timer in the display will flash the time of day (Fig. 1). INSTRUCTIONS PRESS To set the Guard will turn on and cannot be manually turned off during the Self-cleaning cycle. 13 - Kenmore 9742 | Use and Care Guide - Page 14
the oven control is left on for more than 11 hours and 59 minutes. The oven can be programmed to override this feature for Continuous INSTRUCTIONS PRESS DISPLAY Baking. To set the control for Continuous Energy Saving features: Bake or 12 Hour 1. Press and hold _ for 6 seconds (Fig.l). "12:Hr - Kenmore 9742 | Use and Care Guide - Page 15
control can be programmed to display temperatures in Fahrenheit or Celsius. The oven has been preset at the factory to display in Fahrenheit. INSTRUCTIONS PRESS DISPLAY To change display from Fahrenheit to Celsius or Celsius to Fahrenheit: 1. To tell if the display is set for Fahrenheit or - Kenmore 9742 | Use and Care Guide - Page 16
silent operation and later returned to operating with all the normal sounds and beeps. iNSTRUCTiONS PRESS DISPLAY To change control from normal sound operation to silent control operation: 1. To tell if your range is set for normal or silent operation press and hold _ for 7 seconds. " : "will - Kenmore 9742 | Use and Care Guide - Page 17
Setting Oven Controls • Preheat for Electric Ranges Setting Preheat f_ For the best baking the default oven set temperature, will Heat appear in the display (See Fig. 1). (See BAKE instructions for changing oven set temperature.) 3. Press _. "PRE" and "BAKE" will appear in the display - Kenmore 9742 | Use and Care Guide - Page 18
reaches the set temperature. If the oven temperature is set higher during the cooking process, the Convection fan will turn on again until the oven reaches the adjusted set temperature. INSTRUCTIONS PRESS DISPLAY To set the Bake Temperature to 350°F: 1. Arrange interior oven racks and place food - Kenmore 9742 | Use and Care Guide - Page 19
Bake feature. The automatic timer of the Timed Bake feature will turn the oven OFF after cooking for the desired amount of time you selected. INSTRUCTIONS PRESS DISPLAY To program the oven to begin baking immediately and to shut off automatically: (example below to bake at 350°F for 50 minutes - Kenmore 9742 | Use and Care Guide - Page 20
Timed Bake feature. The automatic timer of the Delayed Timed Bake will turn the oven ON and OFF at the time you select in advance. INSTRUCTIONS PRESS DISPLAY To program the oven for a Delay Start and to shut off automatically (example for baking at 375°F for 50 minutes and starting at - Kenmore 9742 | Use and Care Guide - Page 21
Setting Oven Controls • Setting Broil (Electric Range) The B,o,,pad controls the Broil feature. When suit for doneness. If the food you are broiling is not listed in the table, follow the instructions provided in your cookbook and watch the item closely. Broilin_ (Refer to Fig. 4) Food Item Rack - Kenmore 9742 | Use and Care Guide - Page 22
2, 4 and 7 (for 3 racks) and positions 3 and 6 (See Fig. 1). 4. Cakes have better results when baked using the BAKE BBkepad. INSTRUCTIONS PRESS DISPLAY To set the oven for Convection Bake and temperature to 350°F: 1. Arrange interior oven racks and place food in oven (See Fig. 1). 2. Press - Kenmore 9742 | Use and Care Guide - Page 23
all sides, sealing in juices and flavors. Foods are crispy brown on the outside while staying moist on the inside. INSTRUCTIONS PRESS DISPLAY To set the Convection Roast feature (example for Meats to cook at 350°F): 1. Arrange interior oven racks and place food in oven. 2. Press _;_;;.1 "CONY - Kenmore 9742 | Use and Care Guide - Page 24
control will display "End" and will sound 3 long beeps every 30 seconds until the pad is pressed (See Fig. 5). INSTRUCTIONS PRESS DISPLAY Using Convection Convert feature to adjust oven temperature from a Bake recipe (example below when setting oven for 350°F): 1. Arrange interior oven racks - Kenmore 9742 | Use and Care Guide - Page 25
may be used with Bake or a Timed Bake. This feature will not work with any other function including a Belay Start (Delayed Timed Bake) setting. INSTRUCTIONS PRESS DISPLAY To Program the Oven to record a recipe setting and begin baking (sample shown is for bake at 350°F): 1. Place the food in the - Kenmore 9742 | Use and Care Guide - Page 26
Bake or a Delay Start (Delayed Timed Bake). Some tips you should review for best possible results using Slow Cook feature: • Completely thaw all Cook feature recipes provided in the back of this Use & Care Guide. INSTRUCTIONS To Program the Oven to begin baking with the Slow Cook feature ( - Kenmore 9742 | Use and Care Guide - Page 27
KEYPADS should not be used once the Sabbath feature is activated. INSTRUCTIONS PRESS DISPLAY To Program the Oven for 350°F, Begin Baking Immediately and continue to step 6. Refer to the Timed Bake or Delay Start instructions on pages 19-20. Remember the oven will shut down after completing a - Kenmore 9742 | Use and Care Guide - Page 28
or can be used after cooking has finished using TIMED BAKE or DELAY START (Delayed Timed Bake), INSTRUCTIONS PRESS DISPLAY To set Warm & Hold: 1. Arrange interior oven racks and place baked food in oven door is opened, The oven light may also be manually turned ON or OFF by pressing the _ pad. 28 - Kenmore 9742 | Use and Care Guide - Page 29
Setting Warmer Drawer Controls • Arranging Warmer Drawer Racks (some models) • Operating the Warmer Drawer (some models) Arranging Warmer Drawer (Warm & Ready TM Drawer) Rack Positions (some models) Note: Use the warmer drawer to keep hot foods hot such as: vegetables, gravies, meats, casseroles, - Kenmore 9742 | Use and Care Guide - Page 30
Setting Warmer Drawer Controls • Warmer Drawer Humidity Controller (some models) • Removing & Replacing Warmer Drawer (some models) Warmer Drawer Humidity Controller Feature (some models) This feature may be used to control humidity levels in the Warmer Drawer. The control knob is located on the - Kenmore 9742 | Use and Care Guide - Page 31
children unattended near the appliance. The health of some birds is extremely sensitive to the fumes given off during the Self-Cleaning cycle of any range. Move birds to another well-ventilated room. Cony Bake Coaa Cony Boast Convert Pro Heat Bake 8rail Cook Time Delay Start Timer Set/Off - Kenmore 9742 | Use and Care Guide - Page 32
number keypads _ _ @. During the Self=Cleaning cycle, the outside of the range can become very hot to the touch. DO NOT leave small children unattended near air or steam to escape. The oven may still be VERY HOT. INSTRUCTIONS PRESS DISPLAY To start an immediate Self=Cleaning cycle or to set a - Kenmore 9742 | Use and Care Guide - Page 33
Self- Cleaning • Setting Flex Clean • Setting Delay Flex Clean INSTRUCTIONS When the Self=Clean cycle is done: 1. The time of day,"Hot, DOOR LOCKED" and "CLEAN" for Delay Flex-Clean 12-24 hours in advance see page 13 for instructions to set the control for the 24 hour time of day display mode. 33 - Kenmore 9742 | Use and Care Guide - Page 34
higher or lower than the recommended temperature• The baking results should help you to decide how much of an adjustment is needed• INSTRUCTIONS To adjust the oven temperature higher: PRESS 1• Press B,ke for 6 seconds (Fig• 1)• Bake Note: The oven temperature adjustments made with this feature - Kenmore 9742 | Use and Care Guide - Page 35
dry upon removal. If soils are not removed, follow the cooktop cleaning instructions below. Gentle scouring with a soapy scouring pad will remove most spots. damaged during future heating. DO NOT use spray oven cleaners on the range top. Remove racks. See "Removing & Replacing Oven Racks" under - Kenmore 9742 | Use and Care Guide - Page 36
General Care & Cleaning • Cooktop Cleaning & Maintenance • Cleaning Recommendations for the Ceramic Glass Cooktop Cooktop Cleaning & Maintenance Prior to using your cooktop for the first time, apply the recommended CookTop® Cleaning Creme to the ceramic surface (on the web visit www.sears.com for - Kenmore 9742 | Use and Care Guide - Page 37
and into the oven frame on both left and right oven door hinges (See Fig. 2) to the locked position. 5. Close the oven door. Door Care Instructions - Most oven doors contain glass that can break. Read the following recommendations: 1. Do not close the oven door until all the oven racks are fully - Kenmore 9742 | Use and Care Guide - Page 38
is opened. The oven light(s) may also be manually operated by pressing the _ pad. The oven oven light bulb: 1. Turn electrical power off at the main source or unplug the range. 2. Press wire holder to Timer in this Use & Care Guide. Be sure the range is unplugged and all parts are instructions. 38 - Kenmore 9742 | Use and Care Guide - Page 39
house lights to be sure. Call your local electric company for service. Oven does not operate - Be sure the oven controls are set properly for the desired function. See Setting Oven Controls in this Use & Care Manual or read the instructions "Entire appliance does not operate" in this checklist - Kenmore 9742 | Use and Care Guide - Page 40
You r Home ® Registered Trademark / TM Trademark / SM Service Mark of Sears Brands, LLC ® Marca Registrada / TM Marca de Fabrica / SM Marca de Servicio de Sears Brands, LLC MC Marque de commerce / MD Marque d6pos6e de Sears Brands, LLC © Sears Brands, LLC
-
 1
1 -
 2
2 -
 3
3 -
 4
4 -
 5
5 -
 6
6 -
 7
7 -
8
-
9
-
10
-
11
-
12
-
13
-
14
-
15
-
16
-
17
-
18
-
19
-
20
-
21
-
22
-
23
-
24
-
25
-
26
-
27
-
28
-
29
-
30
-
31
-
32
-
33
-
34
-
35
-
36
-
37
-
38
-
39
-
40
 |
 |

®
Electric
=an
e
Estufa
el6ctrica
ii
Models,
Modelos
790.9742*
* = color number,
nOmero de
color
_IIIII,YI?
..........
iii
.........
www.sears.com
Sears Roebuck and Co., Hoffman
Estates, IL 60179 U.S.A.
pin
316902001
(0904)