Kenmore 9804 Installation Instructions
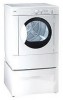
Kenmore 9804 - 5.8 cu. Ft. Gas Dryer Manual
 |
View all Kenmore 9804 manuals
Add to My Manuals
Save this manual to your list of manuals |
Kenmore 9804 manual content summary:
- Kenmore 9804 | Installation Instructions - Page 1
® I stallati I structi instrucci I instal Sears, Roebuck and Co., Hoffman Estates, IL 60179 U.S.A. P/N 134941300 (0708) - Kenmore 9804 | Installation Instructions - Page 2
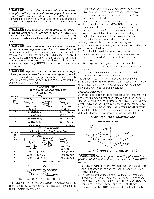
installation, carefully read these instructions. This will simplify the installation and ensure the dryer is installed correctly and safely. Leave these instructions near the Dryer after installation for future reference. NOTE: The electrical service to the Dryer must conform with local codes - Kenmore 9804 | Installation Instructions - Page 3
cm) clearance between the vent hood and the ground or any other obstruction. The following are specific requirements for proper and safe operation of your dryer. Failure to follow these instructions can create excessive drying times and fire hazards. Do not use plastic flexible duct to exhaust the - Kenmore 9804 | Installation Instructions - Page 4
be to the right side of the cabinet or the bottom of the dryer. Directional exhausting can be accomplished by installing Exhaust Kit, P/N 131456800, available through your parts distributor. Follow the instructions supplied with the kit. EXHAUST DUCT LOCATING DIMENSIONS I/ I _'}_ k. SAME AS OTHER - Kenmore 9804 | Installation Instructions - Page 5
the gas supply piping system during any pressure testing of the gas supply piping system at test pressures in excess of 1/2 psig (3.45 kPa). 7. The dryer MUST be isolated from the gas supply piping system during any pressure testing of the gas supply piping system at test pressures equal to or - Kenmore 9804 | Installation Instructions - Page 6
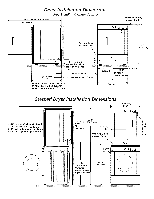
Dryer Installation Dimensions Free=Standing & Under Counter 48.5" To clear open door (123.19cm) to clear knobs (70.49cm) 28.5 to clear door handle (72.39cm) q (68.58cm) (34.29cm) Stacked Dryer Installation Dimensions T 9 (68.58cm) 27.0" 1 28.25" to front of cabinet(71.76cm) 28.75" to clear - Kenmore 9804 | Installation Instructions - Page 7
outside (outdoors, not beneath the mobile home) using metal ducting that will not support combustion. Metal ducting must be 4 inches (10.16 cm) in diameter with no obstructions. Rigid metal duct is preferred. 2. If dryer is exhausted through the floor and area beneath the mobile home isenclosed, the - Kenmore 9804 | Installation Instructions - Page 8
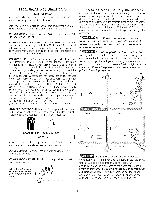
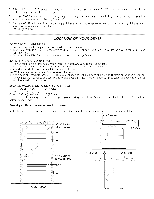
Window Door Reversal Instructions Figure 1 1.0pen door and remove four (4) plugs in the door opening opposite the hinges. Retain all parts for uses later, unless otherwise noted. (Figure 1) Note: - Kenmore 9804 | Installation Instructions - Page 9
11. Reassemble lens to transition ring with holes to install handle on right-hand side of door assembly. For proper fit insure the retention tabs on transition ring are on top of lens Figure 7 8. Remove lens locating screw. (Figure 7) Figure 8 9. Disengaging several of the retention tabs and pull - Kenmore 9804 | Installation Instructions - Page 10
: This appliance MUST be properly grounded. Electrical shock can result if tile dryer is not properly grounded. Follow the instructions in this manual for proper grounding. Do not use an extension cord with this dryer. Some extension cords are not designed to withstand the amounts of electrical - Kenmore 9804 | Installation Instructions - Page 11
USA ELECTRICDryer 1. Remove the screws securing the terminal block access cover and the strain relief mounting bracket located on the back of the dryer upper corner. 2. Install a U.L approved strain relief into the power cord entry hole of the mounting bracket. Finger tighten the nut only at this - Kenmore 9804 | Installation Instructions - Page 12
the dryer is turned on, the safety switch will shut the burner off. If this happens, turn the timer to "OFF" and wait 5 minutes before making another attempt to light. 6. If your dryer does not operate, please review the "Avoid Service Checklist" located in your Use and Care Guide before calling - Kenmore 9804 | Installation Instructions - Page 13
posibilidad de lesi6n y tambi_n qu_ puede suceder si no se siguen las instrucciones. Para su seguridad, siga las instrucciones contenidas en este manual a fin de reducir a un minimo los riesgos de incendio o explosion o para evitar daAos materiales, lesiones personales o la muerte. No almacene ni - Kenmore 9804 | Installation Instructions - Page 14
REQUERIMIENTOS DE INS TALA CION PRELIMINARES Herramientas y materiales necesarios para la instalaci6n: 1. Destornillador Phillips 2. Pinzas universales 3. Nivel de gota 4. Destornillador para tornillo de cabeza plana o recta 5. Cinta para ductos 6. Ducto metalico rigido o flexible de 4" (10,2 cm) 7. - Kenmore 9804 | Installation Instructions - Page 15
Risque d'incendie- Une sOcheuse_ linge produit de la charpie combustible. Si el escape de la secadora no se dirige al exterior, alqunas pelusas finas seran sopladas hacia el recinto donde se efect0a el lavado. La acumulaciOn de pelusas en cualquier lugar de la casa, puede crear un peligro para la - Kenmore 9804 | Installation Instructions - Page 16
UBICACION DEL ESCAPE DESPEJESMiNIMOS DE INSTALACION - Todaslas secadorasvienen de fabrica equipadas con escape trasero. Sin embargo, en las secadoras elOctricas, el escape puede hacerse al lado derecho o izquierdo Pulgadas (cm) Parte Parte Parte del gabinete o en la parte inferior de la - Kenmore 9804 | Installation Instructions - Page 17
Dimensiones de la instalaaY)n 48,5" En el claro abra la puetra (123.19cm' l El tubo de la fuente de gas en la parte posterior de la unidad Fuente ei_ctrica en la parte posterior de la unidad /. 0 o _,_' g [...i l 36" (91.44cm) (27.39cm) 28.5" 5.0" (12.7cm) -$--- Linea de eentro para la alture - Kenmore 9804 | Installation Instructions - Page 18
INSTALAC!ON EN CASAS MOVILES 1. El tubo de escape de la secadora DEBE ser instalado hacia el exterior (El escape debe colocarse en la parte exterior y no debajo de la casa mOvil.) Debe usarse ducto de metal que no sea combustible. El ducto de metal debe tener cuatro pulgadas (10,16 cm) de diametro y - Kenmore 9804 | Installation Instructions - Page 19
Instrucciones para carnbiar la apertura de la Puerta sin Ventana: Figure 1 1. Abra la Puerta y quite los 4 tapones de enfrente a donde se encuentra la bisagra. Conserve todas las piezas para utilizarlas posteriormente, a menos que se especifique Io contrario. (Figura 1 ). Nota: Tenga cuidado al - Kenmore 9804 | Installation Instructions - Page 20
Figure 7 8. Quite el tornillo que fija la lente. (Figura 7). 11. Vuelva a montar la lente al anillo de transici6n con los agujeros para instalar la manija en el lade derecho del montaje de la puerta. Para el ajuste apropiado asegure que las lengeetas de retenci6n en el anillo de transici6n estan - Kenmore 9804 | Installation Instructions - Page 21
de manera correcta. Si la secadora no esta debidamente puesta a tierra se puede producir un choque el_ctrico. Siga las instrucciones indicadas en este manual para la puesta a tierra en forma correcta. No use un cord6n de extensi6n con estasecadora. Algunos cordones de extension no pueden soportar - Kenmore 9804 | Installation Instructions - Page 22
CONEXIONES ELECTRICAS PARA CONEXIONES ELECTRICAS PARA UN SISTEMA TRIFILAR UN SISTEMA TETRAFILAR Secadoras ELECTR/CASNo Canadienses ii Secadoras EL_-CTR/CASNo Canadienses j 1. Saque los tornillos que sujetan la cubierta de acceso al las terminales y el soporte de montaje del anclaje del - Kenmore 9804 | Installation Instructions - Page 23
gas de fluir en la tuberia. 6. Si su secadora no funciona, consulte la seccion "Lista de Control de Averias" que se encuentra en su Manual del Usuario, antes de Ilamar para obtener servicio. 7. Conserve estas instrucciones cerca de la secadora para referencia futura. NOTA: Un cableado diagrama est - Kenmore 9804 | Installation Instructions - Page 24
who sold it! For the replacement parts, accessories and owner's manuals that you need to do-it-yourself. For Sears professional installation of or go on-line for the location of your nearest Sears Parts & Repair Service Center 1-800-488-1222 (U.S.A.) 1-800-469-4663 (Canada) Call anytime, day
-
 1
1 -
 2
2 -
 3
3 -
 4
4 -
 5
5 -
 6
6 -
 7
7 -
8
-
9
-
10
-
11
-
12
-
13
-
14
-
15
-
16
-
17
-
18
-
19
-
20
-
21
-
22
-
23
-
24
 |
 |
I
I
stallati
structi
®
instrucci
instal
I
Sears,
Roebuck
and
Co., Hoffman
Estates, IL
60179
U.S.A.
P/N 134941300
(0708)