Kenmore 9961 Use and Care Guide
Kenmore 9961 - Elite 40 in. Electric Manual
 |
View all Kenmore 9961 manuals
Add to My Manuals
Save this manual to your list of manuals |
Kenmore 9961 manual content summary:
- Kenmore 9961 | Use and Care Guide - Page 1
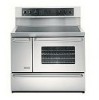
E L !T E Electric Range Use & Care Guide Estufa eldctrica Manual de uso y cuidado Model/Modelo 790.99613 I" Sears Roebuck and Co., Hoffman Estates, IL 60179 U.S.A. www.sears.com P/N 318200712 Rev. A (0801) - Kenmore 9961 | Use and Care Guide - Page 2
& Maintenance 40-41 Before you Call 42-43 Protection Agreements 44 Notes 45 Sears Service 46 Please carefully read and save these instructions This Use & Care Manual contains general operating instructions for your appliance and feature information for several models. Your product - Kenmore 9961 | Use and Care Guide - Page 3
. Know how to disconnect the power to the range at the circuit breaker or fuse box in case of an emergency. • User servicing--Do not repair or replace any part of the appliance unless specifically recommended in the manuals. All other servicing should be done only by a qualified technician, this - Kenmore 9961 | Use and Care Guide - Page 4
earthenware, or other glazed utensils are suitable for rangetop service without breaking due to the sudden change in temperature. Check glass with sharp objects. IMPORTANT INSTRUCTIONS FOR USING YOUR OVEN • Use care when opening oven door--Stand to the side of the range when opening the door of a - Kenmore 9961 | Use and Care Guide - Page 5
cycle only clean the parts listed in this Use and Care Guide. Before self cleaning the oven, remove the broiler pan off during the self-cleaning cycle of any range. Move birds to another well ventilated room. THESE INSTRUCTIONS == Serial Plate Location Product Record You will find the model and - Kenmore 9961 | Use and Care Guide - Page 6
and type of cookware used will influence the setting needed for best cooking results. Note: Always use an utensil for its intended purpose. Follow manufacturer's instructions. Some utensils were not made to be used in the oven or on the cooktop. Do not use griddle over more than one burner because - Kenmore 9961 | Use and Care Guide - Page 7
of these situations could cause discoloring or cracking of the glass range surface. Wire trivets: Do not use wire trivets. Cookware models, only flat bottomed woks (without support rings) may be used. Ill Canning Tips & Information Canning can generate 1. Use tested recipes and follow instructions - Kenmore 9961 | Use and Care Guide - Page 8
Range features Side Oven Thermostat Electronic Oven Controls Surface Control Knobs Grid Broil Pan Searing Grill Adjustable Oven Rack Side Oven Name Plate Drawer Broil Element - Kenmore 9961 | Use and Care Guide - Page 9
instructions for ceramic glass cooktop cleaning in the General Care & Cleaning section and Before You Call checklist section of this Use and Care Guide . Z Locations of the Radiant Surface Elements and Controls Your range is equipped with radiant surface elements with '5" different wattage ratings - Kenmore 9961 | Use and Care Guide - Page 10
the surface control knob to OFF before removing the cookware. Note: The specific Hot Surface Indicator light for the element will come on when the control knob and pepper shakers, spoon holders or plastic wrappings on top of the range when it is in use. These items could melt or ignite. Potholders - Kenmore 9961 | Use and Care Guide - Page 11
control knob to OFF before removing Figure 7 the cookware. Note: The specific Hot Surface Indicator light for the element will come on when the control Indicator Lights Two different surface control lights will glow on your range: Surface Indicator Lights and Hot Surface Indicator Lights. • The - Kenmore 9961 | Use and Care Guide - Page 12
, pull the rack forward until it stops. Lift up front of rack and slide out, To replace an oven rack, fit the rack onto the guides on the oven walls, Tilt the front of the rack upward and slide the rack back into place, 1 Oven Rack E Main Oven Side Oven Air - Kenmore 9961 | Use and Care Guide - Page 13
Setting Side Oven Control Left Oven To Bake Temperature Control Knob Off 1. Arrange oven racks while the oven is still cool. 2. TurntheTemperatureControlKnobtothedesiredoventemperature.When the oven is first turned on, the oven indicator light above the Temperature Control Knob will glow. - Kenmore 9961 | Use and Care Guide - Page 14
of your oven, become familiar with the various features and functions of the oven as described below. Detailed instructions for each feature and function follow later in this Use & Care Guide. DELAY START-- Use with BAKE, CONV BAKE, PREHEAT, SLOW COOK COOK TIME and CLEAN to program a Delayed Timed - Kenmore 9961 | Use and Care Guide - Page 15
is first plugged in, or when the power supply to the range has been interrupted, the timer in the display will flash with "PF" (power failure, See Figure 1). When PF appears in the display, press ("_-_, PF will disappear. INSTRUCTIONS PRESS To set the clock (example below for 1:30) 1. Press - Kenmore 9961 | Use and Care Guide - Page 16
control is left on for more than 11 hours and 59 minutes, The oven can be programmed to override this feature for Continuous Raking, INSTRUCTIONS PRESS To set the control for Continuous Bake or 12 Hour Energy Saving features 1, Press and hold _ for 7 seconds (Figure1), After 7 seconds "12h" or - Kenmore 9961 | Use and Care Guide - Page 17
silent operation and later returned to operating with all the normal sounds and beeps. INSTRUCTIONS PRESS DISPLAY To change control from normal sound operation to silent control operation 1. To tell if your range is set for normal or silent operation press and hold _. "--:-" will appear and - Kenmore 9961 | Use and Care Guide - Page 18
v oven control can be programmed to display temperatures in Fahrenheit or Celsius, The oven has been preset at the factory to display in Fahrenheit. INSTRUCTIONS PRESS DISPLAY To change display from Fahrenheit to Celsius or Celsius to Fahrenheit 1. To tell if the display is set for Fahrenheit or - Kenmore 9961 | Use and Care Guide - Page 19
is not necessary when roasting or cooking casseroles. The oven can be programmed to preheat at any temperature between 170°F to 550°F. INSTRUCTIONS PRESS DISPLAY To set the Preheat temperature for 375°F 1. Arrange the interior oven racks. 2. Press Q. "350" and "BAKE" will appear in the - Kenmore 9961 | Use and Care Guide - Page 20
. The oven can be programmed to bake at any temperature from 170 ° F to 550 ° F (the sample shown below is for 350°F). INSTRUCTIONS PRESS DISPLAY To set the Bake Temperature to 375°F 1. Arrange interior oven racks and place food in oven. 2. Press _, "350" will appear and "BAKE" will - Kenmore 9961 | Use and Care Guide - Page 21
Baking Problems and Solutions Chart Baking Problems Causes oven. _iiiilililililililililililililililililili Cakes not level. • Range not level. Foods not done when cooking the water level is uneven, refer to the installation instructions for leveling the appliance. • Be sure to allow - Kenmore 9961 | Use and Care Guide - Page 22
time and energy. 2 or 3. If cooking on multiple racks, place the oven racks in positions 2 and --No special pans or bakeware 4. needed. INSTRUCTIONS PRESS DISPLAY To set the oven for Convection Bake and temperature to 375°F 1. Arrange interior oven racks and place food in oven. 2. Press - Kenmore 9961 | Use and Care Guide - Page 23
away from the meats replacing it with warm air (making a crisp outside type of searing) sealing in juices for better tasting meats, INSTRUCTIONS PRESS DISPLAY To Set the oven to Convection Roast at 375°F 1, Arrange oven racks, 2. Press _; "350" willbe displayed; CONV ROAST willflash (Figure - Kenmore 9961 | Use and Care Guide - Page 24
10). Below is a list of preparation and cooking tips you should review for best possible results using Slow Cook: • Completely thaw all frozen feature. • Add any cream or cheese sauces during the last hour of cooking. INSTRUCTIONS To Program the Oven to begin baking with the Slow Cook featu re 1. - Kenmore 9961 | Use and Care Guide - Page 25
feature. The automatic timer of the Timed Bake feature will turn the oven OFF after cooking for the desired amount of time you selected. INSTRUCTIONS PRESS DISPLAY To program the oven to begin baking immediately and to shut off automatically (example: BAKE at 350°F for 30 minutes) 1. Be sure - Kenmore 9961 | Use and Care Guide - Page 26
Delayed Timed Bake or Delayed Timed Convection Bake 12-24 hours in advance set the control for the 24 hour time of day display mode. INSTRUCTIONS PRESS DISPLAY To program the oven for a delayed BAKE start time and to shut off automatically (example: baking at 350°F, starting at 5:30 and baking - Kenmore 9961 | Use and Care Guide - Page 27
to thoroughly heat the oven from top to bottom to give more evenly browned foods. Refer to (Figure 4) for foods to cook in each category. INSTRUCTIONS PRESS DISPLAY To set the Food Categories feature (example: for Cakes to cook at 375°F) 1, Arrange interior oven racks and place food in oven - Kenmore 9961 | Use and Care Guide - Page 28
time. With this information the control can calculate the time when cooking will complete and can then start the Warm & Hold feature automatically. INSTRUCTIONS PRESS DISPLAY To set Warm & Hold 1, Arrange interior oven racks and place food in oven, 2. Press _. "HLd" will appear in the display - Kenmore 9961 | Use and Care Guide - Page 29
on the broiling rack and the rack is placed under the broiling element. See the broiling instructions for main oven in the Setting Oven Controls section. See side oven step-by-step instructions in the Setting Side Oven Control section. Preheating Preheating is suggested when broiling rare steaks - Kenmore 9961 | Use and Care Guide - Page 30
the food you are broiling is not listed in the table, follow the instructions provided in your cookbook and watch the item closely. Use the Searing Grill Pan and insert for meats and steaks (See Figure 6). Electric Range Broiling Table Recommendations Food Rack Temp Cook Time Item Steak 1" - Kenmore 9961 | Use and Care Guide - Page 31
If not, skip this step and continue to step 7. Refer to the Timed Bake (complete steps 5-7) / Delayed Start Bake (complete steps 6-10) section for complete instructions. Remember the oven will shut down after using Timed Bake or Delay Start Bake and therefore may only be used once during the Sabbath - Kenmore 9961 | Use and Care Guide - Page 32
further assistance, guidelines for proper usage, and a complete list of models with the Sabbath feature, please visit the web at http:\\www.star including a Delayed Timed Bake, a Clean Cycle or a Broil setting. INSTRUCTIONS PRESS DISPLAY To Program the Oven to Begin and record a Recipe (example - Kenmore 9961 | Use and Care Guide - Page 33
DO NOT HAND CLEAN OVEN DOOR GASKET Note: See additional cleaning information for the oven door in the General Care & Cleaning section. Note: If your range is equipped with a warmer drawer, the warmer drawer cannot be used during a self-clean cycle. Warmer drawer must be turned off before the clean - Kenmore 9961 | Use and Care Guide - Page 34
hour self-clean cycle for light soils, a 3 hour cycle for average soils, and a 4 hour cycle for heavy soils (to assure satisfactory results). INSTRUCTIONS PRESS To set the controls for a 3 hour Self-Cleaning cycle to start immediately and shut off automatically 1. Be sure the clock is set with - Kenmore 9961 | Use and Care Guide - Page 35
. The automatic timer will turn the oven on and off at the time you select in advance. Be sure to review TO START THE SELF-CLEAN CYCLE for recommended clean times. INSTRUCTIONS PRESS DISPLAY To set the control for the Self-Cleaning Cycle to start at a delayed time and shut off automatically - Kenmore 9961 | Use and Care Guide - Page 36
is higher or lower than the recommended temperature. The baking results should help you to decide how much of an adjustment is needed. INSTRUCTIONS To adjust the oven temperature higher PRESS 1. Press _ for 6 seconds (Figure 2). v 2. To increase the temperature use the number pads to enter the - Kenmore 9961 | Use and Care Guide - Page 37
Wear rubber gloves when cleaning the appliance manually. General Cleaning Remove soils using hot, handles or any "it" exterior surfaces of the range, wood or painted surfaces. The cleaner can damage or oven cleaner following oven cleaner manufacturer's instructions, DO NOT line the oven walls, - Kenmore 9961 | Use and Care Guide - Page 38
Ceramic Glass Cooktop Cleaning & Maintenance Prior to using your cooktop for the first time, apply the recommended Cleaning Creme to the ceramic surface. Clean and buff with a non abrasive cloth or pad. This will make cleaning easier when soiled from cooking. The special cooktop cleaning cream - Kenmore 9961 | Use and Care Guide - Page 39
dry may permanently damage cooktop by marking, breaking or fusing to it. Care and Cleaning of Stainless Steel (stainlesssteelmodelsonly) Some models are equipped with stainless steel exterior parts. Special care and cleaning are required for maintaining the appearance of stainless parts. Please - Kenmore 9961 | Use and Care Guide - Page 40
Range Before cleaning any part of the range, be sure all controls are turned OFF and the range abrasive cleaner, following manufacturer's instructions. Rinse with clean water Broiler Pan and Insert (some models), Door Liner, Small Oven soaked paper towel for 30 to 40 minutes. Rinse with clean water - Kenmore 9961 | Use and Care Guide - Page 41
supports. Keep pulling the bottom of the door toward you while rotating the top of the door toward the range glass shield. 4. Replace bulb with a new 40 watt appliance bulb. 5. Replace glass shield in Clockand Minute Timer in the ELECTRONIC OVEN CONTROL manual. Be sure the oven is unplugged and - Kenmore 9961 | Use and Care Guide - Page 42
/SOLUTION Poor installation. To level range, refer to Leveling Guide,in the Installation Instructions. When range is level, cooktop may appear out of alignment if countertop is not level. Weak, unstable floor. Be sure floor is level and can adequately support range. Contact a carpenter to correct - Kenmore 9961 | Use and Care Guide - Page 43
removed after selfcleaning cycle. Before You Call Solutions To Common Problems Excessive spillovers in oven. Set self-clean cycle for a Cycle" in the Self-Cleaning section. Control(s) not set properly. Follow instructions under "Setting Oven Controls" section. Make sure oven door is opened - Kenmore 9961 | Use and Care Guide - Page 44
compra inteligente. Su nuevo producto Kenmore®ast6 diseSado y fabricado para brindarle Think of us as a ,talking owner's manual,,. en nosotros come en un _ - Kenmore 9961 | Use and Care Guide - Page 45
expert troubleshooting and home sold it! For the replacement parts, accessories and owner's manuals that you need to do-it-yourself. For Sears professional a domicilio, y para ordenar piezas: 1-888-SU-HOGAR ® Au Canada pour service en fran_ais: 1-800-LE-FOYER Mc (1-800-533-6937) (1-888-784-6427
-
 1
1 -
 2
2 -
 3
3 -
 4
4 -
 5
5 -
 6
6 -
 7
7 -
8
-
9
-
10
-
11
-
12
-
13
-
14
-
15
-
16
-
17
-
18
-
19
-
20
-
21
-
22
-
23
-
24
-
25
-
26
-
27
-
28
-
29
-
30
-
31
-
32
-
33
-
34
-
35
-
36
-
37
-
38
-
39
-
40
-
41
-
42
-
43
-
44
-
45
 |
 |

E
L
!
T
E
Electric
Range
Use
&
Care Guide
Estufa eldctrica
Manual de uso y cuidado
Model/Modelo
790.99613
I"
Sears
Roebuck
and
Co.,
Hoffman
Estates,
IL
60179
U.S.A.
www.sears.com
P/N 318200712
Rev. A (0801)