Kenmore SI3209ZA Use and Care Guide
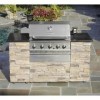
Kenmore SI3209ZA - Elite Island Base Unit Grill Manual
 |
View all Kenmore SI3209ZA manuals
Add to My Manuals
Save this manual to your list of manuals |
Kenmore SI3209ZA manual content summary:
- Kenmore SI3209ZA | Use and Care Guide - Page 1
Island Model 141.16688800 & 141.16689800 • Safety • Assembly • Use and Care • Cooking Guide • Frequently Asked Questions Call us first if you have any problem with this product. We can help you with questions about assembly and grill operation or if there are damaged or missing parts when you - Kenmore SI3209ZA | Use and Care Guide - Page 2
: • Gas Safety and Leak Tests 15-18 • Lighting Instructions 19-20 • Troubleshooting 20 • Rotisserie Instruction 21-23 • Refrigerator Instruction 24 • Cleaning and Maintenance 25-27 • Cooking Guide A1-A5 • Frequently Asked Questions A7-A8 Kenmore Elite Full Warranty If this grill fails due to - Kenmore SI3209ZA | Use and Care Guide - Page 3
these instructions may will need both cartons to complete assembly. [] Use the Hardware and Part Diagrams to ensure all items are included and free of damage. [] or any other appliance, When using electrical appliances, basic safety precautions should always be used. This appliance, when installed, - Kenmore SI3209ZA | Use and Care Guide - Page 4
11 12_ 7_ 57. 20. I0 16 22 64 24. 25 34 30. 36 29. 69. 47 29_ 41 ...._ 48 32 49 - Kenmore SI3209ZA | Use and Care Guide - Page 5
10 22 2.\ 5 46 _\ 32 19 2& 26. 25. 39 "8 D q 33" \\_31 30 27 38 36 _\29 44 37 5 - Kenmore SI3209ZA | Use and Care Guide - Page 6
4_ 5 15 17 9 12 14 J - Kenmore SI3209ZA | Use and Care Guide - Page 7
Support Bracket, Right Control Panel, Upper Control Panel Electric Ignitor,6-port Electric Ignitor Protector Control Knob Control Knob Spring Control Knob Seat Infrared Burner Assembly Drawer Handle Drawer Panel Drawer Drawer Slide Set Cart Panel, Front Cart Panel Frame, Cart Frame Front PART - Kenmore SI3209ZA | Use and Care Guide - Page 8
Electric Wire, 5-contact Electric Wire Set Wire Tube Control Panel Bracket Cover Rotisserie Assembly Use and Care Guide KEY 1 2 3 4 5 6 7 8 9 10 11 12 13 14 DESCRIPTION Lid Panel Bracket, Left Control Panel Bracket, Right PART # P07604018B P07604019B P07604020B P03305060D P03305061D P03637001A - Kenmore SI3209ZA | Use and Care Guide - Page 9
42 43 44 45 46 47 48 49 Control Panel DESCRIPTION Bowl Support Bracket, Left Bowl Support Bracket, Right Bowl Support Bracket, Rear Grease Tray Grease Tray Handle Wheel for Grease Tray Grease , 1-contact Electric Wire Gas Fitting PART # P029056061 P01304014D P01305020D P01319002D P02718047B - Kenmore SI3209ZA | Use and Care Guide - Page 10
to ensure you receive the correct parts: 1. Model and Serial Number 2. Part Number 3. Part Description 4. Quantity of parts needed (see CSA label on grill) Important: Use only Kenmore replacement parts. The use of any part that is not a Kenmore replacement part can be dangerous and will also - Kenmore SI3209ZA | Use and Care Guide - Page 11
5. Rot. Holding Fork 6. Rot. Motor Bracket 7. Rot. Motor/AC 8. Rot. Screw#10-24x3/4"U NC 9. Rot. Washer 10. Rot. Nut #10-24 ...... I 3 PART# P05508167F S196G04084 P05508168F P05508175F P05508169F P03307010A P07101045A S112G10124 S411 G03084 S362G10124 QTY 1 3 1 1 2 1 1 2 2 2 J Rot. Thumbscrew - Kenmore SI3209ZA | Use and Care Guide - Page 12
Assemble Island Set [] Open both cartons and remove alI packing materials. [] Open Grill Lid and Refrigerator door and remove packing materials. [] Align the 3 individual components and slide together as shown. [] Be sure to attach the Regulator with Hose to both the - Kenmore SI3209ZA | Use and Care Guide - Page 13
Set is shown on a tilted angle. FOR YOUR SAFETY DO NOT TILT your Island Assembly at any time. \\\\ Wrench Qty. 1 Part # P05515017L (Already packed in the Use and Care Guide packaging.) / / / / / / / / / / Pull Refrigerator Cord out. [] Unscrew Trim Plate from the rear of Island set, then pull - Kenmore SI3209ZA | Use and Care Guide - Page 14
Install Ignitor Battery [] Unscrew Ignitor Cap from Control Panel. [] Place supplied AA battery into the Ignitor Slot with positive pole facing you. [] Position the Cap and Spring over the AA battery and tighten onto Control Panel. Install Cooking Components [] Place the Heat Diffusers above the - Kenmore SI3209ZA | Use and Care Guide - Page 15
CORRECT LP GAS TANK USE [] LP Gas grill models are designed for use with a standard 20 lb. replaced prior to using the grill again. A. Do not store a spare LP-Gas tank under or near this appliance. B. Never fill the tank beyond 80 percent full; and C. If the information in "(a)" and "(b)" is not - Kenmore SI3209ZA | Use and Care Guide - Page 16
tank through an exchange service. Use only those LP Gas tank section of this guide. • Always keep new and as gas fired or electrical appliances. During the leak test or your Fire Department. LP Gas Model only: Secure a 201b LP Gas Wing Bolt 1!4"xl/2" Qty. 2 Part # S233G0408A (Already installed on - Kenmore SI3209ZA | Use and Care Guide - Page 17
Gas Model only Regulator with Hose (LPG) / LP Gas Tank / CAUTION: When the appliance is not in use the gas must be turned off at the tank. Follow these three steps: [] Make a soap solution by mixing one part liquid detergent and one part water. [] Turn the grill Control Knobs to the full OFF - Kenmore SI3209ZA | Use and Care Guide - Page 18
Check that the end of each Burner Tube is properly located over each Valve Orifice 1. Remove the Drawer and the Grease Draining Tray. I R / ,/ Push LEVER down on right side and up on left side to unlock Air shutter /- View from under the grill head If you have a gas leak that cannot be repaired - Kenmore SI3209ZA | Use and Care Guide - Page 19
do not use your grill before replacing the hose with an authorized part from the Parts List. Also make sure all gas supply connections are securely tightened. 2. Familiarize yourself with the safety and Use and Care instructions in this guide. Do not smoke while lighting grill or checking gas supply - Kenmore SI3209ZA | Use and Care Guide - Page 20
the Burner Tubes and Burners according to the cleaning instructions in this Use and Care Guide. Knob(s) and gas source OFF and conduct a guide. If ingonitiloenakdsoeasrenodtetoecccteudr , inw5aist e5conmdisn,utetusrnfothr eaCnyontgraosl to clear and repeat the lighting procedure. Troubleshooting - Kenmore SI3209ZA | Use and Care Guide - Page 21
ROTISSERIE USE Read all instructions before initial use. IMPORTANT: When using electrical appliances, basic safety precautions before putting on or taking off parts. 3. Do not operate any outdoor cooking gas appliance with a damaged cord, plug, or after the appliance malfunctions or has been damaged - Kenmore SI3209ZA | Use and Care Guide - Page 22
. illllllllllllllllll/ Rot. Screw #10-24x3/4" UNC x2 Outside of Left Grill Bowl Panel Rot. Washer x2 Washer J_--- / / #10-24 Nut /- Rot. Nut #10-24 x2 / / Rot. Screw#10-24x3/4" UNC with washers and nuts Motor / / / l Bracket , Slide the Spit through the piece of meat or poultry - Kenmore SI3209ZA | Use and Care Guide - Page 23
4. Installthe AC (alternatingcurrent)RotisserieMotorontothe MotorBracketas shownbelow.Be sure the Motorattachesto the Bracketwith the electricalcord down.This installationinsuresthat once the Spit is insertedinto the Motorit will also rest securelyinto the slot of your grill bowl. Rotisserie Motor - Kenmore SI3209ZA | Use and Care Guide - Page 24
To start the refrigerator, turn the temperature control to the position corresponding to the desired cooling. The refrigerator temperature will vary or serviceman if the grounding instructions are not completely understood, or if doubt exists as to whether the appliance is properly grounded. Use - Kenmore SI3209ZA | Use and Care Guide - Page 25
smoke from cooking and machine oils used in the each grill use. Remove any grease and wash with a mild soap and warm water neccessary. Refer to the Parts List in this Use and Care Guide. 4. Remove and clean the grain. Failure to complywith these instructions could result in a fire or explosion - Kenmore SI3209ZA | Use and Care Guide - Page 26
or a mild soap suds solution, or some mild detergent. Wash drip tray and glide out shelves in a mild detergent solution damp cloth and some mild detergent or appliance cleaner. Vacation Time For short vacation them in the refrigerator. If you have any problem with the refrigerator. Please call the - Kenmore SI3209ZA | Use and Care Guide - Page 27
To reduce the chance of FLASHBACK FIRE you must clean the Burner Tubes as follows at least once a month in summer and fall or whenever spiders are active in your area, and if your grill has not been used for an extended period of time. 1. Turn all Burner Valves to the full OFF position. 2. Turn the - Kenmore SI3209ZA | Use and Care Guide - Page 28
longer than five minutes may damage certain parts of your grill. Do not leave your alike, we offer this guide as a convenience. We A-1 Failure to comply with these instructions could result in a fire or pilot lights on water heaters and live electrical appliances. Never use your gas grill in a - Kenmore SI3209ZA | Use and Care Guide - Page 29
. Raise lid and turn Burners to MEDIUM heat. Place fish (skin down) on grill and cook over direct heat until done. Use cooking time as a guide or until fish is opaque but still moist. Whole fish Whole fish fillets 10 - 12 minutes per pound or until fish is opaque Smaller Fish - Kenmore SI3209ZA | Use and Care Guide - Page 30
and poultry. • Preheat the Burner properly. • Clean the Burner regularly to remove food and grease build-up. See Burner Tube cleaning instructions in this manual. • Reposition your food often and consider moving the seared meat to the primary grilling area to finish cooking. Searing Steak and Ribs - Kenmore SI3209ZA | Use and Care Guide - Page 31
moist during roasting is to put water in a cooking pan, then cover with foil. The foil should be removed for the first or the last part of the cooking time to ensure proper browning. Tips for roasting Except when roasting with water in a roasting pan, the juices that collect in the - Kenmore SI3209ZA | Use and Care Guide - Page 32
of wood chips available for use in smoking grilled foods. Pre-soaking of wood chips may be required so read and follow the manufacturers instructions for preparing smoking chips prior to use. Note: It is our experience that many smoking chip products do not actually produce a smoke but instead - Kenmore SI3209ZA | Use and Care Guide - Page 33
Kenmore Premium or Kenmore Elite grill as an outdoor kitchen. Not all locations carry all items. Accessory fit will vary by grill model Grill Information Center if you have any problem with this product. We can help or if there are damaged or missing parts when you unpack this unit from the shipping - Kenmore SI3209ZA | Use and Care Guide - Page 34
by the regulator's Are the serial and model numbers of my grill listed excess gas flow silver Lighting Stick and follow the Manual Grill Lighting Instructions. Then, light the match and including pilot lights on water heaters and live electrical appliances. [] Never use your gas grill in a garage - Kenmore SI3209ZA | Use and Care Guide - Page 35
U.S. Government regulates gas appliances and LP Gas tanks. What causes grill parts to rust and what and machine models called Stainless Clad Therma-Core c_.This Cooking Grid combines a heat conducting steel core with an easy-to-clean stainless outer shell. You may also review FAQ's, Troubleshooting - Kenmore SI3209ZA | Use and Care Guide - Page 36
support from a Sears representative. Think of us as a "talking Use and Care Guide." Once you purchase the Repair Protection Agreement, a simple phone call is all that it takes for you to schedule service Sears Installation Service For Sears professional installation of home appliances, garage door - Kenmore SI3209ZA | Use and Care Guide - Page 37
del ensamblaje y operacion de la parrilla, o si hay da5os o partes que faltan cuando desempaca esta unidad de la caja de envio. Favor, usted u otra persona hayan ensamblado esta parriIla, usted debe leer el manual por entero antes de usarta para asegurarse que Ia parriIla este correctamente - Kenmore SI3209ZA | Use and Care Guide - Page 38
Guia para cocinar A1-A5 • Preguntas frecuentes A7-A8 Garantia completa del Kenmore Elite Si esta parrilla falla en funcionar debido a un defecto en el material los gastos de mano de obra para instalarlo. Garantia Limitada en partes selectas de la parrilla Durante los tres a_os siguientes a la fecha - Kenmore SI3209ZA | Use and Care Guide - Page 39
por Io menos y si su parrilIa n, de tiempo proIongado. iar los antes aga esto y oto_o, por un periodo 1. Retire el tornilIo de Ia parte trasera de cada fog6n usando un destorniIIador de cabeza de Phillips. 2. Levante cada fog6n hacia arriba aIejandoIo cuidadosamente deI orificio de Ia valvuIa de - Kenmore SI3209ZA | Use and Care Guide - Page 40
11 12_ 7_ IO 16 22 64 24. 25 34 \ _35 30. 36 29. 69. 47 29_ 41 ...._ 48 $2 49 - Kenmore SI3209ZA | Use and Care Guide - Page 41
10 22 11,_. 46 .\ 32 12 19 13\ \\_31 15 39 ./ 27 38 36 _\29 44 37 - Kenmore SI3209ZA | Use and Care Guide - Page 42
12 - Kenmore SI3209ZA | Use and Care Guide - Page 43
44 Panel de Ia carreta, frontal 45 Marco de panel de carro, frontal 46 Armaz6n de Ia carreta PARTE # P001472134 P00205069M P06801028A P055180021 P00410039C P00601287C P00614027C P01507020G P01604031B P01604013B P01615030F P017080364 P020080324 P0071339B4 P069020184 P033280154 P033280174 P069060454 - Kenmore SI3209ZA | Use and Care Guide - Page 44
63 64 65 66 67 68 69 70 71 72 73 DESCRIPClON DE LAS PARTES Panel de la carreta, izquierdo Panel de la carreta, derecho Panel de la panel Cobertor Ensam bte det rotisor Guia para el uso y cuidado CO DESCRIPClON DE LAS PARTES 1 Tapa 2 Soporte de la tapa, izquierdo 3 Soporte de la tapa, derecho - Kenmore SI3209ZA | Use and Care Guide - Page 45
de plancha 46 Tapa protectora 47 Cables et6ctricos, 1-contactos 48 Cables et6ctricos 49 Encaje det gas PARTE # P029056061 P01304014D P01305020D P01319002D P02718047B P00213021M P05354002A P02721042B P03245001G P03426353J P05504021A P03413011J P07621013D P07620020D P03344014D P03344016D P03344015D - Kenmore SI3209ZA | Use and Care Guide - Page 46
3. Descripci6n de Ia parte 4. Cantidad de partes requeridas Importante: S6Io use partes autorizadas por Ia fabrica. El uso de cuaIquier parte que no sea autorizada puede ser peligroso y Ie anulara Ia garantia deI producto. Mantenga el Manual de Operaci6n en un Iugar conveniente para su referencia - Kenmore SI3209ZA | Use and Care Guide - Page 47
Motor deI rotisor 8. Rot. TornilIo #10-24x3/4" UNC 9. Rot. Arandela simple 10. Rot. Nut #10-24 3 #DE PARTE P05508167F S196G04084 P05508168F P05508175F P05508169F P03307010A P07101045A S112G10124 S411 G03084 S362G10124 I _J UNIDADES 1 3 1 1 2 1 1 2 2 2 / [Illlllllllllllllll Rot. TornilIo - Kenmore SI3209ZA | Use and Care Guide - Page 48
Conjunto de montaje de la isla [] Abra las dos cajas y saque todo el material de embajale. [] Abra la tapa de la barbacoa y la puerta de la nevera y saque los materiales de embalaje. [] Alinee los 3 componentes individuales y col6quelos conjuntamente como se indic& [] AsegQrese de sujetar el - Kenmore SI3209ZA | Use and Care Guide - Page 49
Incluido en el embalaje de la Guia de Uso y Cuidados.) // / / /' / / Saque el cable de la nevera [] Desenrosque Ia ptaca de embelIecedor de Ia parte trasera deI equipo de isla, y saque el cable deI refrigerador. [] Vuelva a instalar Ia ptaca de embelIecedor en el equipo de isla. [] Conecte el cable - Kenmore SI3209ZA | Use and Care Guide - Page 50
Difusores de calo de cercSmica. []Coloque Ia bandeja de cocci6n secundaria dentro de los agujeros sobre Ia parte superior izquierda y derecha de Ia estructura deI quemador posterior con Ia parte inferior descansando sobre Ias ranuras de cualquiera de los Iados deI boI deI grill. [] Ponga Ia ptancha - Kenmore SI3209ZA | Use and Care Guide - Page 51
y el ensamble de manguera proporcionadas con su parriIla de gas. Sustitucibn de reguladores y ensambles de manguera deben ser los especificados por Kenmore. Vea Ia Iista de partes. [] Haga que su comerciante de gas LP inspeccione Ia valvuIa de niveI de gas despues de cada IIenado y que Ie asegure - Kenmore SI3209ZA | Use and Care Guide - Page 52
ala deI soporte derecho deI espacio para el dep6sito. [] Ponga el dep6sito de gas LP en el espacio para el dep6sito. Aseg0rese de que Ia parte inferior deI dep6sito descanse por compteto en el estante inferior. [] Instale el tanque de manera que Ia valvula deI tanque mire hacia Ia esquina derecha - Kenmore SI3209ZA | Use and Care Guide - Page 53
de gas LP, Asegerese que no hayan escapes de gas. Siga estos tres pasos: [] Haga una soluci6n de jab6n mezclando detergente Iiquido con agua una parte jabon: a una de agua. [] Gire Ias periIIas de Control deI fog6n por compteto a Ia posici6n OFF, Iuego encienda el gas (ON) en su punto de - Kenmore SI3209ZA | Use and Care Guide - Page 54
del aired/i T /) / / // Presionar la PALANCA abajo en el lado derecho y arriba en el lado izquierdo para abrir. Obturador f del aire Vista desde debajo de la parte superior de la barbacoa Si usted tiene un escape de gas que no se puede reparar apretando Ia tuerca, cierre el gas en su punto - Kenmore SI3209ZA | Use and Care Guide - Page 55
nuevo a Hi a y gire la valvula del tanque DESPACIO otro 1/4 de vuelta. Instrucciones de encendido del fog6n para asado 1. Siga los pasos 1 a 3 del manual de instrucciones de encendido del Grill. 2. Abra la tapa del fog6n lateral de plancha. 3. Empuje y gire las perillas de control a OFF y gire la - Kenmore SI3209ZA | Use and Care Guide - Page 56
cuerpo a una distancia segura (al menos 18 pulgadas -46 cm-) de Ia parte delantera de Ia barbacoa cuando encienda Ia barbacoa con cerilIas. Si ocurriese un el tubo det fog6n usando el procedimiento en Ia pagina 27 deI manual de Operaci6n. [] Mala aliniaci6n deI encendedor sobre et fog6n Correccion: - Kenmore SI3209ZA | Use and Care Guide - Page 57
para manejar el rotisor. Desenchufe el rotisor deI tomacorrientes cuando no esta en uso o antes de Iimpiarto. Deje que se enfrie antes de remover Ias partes. Cuando va a cocinar con el rotisor coloque un recipiente de metal debajo de Ia comida para capturar Ia grasa y mantener Ia parrilIa Iibre de - Kenmore SI3209ZA | Use and Care Guide - Page 58
1. Removetrodaslaspartesdelcart6ndeenvio. 2. Adjunteel soportedel motoral exteriordel panelizquierdodel taz6nde la parrilla. Alinielos dos agujerosdel soporteconlos hoyosenrroscadosobreel taz6nde la parrilla.Aj6stelobienapretado usandodostornillos10o24x3/4U"NCy arandelas. ! i[1111111111111111 Rot. - Kenmore SI3209ZA | Use and Care Guide - Page 59
, Instale el Motor del rotisor de (corriente alterna) AC al soporte del motor como se muestra abajo. AsegQrese que el motor est6 adjunto al soporte con el cable el6ctrico hacia abajo. Esta instalaci6n asegura que cuando la brocheta ha sido insertada dentro del motor tambi6n se apoyara con seguridad - Kenmore SI3209ZA | Use and Care Guide - Page 60
Esteaparatodebe tenertoma de tierra.Si se produceun cortocircuitol,a tomade tierra reduceel riesgode electrocuci6pnroporcionando un cablede salidaparala corrienteel6ctrica. Esteaparatotieneun cablecon hilo paratierra y un enchufecon toma de tierra. El enchufe debeconectarsea unatoma adecuadamente - Kenmore SI3209ZA | Use and Care Guide - Page 61
. Inspeccione la manguera y ensamble del regulador por grietas, cortadas o cualquier otro daSo, y reemplaze como sea necesario. Consulte la lista de partes en este Manual de operaci6n. 4. Retire y limpie los difusores de calor, rejas para asar y fogones de la parrilla. 5. Cubra cada orificio de la - Kenmore SI3209ZA | Use and Care Guide - Page 62
envolverse individualmente y ponerse en un plato de almacenamiento. Envuelva el pescado y las aves en papel de aluminio o papel encerado fuerte. La mayor parte del pescado debe usarse el mismo dia de la compra. Las carnes embaladas, como el jam6n, bac6n, carne seca o salchichas, se guardan mejor - Kenmore SI3209ZA | Use and Care Guide - Page 63
de gas LP. 4. Remueva de su parrilIa Ias rejas de cocinar, los difusores de calory Ias bandejas para Ia grasa 5. Remueva el torniIIo en la parte de atras de cada fog6n usando un destorniIIador con cabeza Phillips. 6. Levante con cuidado cada fog6n y alejelos deI orificio de Ia valvula de gas - Kenmore SI3209ZA | Use and Care Guide - Page 64
be open if the burner is lit. ADVERTENClA: Si opera TODOS los fogones principaIes en Hi por mas de 5 minutos puede causarte dafio a ciertas partes de su parriIIa. No descuide su parriIIa cuando esta en uso. Preheating [] Para precalentar los fogones principales, encienda su parriIIa en Hi, baje Ia - Kenmore SI3209ZA | Use and Care Guide - Page 65
Asando Bistecs y costillas Gire el control de los fogones a Hi, cierre Ia tapa y precaIiente su parriIIa entre 3 y 5 minutos. Abra Ia tapa y coIoque Ia carne sobre Ias rejas directamente por encima deI fog6n encendido. Cocine Ia carne en ambos Iados hasta que se dore. Reduzca el caIor a MEDIO y - Kenmore SI3209ZA | Use and Care Guide - Page 66
el grill regularmente para quitar los alimentos y grasa incorporados. Consulte Ias instrucciones de Iimpieza deI tubo de quemador en este manual • Cambie de posici6n los alimentos para evitar Ias continuas llamas. Tostando bistec y costillas. Gire el quemador infrarrojo a Hi y precalientelo durante - Kenmore SI3209ZA | Use and Care Guide - Page 67
Una nota importante sobre el calor deseado Los ajustes de calor indicados son aproximados. Hay muchos factores como Ia temperatura exterior, Ias condiciones de viento y Ia ubicacidn de Ia parriIIa afectan el rendimiento de su parriIIa. Ofrecemos Ias indicaciones de caIor como un mecanismo QtiI, pero - Kenmore SI3209ZA | Use and Care Guide - Page 68
de estas posiciones. Despues de esta prueba puede coIocarta Ia brocheta en su parriIIa. Preparacion de comida Cuando esta preparando aves, amarre bien todas Ias partes contra el cuerpo deI ave, de taI manera que parezca una bola. Jale Ia pieI deI cuelIo y usando una brocheta pequeSa, amarreIa a Ia - Kenmore SI3209ZA | Use and Care Guide - Page 69
estufa al aire libre, ya sean tas parrilIas Premium de Kenmore o Elite de Kenmore. No todos los elementos estan disponibtes en todos los Iugares.EI con sus preguntas sobre el ensambtaje y operaci6n de Ia parrilIa o si hay partes dafiadas o que faltan aI desempacar Ia unidad de Ia caja de envio. Por - Kenmore SI3209ZA | Use and Care Guide - Page 70
per escapes de gas como se indica en la Secci6n de Use y Cuidado de este manual. 3. Si no encuentra escapes de gas espere 5 minutos y vueIva a tratar de y cuerpo a una distancia segura (aI menos 18 pulgadas) de Ia parte delantera de Ia barbacoa cuando encienda Ia barbacoa con cerilIas. [] Nunca use - Kenmore SI3209ZA | Use and Care Guide - Page 71
la parrilla y que efecto tienen? Respuesta: El herrumbre es un proceso natural y puede aparecer en partes de hierro fundido y de acero inoxidabte las partes no afectaran Ia operaci6n de tiempo corto de su parrilIa. Para reducir el proceso de oxidaci6n en Ias rejas para cocinar en (modelos selectos - Kenmore SI3209ZA | Use and Care Guide - Page 72
por hacer una compra tan inteligente. Su nuevo producto Kenmore ® esta disefiado y fabricado para tener afios de una por uno de nuestos 10,000 especiaIistas en reparos. [] Servicio sin Iimites con partes y labor gratis para todas Ias reparaciones que estan cubiertas. [] Reemptazo de producto - Kenmore SI3209ZA | Use and Care Guide - Page 73
appliances lawn and garden equ_#ment, or heating and coo_ing system& no matter who made it, no ma_er who sold it[ Fo_ the replacement pa_s, accessories and owner's manuals _w,sears,_a To purchase a protection agreement oa a product serviced by Sears: 1-800-827-6655 (U.S.A,) 1-800-36t-6665 (
-
 1
1 -
 2
2 -
 3
3 -
 4
4 -
 5
5 -
 6
6 -
 7
7 -
8
-
9
-
10
-
11
-
12
-
13
-
14
-
15
-
16
-
17
-
18
-
19
-
20
-
21
-
22
-
23
-
24
-
25
-
26
-
27
-
28
-
29
-
30
-
31
-
32
-
33
-
34
-
35
-
36
-
37
-
38
-
39
-
40
-
41
-
42
-
43
-
44
-
45
-
46
-
47
-
48
-
49
-
50
-
51
-
52
-
53
-
54
-
55
-
56
-
57
-
58
-
59
-
60
-
61
-
62
-
63
-
64
-
65
-
66
-
67
-
68
-
69
-
70
-
71
-
72
-
73
 |
 |

Use and Care Guide
E
L
I
T
E
Liquid Propane Gas (LPG) Grill Island
Model 141.16688800 & 141.16689800
_®
• Safety
• Assembly
• Use and Care
• Cooking
Guide
• Frequently
Asked
Questions
Call
us first
if you have any problem
with
this
product.
We
can help you with
ques-
tions about
assembly
and grill operation
or
if there
are
damaged
or
missing
parts
when
you unpack
this unit from
the ship-
ping
box.
Please
call
before
contacting
your
local
retailer.
1- 888-317-7642
8am-8pm
CST,
Monday
throu,qh
Friday
•
NOTE TO ASSEMBLER/INSTALLER:
Leave this guide with the consumer.
•
NOTETOCONSUMER:
Keep this guide for future reference.
•
RECORDYOURSERIAL#
(see silver CSA label on main body of grill)
•
Failure to comply with these instructions
could
result
in a fire
or explosion
that could cause
serious bodily injury, death or property damage.
•
Whether
this grill
was
assembled
by you or
someone else, you must read this entire manual
before
using
your
grill
to ensure
the grill
is
properly assembled,
installed and maintained.
•
Use your grill at least 3
feet
away
from
any
wall or surface.
Use your
grill at
least 3
feet
away from combustible
objects that can melt or
catch fire
such as vinyl or wood siding, fences
and overhangs
or sources of ignition including
pilot lights on water heaters and live electrical
appliances.
•
THIS GASAPPLIANCE IS DESIGNED FOROUT-
DOOR USE ONLY.
•
Never
use your gas grill
in a garage,
porch,
shed, breezeway
or any other enclosed
area.
•
Never
obstruct
the flow
of
ventilation
air
around
your
gas grill
housing.
•
Never
disconnect
the gas regulator or any gas
fitting while your grill is lit. A lit grill can ignite
leaking gas and cause a fire or explosion
which
could result in property damage,
personal injury
or death.
Guide # P80136006Y - Date:2014/05/26
Sears,
Roebuck
and
Co.,
Hoffman
Estates,
IL
60179,
USA
www.sears.com