Kenwood CMOS-300 Instruction Manual
Kenwood CMOS-300 Manual
 |
UPC - 019048189233
View all Kenwood CMOS-300 manuals
Add to My Manuals
Save this manual to your list of manuals |
Kenwood CMOS-300 manual content summary:
- Kenwood CMOS-300 | Instruction Manual - Page 1
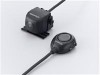
CMOS-300 CMOS-200 UNIVERSAL MULTI-VIEW CAMERA/ UNIVERSAL REAR VIEW CAMERA INSTRUCTION MANUAL CAMÉRA MULTI-VUES UNIVERSELLE/ CAMÉRA DE RECUL UNIVERSELLE MODE D'EMPLOI UNIVERSAL MULTIVIEW-KAMERA/ UNIVERSAL RÜCKFAHRKAMERA BEDIENUNGSANLEITUNG UNIVERSELE MULTIVIEWCAMERA/ UNIVERSELE ACHTERUITRIJCAMERA - Kenwood CMOS-300 | Instruction Manual - Page 2
is a rear view camera for checking the view at the rear of a car. • A rear view camera is a camera that provides symmetrical images in the same way as rear and side view mirrors. • Connection to a TV with an RCA video input is possible, but confirm whether the TV you use has a reverse gear connection - Kenwood CMOS-300 | Instruction Manual - Page 3
. • May result in the rear view camera falling off. - Do not apply water to the unit. - Do not expose the unit to rain. - Do not subject the camera to unnecessary force. - Thoroughly clean where tape is used for sticking on the unit. • Refer to the Instruction's manual for details on connecting the - Kenwood CMOS-300 | Instruction Manual - Page 4
at the top. 6 Fix the camera temporarily with tape, etc. Using a piece of tape, etc., fix the camera temporarily and adjust the angles so that the rear end of the vehicle can be viewed. 12-34 Mount so that the "KENWOOD" logo appears at the top. The CMOS-300 should be installed at a height of 55 cm - Kenwood CMOS-300 | Instruction Manual - Page 5
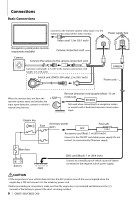
visible at the bottom of the monitor screen. Installing the Power Supply Box 1 Attach double-side adhesive tape on the power supply box and then attach it under the carpet on the front passenger seat side. Vehicle rear part or bumper When adjusting the camera angle, be careful not to stretch the - Kenwood CMOS-300 | Instruction Manual - Page 6
unit (CMOS-300 only): 2 m (78.7 inch) CAMERA CAMERA Power cord When the monitor does not have the rearview camera input and switches the input upon detection, connect to vehicle's reverse lamp harness. Reverse detection cord (purple/white): 10 cm (3.94 inch) REVERSE Not used when connecting - Kenwood CMOS-300 | Instruction Manual - Page 7
the display view and adjust the camera as well. • When using two CMOS-300 units (for the front and rear), it is required to set an ID for the front camera. For details, see "Camera ID Setting" (page 13). • Connect the power supply in the same way as "Basic Connections". The reverse detection cord - Kenwood CMOS-300 | Instruction Manual - Page 8
not cause nuisance to other people. 8 | CMOS-300/CMOS-200 Use the + or - button to select an item and press the view button to enter the selection. • When using the camera as the rearview camera, select [OK]. • When using the camera as the front camera, select [Switch to Normal Image Display] and - Kenwood CMOS-300 | Instruction Manual - Page 9
corresponding to the center line of the vehicle. Overhead View Image Adjustment (Right-and-Left Angle) This item adjusts the horizontal angle (in the rotary direction) of the camera installation position. 1 Select "OVERHEAD VIEW IMAGE ADJUSTMENT (Right-and-Left ANGLE)". Adjustment is possible by - Kenwood CMOS-300 | Instruction Manual - Page 10
Camera Setting (CMOS-300 only) Overhead View Image Adjustment (Up-and-Down Angle) This item adjusts the vertical angle (inclination) of the camera installation position. 1 Select "OVERHEAD VIEW IMAGE ADJUSTMENT (Up-and-Down ANGLE)". 2 Press the + or - button of the switch unit so that the lines - Kenwood CMOS-300 | Instruction Manual - Page 11
completing the adjustment, press the view button. Advances to "WIDE VIEW GUIDELINE ADJUSTMENT (Red Line Position Setting)." Wide View Guideline Adjustment (Red Line Position Setting) This item adjusts the position of the red line displayed in the wide view. The red line can be used independently to - Kenwood CMOS-300 | Instruction Manual - Page 12
Camera Setting (CMOS-300 only) Overhead View Guideline Adjustment (Size) This item adjusts the overall size of the guidelines displayed in the overhead view. 1 Select "OVERHEAD VIEW GUIDELINE ADJUSTMENT (Size)". 2 Press the + or - button of the switch unit to adjust the size. 3 After completing - Kenwood CMOS-300 | Instruction Manual - Page 13
until the edge of your vehicle's bumper. Camera ID Setting When connecting two CMOS-300 units to a Kenwood navigation system equipped etc. with the camera control function, it is required to assign different camera IDs to the 2 cameras. The camera IDs of both cameras have been set to ID1 at the - Kenwood CMOS-300 | Instruction Manual - Page 14
of about 190°. Corner View The views seen from the two corners of vehicle are displayed on the left and right halves of the screen. Wide View Camera image covering a horizontal angle of about 135°. Overhead View Image seen from the viewpoint straight up above the vehicle. 14 | CMOS-300/CMOS-200 - Kenwood CMOS-300 | Instruction Manual - Page 15
Specifications Camera Unit (CMOS-300) Output video : Wide-angle mirror image (for rearview)/wideangle normal image (for front view) Sensor: 1/4-inch color CMOS sensor Number of pixels: Approx. 310,000 pixels Lens : Wide angle, focal length f=0.82mm, F value 2.6 Angles of view : Horizontal: Approx.
-
 1
1 -
 2
2 -
 3
3 -
 4
4 -
 5
5 -
 6
6 -
 7
7 -
8
-
9
-
10
-
11
-
12
-
13
-
14
-
15
 |
 |

CMOS-300
CMOS-200
UNIVERSAL MULTI-VIEW CAMERA/ UNIVERSAL REAR VIEW CAMERA
INSTRUCTION MANUAL
CAMÉRA MULTI-VUES UNIVERSELLE/ CAMÉRA DE RECUL UNIVERSELLE
MODE D’EMPLOI
UNIVERSAL MULTIVIEW-KAMERA/ UNIVERSAL RÜCKFAHRKAMERA
BEDIENUNGSANLEITUNG
UNIVERSELE MULTIVIEWCAMERA/ UNIVERSELE ACHTERUITRIJCAMERA
GEBRUIKSAANWIJZING
TELECAMERA MULTIVISIONE UNIVERSALE/ TELECAMERA PER RETROMARCIA UNIVERSALE
ISTRUZIONI PER L’USO
CÁMARA DE MULTIVISIÓN UNIVERSAL/ CÁMARA DE VISTA TRASERA UNIVERSAL
MANUAL DE INSTRUCCIONES
CÂMARA MULTIVISÃO UNIVERSAL/ CÂMARA TRASEIRA UNIVERSAL
MANUAL DE INSTRUÇÕES
©
B64-4756-18/01 (W)
Take the time to read through this instruction manual.
Familiarity with installation and operation procedures will help you obtain the best
performance from your new Universal Camera.
For your records
Record the serial number, found on the back of the unit, in the spaces designated on the
warranty card, and in the space provided
below. Refer to the model and serial numbers
whenever you call upon your Kenwood dealer for information or service on the product.
Model CMOS-300/CMOS-200
Serial number
US Residence Only
Register Online
Register your Kenwood product at
www.Kenwoodusa.com