Kenwood DDX318 Installation Manual
Kenwood DDX318 Manual
 |
UPC - 019048192561
View all Kenwood DDX318 manuals
Add to My Manuals
Save this manual to your list of manuals |
Kenwood DDX318 manual content summary:
- Kenwood DDX318 | Installation Manual - Page 1
DDX418 DDX4048BT DDX318 DDX3048 MONITOR WITH DVD RECEIVER INSTALLATION MANUAL MONITEUR AVEC RÉCEPTEUR DVD MANUEL D'INSTALLATION MONITOR CON RECEPTOR DVD MANUAL DE INSTALACIÓN © 2010 Kenwood Corporation All Rights Reserved. LVT2199-005A (KN/RN) - Kenwood DDX318 | Installation Manual - Page 2
wiring harness. 4 Connect the wiring harness wires in the following order: ground, battery, ignition. 5 Connect the wiring harness connector to the unit. 6 Install the unit in your car. 7 Reconnect the - battery. 8 Press the reset button. 9 Perform the Initial Setup. (Refer to the Instruction Manual - Kenwood DDX318 | Installation Manual - Page 3
you share the wires or ground them to any metal part in the car. • When only DDX418/ DDX4048BT only • Install the Bluetooth adaptor (KS-UBT1) besides the place enclosed by the metal. Bluetooth adaptor (KS-UBT1) ¤ CAUTION Install this unit in the console of your vehicle. Do not touch the metal part - Kenwood DDX318 | Installation Manual - Page 4
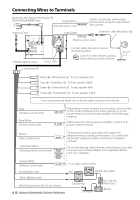
Wires to Terminals Bluetooth Microphone (Accessory 7) DDX418/DDX4048BT only Purple/White (Reverse sensor wire) Antenna Cord Light Green Connect to vehicle's reverse lamp harness when using the optional rear view camera. Extension cable (Accessory 2) (Parking sensor wire) FM/AM antenna input - Kenwood DDX318 | Installation Manual - Page 5
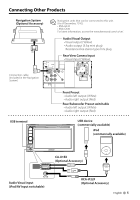
): • KNA-G610 • KNA-G630 For latest information, access the www.kenwood.com/cs/ce/. Audio/Visual Output • Visual output (Yellow) • Audio output (3.5φ mini plug) Resistance-free stereo type mini plug Rear View Camera Input • Visual input (Yellow) Connection cable (Included in the Navigation System - Kenwood DDX318 | Installation Manual - Page 6
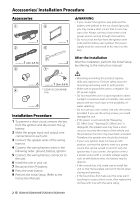
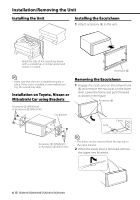
Make sure that the unit is installed securely in place. If the unit is unstable, it may malfunction (eg, the sound may skip). Installation on Toyota, Nissan or Mitsubishi Car using Brackets Accessory 3 (M5x6mm) or Accessory 4 (M5x7mm) Car Bracket Accessory 5 Removing the Escutcheon 1 Engage the - Kenwood DDX318 | Installation Manual - Page 7
the inside. Installing the Microphone Unit (DDX418/DDX4048BT only) 1 Check the installation position of the microphone (accessory 7). 2 Remove oil and other dirt from the installation surface. 3 Install the microphone. 4 Wire the microphone cable up to the unit with it secured at several positions - Kenwood DDX318 | Installation Manual - Page 8
doit parvenir aux câbles par le biais du fusible. ..........1 (2m: 6,5 ft) 3 7*1 ..........2 Après l'installation Après l'installation, effectuez la première mise en service en suivant les instructions du mode d'emploi. ..........6 ..........1 (3m: 9,8 ft) 4 *1 DDX418/ DDX4048BT uniquement - Kenwood DDX318 | Installation Manual - Page 9
de la température interne et provoquerait une panne. Ventilateur de refroidissement DDX418/ DDX4048BT uniquement • Installez l'adaptateur Bluetooth (KS-UBT1) prêt de l'emplacement de l'enveloppe métallique. Adaptateur Bluetooth (KS-UBT1) ¤ ATTENTION Installez cette unité dans la console de votre - Kenwood DDX318 | Installation Manual - Page 10
bles aux bornes Microphone Bluetooth (accessoire 7) DDX418/ (Pour connecter le système de navigation Kenwood, consultez le manuel du système de navigation.) Pour utiliser la fonction de télécommande 10 DDX418/DDX4048BT/DDX318/DDX3048 Boîte à fusibles de la voiture (Fusible principal) Batterie - Kenwood DDX318 | Installation Manual - Page 11
autres produits Système de navigation (Accessoire en option) ⁄ Systèmes de navigation pouvant être connectés à cet appareil. (En date de décembre 2010) : • KNA-G610 • KNA-G630 Pour consultez les informations les plus récentes, veuillez vous rendre sur le site www.kenwood.com/cs/ce/. Sortie audio - Kenwood DDX318 | Installation Manual - Page 12
par ex., le son pourrait sauter). Installation sur les véhicules Toyota, Nissan ou Mitsubishi avec des supports Accessoire 3 (M5x6mm) ou Accessoire 4 (M5x7mm) Support pour voiture Accessoire 5 Pour retirer rieure est retirée, retirez les deux crochets supérieurs. 12 DDX418/DDX4048BT/DDX318/DDX3048 - Kenwood DDX318 | Installation Manual - Page 13
en appuyant vers l'intérieur. Pour installer le microphone (DDX418/DDX4048BT uniquement) 1 Vérifiez de l'emplacement de l'installation du microphone (accessoire 7). 2 Ôtez Détachez la pellicule papier du ruban adhésif double-face pour fixer à l'endroit indiqué ci-dessus. Ajustez l'orientation du microphone vers - Kenwood DDX318 | Installation Manual - Page 14
cables a la unidad. 6 Instale la unidad en el automóvil. 7 Vuelva a conectar la batería -. 8 Pulse el botón Reset. 9 Realice la configuración inicial. (Consulte el manual alimentación (se muestra "Miswiring DC Offset Error", "Warning DC Offset Error"), puede que el cable del altavoz haya sufrido un - Kenwood DDX318 | Installation Manual - Page 15
fusibles, asegúrese primero de que los cables no están en contacto pues pueden DDX418/DDX4048BT • Instale el adaptador de Bluetooth (KS-UBT1) junto al lugar rodeado por el metal. Adaptador de Bluetooth (KS-UBT1) ¤ PRECAUCIÓN Instale esta unidad en la consola de su vehículo. No toque la parte - Kenwood DDX318 | Installation Manual - Page 16
el sistema de navegación Kenwood, consulte el manual de navegación.) Para control de iluminación del automóvil Interruptor de la llave de CCA encendido Amarillo (cable de la batería) Negro (cable de masa) - (al chasis del automóvil) Caja de fusibles del automóvil 16 DDX418/DDX4048BT/DDX318 - Kenwood DDX318 | Installation Manual - Page 17
. (Con fecha de diciembre de 2010): • KNA-G610 • KNA-G630 Para obtener la información más reciente, visite www.kenwood. com/cs/ce/. Salida Audio/Visual • Salida audio (Roja) Dispositivo USB (disponible en el comercio) iPod (disponible en el comercio) CA-U1EX (Accesorio opcional) Entrada de audio - Kenwood DDX318 | Installation Manual - Page 18
. Accesorio 6 Uña de agarre Bloqueo Accesorio 3 (M5x6 mm) o accesorio 4 (M5x7 mm) ⁄ • El marco puede extraerse desde el lado superior del mismo modo. 2 Después de extraer la parte inferior, libere de la misma manera los dos lugares del lado superior. 18 DDX418/DDX4048BT/DDX318/DDX3048 - Kenwood DDX318 | Installation Manual - Page 19
. Instalación de la unidad del micrófono (sólo DDX418/DDX4048BT) 1 Compruebe la posición de instalación del micrófono (accesorio 7). 2 Elimine el aceite y los restos de suciedad de la superficie de instalación. 3 Instale el micrófono. 4 Conecte el cable del micrófono a la unidad de forma segura en - Kenwood DDX318 | Installation Manual - Page 20
-
 1
1 -
 2
2 -
 3
3 -
 4
4 -
 5
5 -
 6
6 -
 7
7 -
8
-
9
-
10
-
11
-
12
-
13
-
14
-
15
-
16
-
17
-
18
-
19
-
20
 |
 |

LVT2199-005A (KN/RN)
© 2010 Kenwood Corporation All Rights Reserved.
DDX418
DDX4048BT
DDX318
DDX3048
MONITOR WITH DVD RECEIVER
INSTALLATION MANUAL
MONITEUR AVEC RÉCEPTEUR DVD
MANUEL D'INSTALLATION
MONITOR CON RECEPTOR DVD
MANUAL DE INSTALACIÓN