Kenwood DDX396 Instruction Manual
Kenwood DDX396 Manual
 |
View all Kenwood DDX396 manuals
Add to My Manuals
Save this manual to your list of manuals |
Kenwood DDX396 manual content summary:
- Kenwood DDX396 | Instruction Manual - Page 1
WITH DVD RECEIVER INSTRUCTION MANUAL ENGLISH DDX396 (Region 1 - DVD Region Code 1 Area) DDX376BT (Region 1 - DVD Region Code 1 Area) DDX276BT (Region 1 - DVD Region Code 1 Area) DDX26BT (Region 1 - DVD Region Code 1 Area) DDX419BT (Region 4 - DVD Region Code 4 Area) This instruction manual is - Kenwood DDX396 | Instruction Manual - Page 2
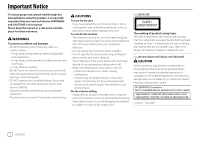
manual. Please keep the manual in a safe and accessible place for future reference. WARNINGS To prevent accidents and damages • DO NOT install any unit or wire danger of hazardous radiation outside the unit. For DDX396/DDX376BT/DDX276BT/DDX26BT: CAUTION Use of controls or adjustments or performance - Kenwood DDX396 | Instruction Manual - Page 3
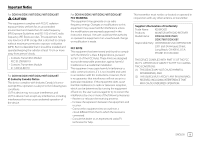
installed and used in accordance with the instructions. However, there is no guarantee that interference will not occur in a particular installation of Conformity Trade Name: KENWOOD Products: MONITOR WITH DVD RECEIVER Model Name: DDX396/DDX376BT/ DDX276BT/DDX26BT Responsible Party: JVCKENWOOD - Kenwood DDX396 | Instruction Manual - Page 4
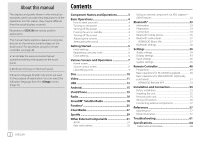
(optionally purchased 51 KENWOOD Remote APP 53 Installation and Connection 53 Before installation 53 Installing the unit 55 Removing the unit 55 Wiring connection 56 Connecting external components 57 References 57 Maintenance 57 More information 57 Troubleshooting 61 Specifications 64 - Kenwood DDX396 | Instruction Manual - Page 5
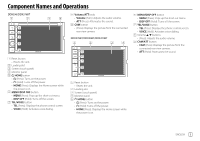
Adjusts the audio volume. • ATT (Press): Attenuates the sound. 9 CAM button • (Press): Displays the picture from the connected rear view camera. DDX276BT/DDX26BT/DDX419BT 1 Reset button • Resets the unit. 2 Loading slot 3 Screen (touch panel) 4 Monitor panel 5 HOME button • (Press): Turns on the - Kenwood DDX396 | Instruction Manual - Page 6
-cut menu. You can adjust the volume (00 to 35) by turning the knob to the right to increase and to the left to decrease. DDX276BT/DDX26BT/DDX419BT You can adjust the volume (00 to 35) by pressing J to increase and pressing K to decrease. • Holding J increases the volume continuously to level - Kenwood DDX396 | Instruction Manual - Page 7
Hold) To cancel attenuation: For DDX396/DDX376BT: Press the same button again. For DDX276BT/DDX26BT/DDX419BT: Press and hold the same button again. Perform the initial settings. Initial Setup Demonstration Language Rear Camera User Customize Viewing Angle ON OFF English Enter Enter Enter Finish - Kenwood DDX396 | Instruction Manual - Page 8
as follows: E.g. Clock settings screen for DDX396 • Radio Data System (Initial): Synchronizes the clock time with FM RBDS. • OFF: Sets the clock manually. Touch [J]/[K] to adjust the hour, then minute. - Touching [Reset] will set the minute to "00". • To delete the last entry, touch - Kenwood DDX396 | Instruction Manual - Page 9
files on a USB device. Plays an iPod/iPhone. Plays an Android device. Plays a Bluetooth audio player. Displays the phone control screen. Switches to an external component connected to the AV the source/option selection screen. *1 Only for DDX396/DDX376BT/DDX276BT/DDX26BT. *2 Only for DDX396/DDX376BT - Kenwood DDX396 | Instruction Manual - Page 10
Various Screens and Operations Source control screen You can perform the playback operation from the source control screen during playback. • The operation keys and information displayed vary depending on the selected source/disc type/file type being played. • If the operation keys are not - Kenwood DDX396 | Instruction Manual - Page 11
from loading slot. [Screen Displays the picture adjustment Adjustment] screen. [Display OFF] Turns off the screen. [Camera] Displays the picture from the connected rear view camera. [SETUP] Displays the screen. [Current Source] Displays the current source control screen. To close - Kenwood DDX396 | Instruction Manual - Page 12
Disc • If a disc does not have a disc menu, all tracks on it will be played repeatedly until you change the source or eject the disc. • For playable disc types, file types and other information, see pages 57 and 58. • If " " appears on the screen, the unit cannot accept the operation you have tried - Kenwood DDX396 | Instruction Manual - Page 13
Disc Video 2 Make the settings. DISC Mode Menu Language English SET Subtitle Language English SET Audio Language English SET Dynamic Range Control Dialog Down Mix Dolby Surround Stereo Screen Ratio 16:9 *1 Select the initial disc menu language. (Initial: English) < - Kenwood DDX396 | Instruction Manual - Page 14
Video Video menu control operations You can display the video menu control during video playback. • Available operation keys differ depend on the selected disc type and file type. Video playback except VCD Menu Control E.g. Video menu control screen for DDX396 Touching the operation keys performs - Kenwood DDX396 | Instruction Manual - Page 15
Video USB 2 [ MENU] Displays the disc menu (DVD). [T MENU] Displays the disc menu (DVD). [Highlight] Switches to the direct disc menu mode. Touch the target item to select. [CUR] Displays the menu/scene selection screen. • [J] [K] [H] [I]: Selects an item. • [Enter]: - Kenwood DDX396 | Instruction Manual - Page 16
USB Playback operations Playback information and key operation • For playback information, see "Source control screen" on page 8. • For key operations on the touch panel, see "Common operation keys on source control screen" on page 8. Selecting the file type to play You can specify the file type to - Kenwood DDX396 | Instruction Manual - Page 17
an Android device This unit supports Android OS 4.1 and above. information, see page 60. • You cannot watch video. Wired connection iPod/iPhone iPod/iPhone 30-pin Lightning model connector device using a media player application installed in the Android device. The source changes to "iPod" and - Kenwood DDX396 | Instruction Manual - Page 18
iPod/iPhone Radio Bluetooth connection Pair the iPod/iPhone with this unit via Bluetooth. (Page 33) Selecting files. Listening to the radio The unit switches to FM alarm scene automatically when receiving an alarm signal from FM broadcast. Playback information on the source control screen Radio - Kenwood DDX396 | Instruction Manual - Page 19
indicator 8 ST/MONO indicator The ST indicator lights up when receiving an FM stereo broadcast with sufficient signal strength. 9 Seek mode (Hold) The local stations with the strongest signals are found and stored automatically. Manual presetting 1 Tune in to a station you want to preset. 2 Select a - Kenwood DDX396 | Instruction Manual - Page 20
To hide the window: Touch [ ]. SiriusXM® Satellite Radio (Only for DDX396/DDX376BT/DDX276BT/DDX26BT) Only SiriusXM® brings you more of what you love to listen to, all Connecting the SiriusXM Connect Vehicle Tuner Perform this installation when you install the unit for the first time. Antenna Rear - Kenwood DDX396 | Instruction Manual - Page 21
SiriusXM® Satellite Radio 1 Displays/hides other available operation keys* 2 Selects the band (SXM1/SXM2/SXM3/SXM4) 3 Channel number 4 Text information • Touching [ ] scrolls the text if not all of the text is shown. • Touching [Song Title]/[Info]/[Category] switches the information. 5 Displays the - Kenwood DDX396 | Instruction Manual - Page 22
up to 60 minutes of audio. • If you change to another channel during playback, the buffered contents will be lost. • The time code is updated every second. 1 Display the operation keys for replay. On the source control screen, touch as follows: 2 Perform the replay operations. SiriusXM To hide the - Kenwood DDX396 | Instruction Manual - Page 23
to the current song/content, touch [SCAN] again. • To exit scanning, touch and hold [SCAN]. Content Alert The unit informs you when receiving the content you are interested in, such as music, information about a sports team, weather and traffic information. Registering items for Contents Alert You - Kenwood DDX396 | Instruction Manual - Page 24
items for Content Alert You can select items (artists/songs/teams) from the registered items on the list to inform you once the unit receives the information. For artists/songs/teams 1 Display the screen. On the source control screen, touch as follows: To delete the - Kenwood DDX396 | Instruction Manual - Page 25
> is set to [ON], then on the source control screen, touch as follows: • When a traffic and weather broadcast for the selected city is received, the unit automatically switches the channel. To deactivate the Content Alert: Touch [ ] again. Switching to registered content When an artist/song/team - Kenwood DDX396 | Instruction Manual - Page 26
24 ENGLISH Parental Lock channel selection This option allows you to manually select the channels to be locked by the parental control feature enter the parental code. Skipping unwanted channels If you do not want to receive some channels, you can skip them. 1 Display the - Kenwood DDX396 | Instruction Manual - Page 27
DDX276BT services may become unavailable. • Some functions of Pandora cannot be operated from this unit. • For issues using the application, contact Pandora at . Preparation Installing the application Your smartphone must has built in Bluetooth Via Bluetooth: Pair the - Kenwood DDX396 | Instruction Manual - Page 28
Playback information and key operation Pandora You can also operate Pandora with optional remote controller, KNA-RCDV331. You can only control play, pause and skip with the remote controller. 1 Displays/hides other available operation keys* 2 Picture data 3 Track information • Touching [ - Kenwood DDX396 | Instruction Manual - Page 29
iHeartRadio (Only for DDX396/DDX376BT/DDX276BT/DDX26BT) iHeartRadio is a free, all-in-one digital radio service that lets you listen to your Store to find and install the most recent version. Connecting the device For Android devices Pair the Android device with this unit via Bluetooth. (Page 33) - Kenwood DDX396 | Instruction Manual - Page 30
keys on source control screen" on page 8. You can also operate iHeartRadio with optional remote controller, KNA-RCDV331. You can only control play, pause and skip with the remote controller. 1 Displays/hides other available operation keys* 2 Picture data 3 Track information • Touching [ - Kenwood DDX396 | Instruction Manual - Page 31
services may become unavailable. • Some functions of Spotify cannot be operated from this unit. • For issues using the application, contact Spotify at . Preparation Installing the application Your smartphone must has built in Bluetooth and the following profiles must be supported - Kenwood DDX396 | Instruction Manual - Page 32
Store to find and install the most recent version. Connecting the device For Android devices Pair the Android device with this unit via Bluetooth. (Page 33) For status 6 Progress bar *1 For DDX396/DDX376BT/DDX276BT/DDX26BT: Purchase optional remote controller, KNA-RCDV331. *2 See "Operation keys - Kenwood DDX396 | Instruction Manual - Page 33
Spotify *3 Not available for tracks in a playlist. *4 Not available for tracks in the Radio. *5 Available only for premium account users. Creating your station (Start Radio) Start Radio is to start a radio channel based on the currently played track. Create your station. On the source control - Kenwood DDX396 | Instruction Manual - Page 34
camera Install the rear view camera (separately purchased) in the appropriate position according to the instructions supplied with the rear view camera. Connecting a rear view camera See page 57 for more information. • To use the rear view camera view camera manually without shifting the gear - Kenwood DDX396 | Instruction Manual - Page 35
book - Dialed calls, received calls, and missed calls (up to 10 entries in total) Preparation Connect and install the microphone beforehand. For details, see page 56. Connection When you connect a Bluetooth device to the unit for the first time: 1 Register the device by pairing the unit and the - Kenwood DDX396 | Instruction Manual - Page 36
to [ON] (page 39), iOS (such as iPhone) devices are automatically paired when connected via USB. Pairing a Bluetooth device using SSP (for Bluetooth 2.1) When the Bluetooth device is compatible with Bluetooth 2.1, a pairing request is sent from the available device. 1 Search for the unit ("DDX3eX - Kenwood DDX396 | Instruction Manual - Page 37
Bluetooth® 2 Select the device (1) you want to connect, then select [Connection] (2). Paired Device is not available while the picture from the rear view camera is displayed. Touching the operation keys performs the following actions DDX276BT/DDX26BT/DDX419BT: Press volume J/K button. ENGLISH 35 - Kenwood DDX396 | Instruction Manual - Page 38
Bluetooth® Making a call 1 Display the phone control screen. On the Home screen, touch as follows: 2 Select a method to make a call. 1 Device Name 1 2 Device Name 2 1234XXXXXX X 1 2 3 4 5 6 7 8 9 * 0/+ # 1 From the call history* (missed calls/received calls/dialed calls) 2 From the - Kenwood DDX396 | Instruction Manual - Page 39
To delete the contact in the preset number: Touch [ ] besides the contact on the preset list. Bluetooth audio player KENWOOD Music Mix When "BT Audio" is selected as the source, you can connect up to five Bluetooth audio devices at the same time. You can easily switch between these five devices by - Kenwood DDX396 | Instruction Manual - Page 40
Device List Enter PIN Code 0000 Device Name DDX3eX Device Address 01:20:03:40:05:60:07 Auto Connect ON OFF Bluetooth HF/Audio Front Only All Display the list of registered devices. You can connect a device or delete registered devices. Change the PIN code - Kenwood DDX396 | Instruction Manual - Page 41
and Bluetooth audio players. • Front Only: Front speakers only. • All (Initial): All speakers. • ON: The unit answers the incoming calls automatically in 5 seconds. • OFF (Initial): The unit does not answer the calls automatically. Answer the calls manually. • ON - Kenwood DDX396 | Instruction Manual - Page 42
Settings Store your own sound adjustments 1 Select a preset sound mode. 2 Select a band (1) and adjust the level (2), then adjust the sound (3). Equalizer SRC Name Preset Natural Q factor 1.5 [dB] +9 +7 +5 +3 0 -3 -5 -7 -9 62.5 100 160 250 400 630 1k 1.6k 2.5k 4k 6.3k 10k 16k [Hz] Bass EXT - Kenwood DDX396 | Instruction Manual - Page 43
Settings - Kenwood DDX396 | Instruction Manual - Page 44
Settings 3 Adjust the crossover frequency of the selected speaker. • Adjustable items vary depending on the selected speaker type/speaker size/crossover settings. / Adjusts the output volume of the tweeter (left/ right). Adjusts the crossover frequency for the - Kenwood DDX396 | Instruction Manual - Page 45
and store the auto-adjustment volume level for each source. If the source is a disc, the adjustment is stored for each of the following categories: • DVD/VCD • CD • DivX*/MPEG1/MPEG2/MP3/WMA/WAV/AAC/FLAC • Auto (Initial): Dims the screen and button illumination when you turn on the - Kenwood DDX396 | Instruction Manual - Page 46
Settings 3 Adjust the image (1), then capture the image (2). • ON (Initial): Activates the display demonstration. • OFF: Deactivates the display demonstration. $BQUVSF $BODFM • ON (Initial): Scrolls the displayed information repeatedly. • Once: Scrolls the displayed - Kenwood DDX396 | Instruction Manual - Page 47
. • OFF (Initial): Select this when no camera is connected. • ON (Initial . (Only for DDX396/DDX376BT/DDX276BT) Configure settings for using the ADS adapter. Language Display Clock Input Smartphone Setup System Bluetooth Setup OEM Setup English Enter Enter Enter - Kenwood DDX396 | Instruction Manual - Page 48
USB 1 Wire Bluetooth OK [USB 1 Wire] [Bluetooth] Select this Bluetooth. (Go to step 3.) If [Android/Other] is selected in step 1: Smartphone Setup Bluetooth (Only for DDX396/DDX376BT/DDX276BT) Get information, and change the settings for using the ADS adapter. Next The - Kenwood DDX396 | Instruction Manual - Page 49
for the unit. (Page 6) (Only for DDX396/DDX376BT/DDX276BT/DDX26BT) Displays the serial number. Adjust the touch as instructed. Touch Panel Adjust • To reset the touch position, touch [Reset]. • To cancel the current operation, touch [Cancel]. - Kenwood DDX396 | Instruction Manual - Page 50
, and retry the update. • For DDX419BT: This unit can be operated using the remote controller (RC-DV340) supplied with this unit. • For DDX396/DDX376BT/DDX276BT/DDX26BT: Optional remote controller KNA-RCDV331 is designed for controlling this unit. Refer to the instruction manual that comes with the - Kenwood DDX396 | Instruction Manual - Page 51
this mode when controlling a selected source or tuner source, etc. • DVD mode: Switch to this mode when playing DVDs or CDs etc. with the player integrated in this unit. • TV mode: Not used. • NAV mode: Not used. • The position of the remote control mode switch is indicated in the title of each mode - Kenwood DDX396 | Instruction Manual - Page 52
Remote Controller DVD/VCD (DVD mode) J/K/H/I S/T I/W o 0 - 9 MODE/TOP MENU FNC/PBC/ MENU SUBTITLE ZOOM ANGLE AUTO2, MANU). • Specifies preset number. (1-5) • Specifies the frequency of the station to receive to search for in direct search. Enters direct search mode. * The search method differs - Kenwood DDX396 | Instruction Manual - Page 53
Remote Controller Basic operations for KNA-RCDV331 (optionally purchased) MAP used for this unit. Not used for this unit. * Available only when the AUD mode is selected. DVD/VCD (DVD mode) Common operations (AUD/DVD mode) SRC* VOL J/K ATT VOICE/FNC/ MENU/PBC* ENTER ROUTE M/ MODE/ TOP MENU* VIEW - Kenwood DDX396 | Instruction Manual - Page 54
Remote Controller Music Disc/Audio file/Video file/Picture file (AUD mode) J/FM+ / K/AM− Selects a Specifies the frequency of the station to receive to search for in direct search. # BS/DIRECT Enters direct search mode. *1 Only for DDX396/DDX376BT/DDX276BT/DDX26BT. *2 The search method differs - Kenwood DDX396 | Instruction Manual - Page 55
Remote Controller Installation and Connection KENWOOD Remote APP KENWOOD Remote is an application that connects and controls compatible KENWOOD car receivers via Bluetooth® like a wireless remote control. You can also operate this unit from a Smartphone using KENWOOD Remote the speaker wire may - Kenwood DDX396 | Instruction Manual - Page 56
cable (× 1) Å Steering remote cable (× 1) Installation procedure 1 Remove the key from the ignition and disconnect the · battery. 2 Make the proper input and output wire connections for each unit. 3 Connect the speaker wires of the wiring harness. 4 Connect the wires of the wiring harness in the - Kenwood DDX396 | Instruction Manual - Page 57
2 Remove from the upper two catches of the trim plate (]). π / [ Car bracket Note: Select the appropriate screws (supplied) for the mounting bracket. Installing the unit using the mounting sleeve (Only for DDX396) ' Removing the unit (Only for DDX396) 1 Engage the catch pins on the extraction - Kenwood DDX396 | Instruction Manual - Page 58
wire) Yellow (Battery wire) Black (Ground wire) 56 ENGLISH 10 A fuse " *1 Only for DDX396/DDX376BT/DDX276BT/ DDX26BT. *2 Only for DDX396/DDX376BT/DDX276BT reverse lamp harness when using the optional rear view camera To the car's parking brake detection switch harness PRK SW Extension wire ( ø - Kenwood DDX396 | Instruction Manual - Page 59
input for connecting an ADS adapter (commercially available)*2 3 Steering wheel remote controller input (REMO-IN)*3 • Connect to the car's steering remote harness using the steering remote cable (Å). Contact your KENWOOD dealer for details. 4 Microphone input (MIC) (Page 56) 5 Audio video - Kenwood DDX396 | Instruction Manual - Page 60
playback Playable disc types • CD-DA: Audio CD, CD Text • DVD Video: Region code: 1 or 4 (depending on the country and sales area) • Dual Disc: DVD side • VCD: Video CD (PBC compatible) • DVD Recordable/Rewritable (DVD-R/-RW, +R/+RW) - DVD Video: UDF bridge - ISO 9660 level 1, level 2, Romeo, Joliet - Kenwood DDX396 | Instruction Manual - Page 61
discs or files may not be played back due to their characteristics or recording conditions. * Only for DDX396/DDX376BT/DDX276BT/DDX26BT. Language codes (for DVD language selection) AA Afar GD Scots Gaelic AB Abkhazian GL Galician AF Afrikaans GN Guarani AM Ameharic GU Gujarati AR - Kenwood DDX396 | Instruction Manual - Page 62
5, 5C, 5S, 6, 6 Plus, 6S, 6S Plus, SE, 7, 7 Plus, 8, 8 Plus, X • Via Bluetooth: Made for - iPod touch (5th and 6th Generation) - iPhone 4S, 5, 5C, 5S, 6, 6 Plus, 6S, 6S correctly or as intended. In this case, visit the following KENWOOD web site: • When you turn on this unit - Kenwood DDX396 | Instruction Manual - Page 63
Troubleshooting What appears to be trouble is not always serious. Check the following points before calling a service center. • For operations with external components, refer also to the instructions supplied with the adapters used for connection (as well as the instructions supplied with the - Kenwood DDX396 | Instruction Manual - Page 64
player application. Restart the Android device. If this does not solve the problem, the connected Android device is unable to route the audio signal to unit. If USB connection does not work, connect the Android device via Bluetooth or through the AV-IN jack on the rear panel. "NO DEVICE" or - Kenwood DDX396 | Instruction Manual - Page 65
* Only for DDX396/DDX376BT/DDX276BT/DDX26BT. SiriusXM Satellite Radio supports AVRCP (Audio/Video Remote Control Profile). The Bluetooth device does not detect the unit. Search from the Bluetooth device again. The unit does not pair with the Bluetooth device. For devices compatible with Bluetooth - Kenwood DDX396 | Instruction Manual - Page 66
Troubleshooting Specifications Echo or noise occurs. Adjust the microphone unit position. appears. The unit has failed to receive a call. The Bluetooth connection between the Bluetooth device and the unit is unstable. Delete the unused registered Bluetooth device from the unit. (Page 35) - Kenwood DDX396 | Instruction Manual - Page 67
dB 90 dB DVD-Video/VIDEO-CD/CD-DA 44.1 kHz/48 kHz/96 kHz 16 bit/20 bit/24 bit * Only for DDX419BT. Bluetooth section Technology Frequency 1.3 AVRCP (Audio/Video Remote Control Profile) 1.5 GAP (Generic Access Profile) PBAP (PhoneBook Access Profile) 1.2 SDP (Service Discovery Profile) SPP ( - Kenwood DDX396 | Instruction Manual - Page 68
Frequency Response (±3.0 dB) Signal to Noise Ratio Selectivity Stereo Separation DDX396/DDX376BT/ DDX276BT/DDX26BT: 87.9 MHz to 107.9 MHz (200 kHz) DDX419BT: 87.5 MHz Input Level (mini jack) Video Input Level for Rear Camera (RCA jack) Video Output Level (RCA jack) NTSC/PAL 1 Vp-p/75 Ω 2 V/25 - Kenwood DDX396 | Instruction Manual - Page 69
Impedance Speaker Impedance 50 W × 4 22 W × 4 (at less than 1% THD) DDX396: 5 V/10 kΩ DDX376BT: 4 V/10 kΩ DDX276BT/DDX26BT/ DDX419BT: 2.5 V/10 kΩ ≤ 600 Ω 4 Ω to 8 Ω General Operating Voltage Installation Dimensions (W × H × D) Weight (Main Unit) 12 V DC car battery DDX396: With sleeve: 182 mm - Kenwood DDX396 | Instruction Manual - Page 70
Dolby Laboratories. • "DVD Logo" is a trademark of DVD Format/Logo Licensing Corporation Bluetooth® word mark and logos are registered trademarks owned by the Bluetooth SIG, Inc. and any use of such marks by JVC KENWOOD TO, PROCUREMENT OF SUBSTITUTE GOODS OR SERVICES; LOSS OF USE, DATA, OR - Kenwood DDX396 | Instruction Manual - Page 71
- Kenwood DDX396 | Instruction Manual - Page 72
For updated information (the latest Instruction Manual, system updates, new functions, etc.), please visit the following website:
-
 1
1 -
 2
2 -
 3
3 -
 4
4 -
 5
5 -
 6
6 -
 7
7 -
8
-
9
-
10
-
11
-
12
-
13
-
14
-
15
-
16
-
17
-
18
-
19
-
20
-
21
-
22
-
23
-
24
-
25
-
26
-
27
-
28
-
29
-
30
-
31
-
32
-
33
-
34
-
35
-
36
-
37
-
38
-
39
-
40
-
41
-
42
-
43
-
44
-
45
-
46
-
47
-
48
-
49
-
50
-
51
-
52
-
53
-
54
-
55
-
56
-
57
-
58
-
59
-
60
-
61
-
62
-
63
-
64
-
65
-
66
-
67
-
68
-
69
-
70
-
71
-
72
 |
 |

DDX396
(Region 1 – DVD Region Code 1 Area)
DDX376BT
(Region 1 – DVD Region Code 1 Area)
DDX276BT
(Region 1 – DVD Region Code 1 Area)
DDX26BT
(Region 1 – DVD Region Code 1 Area)
DDX419BT
(Region 4 – DVD Region Code 4 Area)
MONITOR WITH DVD RECEIVER
INSTRUCTION MANUAL
This instruction manual is used to describe the models listed above. Model availability and features (functions) may differ depending on the country and
sales area.
B5A-2606-10 (KN/RN)
ENGLISH
Take the time to read through this instruction manual.
Familiarity with installation and operation procedures will help you obtain the best performance from your new DVD-receiver.
For your records
Record the serial number, found on the back of the unit, in the spaces designated on the warranty card, and in the space provided
below. Refer to the model and
serial numbers whenever you call upon your Kenwood dealer for information or service on the product.
Model DDX396/DDX376BT/DDX276BT/DDX26BT/DDX419BT
Serial number
US Residents Only
Register Online
Register your Kenwood product at
www.kenwood.com/usa/
© 2018 JVC KENWOOD Corporation