Kenwood DDX4031 User Manual
Kenwood DDX4031 Manual
 |
View all Kenwood DDX4031 manuals
Add to My Manuals
Save this manual to your list of manuals |
Kenwood DDX4031 manual content summary:
- Kenwood DDX4031 | User Manual - Page 1
DDX6031 DDX6031M DDX4031BT DDX4031BTM DDX4031 DDX4031M MONITOR WITH DVD RECEIVER INSTRUCTION MANUAL This instruction manual is used to describe models listed below. Model availability and features (functions) may differ depending on the country and sales area. • Region 2 (DVD Region Code 2 area - Kenwood DDX4031 | User Manual - Page 2
Troubleshooting 64 Accessories/Installation Procedure 68 Connecting Wires to Terminals...70 Connecting a USB device/iPod/ iPhone 71 Connecting Other Products........72 Installing the Unit 73 Specifications 75 KS-UBT1 (USB Bluetooth Adapter 78 2 DDX6031BT/DDX6031BTM/DDX6031/DDX6031M/DDX4031BT - Kenwood DDX4031 | User Manual - Page 3
any unit or wire any cable in Reset button DDX4031BT/DDX4031BTM/DDX4031/DDX4031M Reset button If the unit fails to operate properly, press the Reset button. The unit returns to factory settings when the Reset button is pressed (except the registered Bluetooth devices). How to read this manual - Kenwood DDX4031 | User Manual - Page 4
/108/EC Manufacturer: JVC KENWOOD Corporation 3-12 Moriya-cho, Kanagawa-ku, Yokohamashi, Kanagawa, 221-0022, Japan EU Representative's: Kenwood Electronics Europe BV Amsterdamseweg 37, 1422 AC UITHOORN, The Netherlands 4 DDX6031BT/DDX6031BTM/DDX6031/DDX6031M/DDX4031BT/DDX4031BTM/DDX4031/DDX4031M - Kenwood DDX4031 | User Manual - Page 5
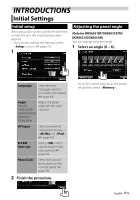
Initial setup When you power on the unit for the first time or reset the unit, the initial setting screen appears. • You can also change the settings on the screen. (☞ page 41) 1 Adjusting the panel angle (Only for DDX6031BT/DDX6031BTM/ DDX6031/DDX6031M) You can change the panel angle - Kenwood DDX4031 | User Manual - Page 6
update has failed, turn the power off and then on, and retry the update. * Even if you have turned off the power during update, you can restart the update after the power is turned on. The update will be performed from the beginning. 3 6 DDX6031BT/DDX6031BTM/DDX6031/DDX6031M/DDX4031BT/DDX4031BTM - Kenwood DDX4031 | User Manual - Page 7
the security code 1 Display the security code setting screen. On : 2 Enter a four-digit number (1), then confirm the entry (2). Deletes the last entry Cancels the setting 3 Repeat step 2 to confirm your security code. Now, your security code is registered. • When the unit is being reset - Kenwood DDX4031 | User Manual - Page 8
panel 1 Reset button/Power indicator/Security indicator • Resets the unit. (☞ page 3) • Lights up while the unit is turned on. • Flashes when the security function is • Opens/Closes the monitor panel. p Remote sensor 8 DDX6031BT/DDX6031BTM/DDX6031/DDX6031M/DDX4031BT/DDX4031BTM/DDX4031/DDX4031M - Kenwood DDX4031 | User Manual - Page 9
DDX4031BT/DDX4031BTM/DDX4031/DDX4031M Screen (Touch panel) Monitor panel 1 Loading slot 2 0 (Eject) button Ejects the disc. 3 Remote sensor 4 Reset button/Power indicator/Security indicator • Resets the unit. (☞ page 3) • Lights up while the unit is turned on. • Flashes when the security function - Kenwood DDX4031 | User Manual - Page 10
. 3 *1 Synchronizes the clock time with the connected navigation unit. *2 time with FM Radio Data System. Sets the clock manually. (☞ below) 1 Adjust the hour 2 Adjust the minute [Reset]: Sets the minute to "00." Example: 3:00 - 3:29 = 3:00 - Kenwood DDX4031 | User Manual - Page 11
DDX4031/DDX4031M (Hold) (Hold) The ATT indicator lights up. To cancel the attenuation, press the ATT button (DDX6031BT/DDX6031BTM/ DDX6031/DDX6031M) or VOL/ATT knob (DDX4031BT/DDX4031BTM/DDX4031/ DDX4031M) again. The screen is turned off. To turn on the screen, press MENU/ . English 11 - Kenwood DDX4031 | User Manual - Page 12
navigation unit is connected. • Changes the AV source. • Displays the screen. You can select 3 items to be displayed in this area. (☞ page 13) Changes the detailed settings. rear view camera. 12 DDX6031BT/DDX6031BTM/DDX6031/DDX6031M/DDX4031BT/DDX4031BTM/DDX4031/DDX4031M - Kenwood DDX4031 | User Manual - Page 13
area. (☞ page 42) *2 Switches between the previous and next pages. *3 When no navigation unit is connected, "No Navigation" appears. *4 Only for DDX6031BT/DDX6031BTM/DDX4031BT/DDX4031BTM. *5 Select an appropriate input setting on . (☞ page 43) Displaying the source control screen On each - Kenwood DDX4031 | User Manual - Page 14
the disc. Inserting a disc To eject a disc DDX6031BT/DDX6031BTM/DDX6031/DDX6031M DDX6031BT/DDX6031BTM/DDX6031/DDX6031M Label side DDX4031BT/DDX4031BTM/DDX4031/DDX4031M DDX4031BT/DDX4031BTM/DDX4031/DDX4031M Label side • You can eject a disc when playing another AV source. • If the ejected disc - Kenwood DDX4031 | User Manual - Page 15
type Recording format, file type, etc Playable DVD DVD-Video *1 Region Code: • For DDX6031BT/DDX6031/DDX4031BT/ DDX4031: 3/4/6 (depending on the country and sales area) • For DDX6031BTM/DDX6031M/DDX4031BTM/ DDX4031M: 2 DVD-Audio/DVD-ROM DVD Recordable/ Rewritable (DVD-R/-RW *2, +R/+RW - Kenwood DDX4031 | User Manual - Page 16
[MENU] • Reverse/forward search during playback.*4 • Plays back in slowmotion during pause. Changes the settings for disc playback. (☞ page 20) Displays screen. • For DivX/MPEG1/MPEG2/ not appear for VCD. 16 DDX6031BT/DDX6031BTM/DDX6031/DDX6031M/DDX4031BT/DDX4031BTM/DDX4031/DDX4031M - Kenwood DDX4031 | User Manual - Page 17
time Playback status (3: play/8: pause) • MP3/WMA/WAV/AAC: Folder no./Track no. • CD: Track no. Selects track. Reverse/forward search.*2 Changes the settings for disc playback. (☞ page 20) Displays screen. *1 Does not appear for CD. *2 Search speed varies depending on the type of disc or - Kenwood DDX4031 | User Manual - Page 18
select. Displays picture adjustment screen. (☞ page 37) Selects aspect ratio. (☞ page 38) Displays the picture size selecting screen. (☞ page 38) 18 DDX6031BT/DDX6031BTM/DDX6031/DDX6031M/DDX4031BT/DDX4031BTM/DDX4031/DDX4031M - Kenwood DDX4031 | User Manual - Page 19
Only for VCD 1 2 • To deactivate the PBC function, press [7] then the direct selecting buttons to select a track number. Selecting playback mode For DVD/DVD-VR Selects Repeat playback mode For VCD (without PBC)/CD/DivX/MPEG1/ MPEG2/MP3/WMA/WAV/AAC Direct selecting buttons (☞ below) [Audio] [ - Kenwood DDX4031 | User Manual - Page 20
page 63). For DVD/DVD-VR Down Mix When playing back a multi-channel disc, this setting affects the signals reproduced through the front and/or rear speakers. ♦ Dolby : Select this to audio, video, then still image. 20 DDX6031BT/DDX6031BTM/DDX6031/DDX6031M/DDX4031BT/DDX4031BTM/DDX4031/DDX4031M - Kenwood DDX4031 | User Manual - Page 21
USB extension cord. • USB devices equipped with special functions such as data security functions cannot be used with the unit. • Do not use a USB device playback of the device. In this case, disconnect the USB device then reset this unit and the USB device. • Operation and power supply may not - Kenwood DDX4031 | User Manual - Page 22
existing files are played in the following order: audio, video, then still image. Setting Press [Next] to switch to another USB device when multiple USB devices are connected via a USB hub or the like. 22 DDX6031BT/DDX6031BTM/DDX6031/DDX6031M/DDX4031BT/DDX4031BTM/DDX4031/DDX4031M - Kenwood DDX4031 | User Manual - Page 23
iP202 (optional accessory) - To listen to the music (digital): USB Audio cable for iPod/iPhone-KCA-iP102 (optional accessory) • Select appropriate input settings on according to the connection method (☞ the right column). • Do not use extension cables. iPod/iPhone that can be connected to - Kenwood DDX4031 | User Manual - Page 24
operations explained in this manual are under the condition when changing the Artwork display setting, ☞ page 23 reset your iPod/iPhone. • For the latest compatible list and software version of iPod/iPhone, see: www.kenwood.com/cs/ce/ipod 24 DDX6031BT/DDX6031BTM/DDX6031/DDX6031M/DDX4031BT/DDX4031BTM - Kenwood DDX4031 | User Manual - Page 25
Selecting a track/video from menu on the iPod/iPhone 1 Operating in iPod/iPhone control mode You can play back the audio/video using iPod/iPhone itself instead of the unit. 2 Select the menu (Music or Video) (1), a category (2), then a desired item (3). • Select the item in the selected layer - Kenwood DDX4031 | User Manual - Page 26
setting Manual Search Searches for a station. • The search method differs according to the selected seek mode (☞ above) Displays screen. *1 Appears only for Region 2/3 models. *2 Appears only when FM is selected as the source. 26 DDX6031BT/DDX6031BTM/DDX6031/DDX6031M/DDX4031BT/DDX4031BTM - Kenwood DDX4031 | User Manual - Page 27
from the tuner to another. • The antenna is extended regardless of the setting when the source is the tuner. 1 2 The station frequency currently tuned in Press the Reset button while holding the following buttons. • Release them after the message appears. DDX6031BT/DDX6031 DDX4031BT/DDX4031 ON - Kenwood DDX4031 | User Manual - Page 28
broadcast by selecting the PTY code for your favorite programs. 1 Local stations with the strongest signals are searched and stored automatically. Manual presetting 1 Tune in to ), the text language is set to English. 28 DDX6031BT/DDX6031BTM/DDX6031/DDX6031M/DDX4031BT/DDX4031BTM/DDX4031/DDX4031M - Kenwood DDX4031 | User Manual - Page 29
. • The volume adjustment for Traffic Information is automatically memorized. The next time the unit switches to Traffic Information, the volume is set to the previous level. NEWS indicator 2 00min - 90min OFF Activates News Standby Reception (the NEWS indicator lights up). Select the period - Kenwood DDX4031 | User Manual - Page 30
shipped from the factory, NetworkTracking Reception is activated. To change the Network-Tracking Reception setting 1 Automatic TI station seek- Auto TP Seek • This feature is available only Data System station is found. 30 DDX6031BT/DDX6031BTM/DDX6031/DDX6031M/DDX4031BT/DDX4031BTM/DDX4031/DDX4031M - Kenwood DDX4031 | User Manual - Page 31
You can connect an external component to the AV-IN terminal. Preparation: If you want to use AV-IN2, select for setting. (☞page 43) 3 Turn on the connected component and start playing the source. 1 Connect an external component. To connect it, ☞ page 71, 72. 2 Select "AV-IN - Kenwood DDX4031 | User Manual - Page 32
the sound coming through speakers other than the front speakers during navigation guidance. Press [Enter] to display the setup screen for the navigation unit. See the instruction manual supplied for the navigation unit. 32 DDX6031BT/DDX6031BTM/DDX6031/DDX6031M/DDX4031BT/DDX4031BTM/DDX4031/DDX4031M - Kenwood DDX4031 | User Manual - Page 33
preset sound mode 1 On : 2 Storing your own adjustment Customizing preset sound mode 1 Select a sound mode. (☞ "Selecting a preset sound mode") 2 Set to (1), then press [Tone] (2). 3 Select a sound mode. 3 Adjust the level of each band (1), then select the subwoofer - Kenwood DDX4031 | User Manual - Page 34
bass. SW Level Adjusts subwoofer level.* The adjustments are stored and is activated. * Adjustable only when the subwoofer is activated. (☞ page page 41) *2 Not selectable when is set to . 34 DDX6031BT/DDX6031BTM/DDX6031/DDX6031M/DDX4031BT/DDX4031BTM/DDX4031/DDX4031M - Kenwood DDX4031 | User Manual - Page 35
color adjustment • You can make your own color adjustment only when is selected. 1 4 Select a background/panel color. To select a background 2 3 User color adjuster: You can make your own color adjustment stored in For setting your favorite scene as the background, ☞ page 36 Dimmer - Kenwood DDX4031 | User Manual - Page 36
image may look different from that of the actual scene. 1 Play back a video or JPEG. 2 Display . (☞ page 35) 3 4 Adjust the image. [38]* Starts/Pauses playback. [ 3]* Advances scenes the previous screen. 36 DDX6031BT/DDX6031BTM/DDX6031/DDX6031M/DDX4031BT/DDX4031BTM/DDX4031/DDX4031M - Kenwood DDX4031 | User Manual - Page 37
for video playback You can change the setting for video playback. Picture adjustment You can adjust the picture quality. 1 Display the adjustment menu. 3 Adjust the picture (-15 to +15). Adjusts the brightness Adjusts - Kenwood DDX4031 | User Manual - Page 38
or (☞ left column), the picture is zoomed with the aspect ratio of the setting. 1 2 2 FULL*: For 16:9 original pictures JUST: For 4:3LB original pictures Normal*: For [2] [3] : Moves the zooming frame. 38 DDX6031BT/DDX6031BTM/DDX6031/DDX6031M/DDX4031BT/DDX4031BTM/DDX4031/DDX4031M - Kenwood DDX4031 | User Manual - Page 39
. To display the picture from the rear view camera manually DDX6031BT/ DDX4031BT/ DDX6031BTM/ DDX4031BTM/ DDX6031/DDX6031M DDX4031/DDX4031M (Hold) (Hold) When displaying the picture from the rear view camera manually, you can change the setting of the picture. (☞ page 37) To cancel the rear - Kenwood DDX4031 | User Manual - Page 40
the function list. You cannot edit the function list. 3 Initializing the settings 1 In step 2 in the left column: 4 Press a steering remote controller button to register/ change. 2 5 Select a function to assign. 40 DDX6031BT/DDX6031BTM/DDX6031/DDX6031M/DDX4031BT/DDX4031BTM/DDX4031/DDX4031M - Kenwood DDX4031 | User Manual - Page 41
balance. ♦ F6 to R6; Initial 0 • When using a two-speaker system, set the fader to the center (0). Balance : Adjust the left and right speaker output balance source. (☞ page 33) ♦ Natural/Rock/Pops/Easy/Top40/Jazz/User Audio Loudness X'over You can activate/deactivate the loudness function. ♦ - Kenwood DDX4031 | User Manual - Page 42
deactivates dimmer according to the day/night display setting of the connected navigation unit. User Customize Change the display design (background and panel setting is changed. Turn off the power, then turn on to enable the change. 42 DDX6031BT/DDX6031BTM/DDX6031/DDX6031M/DDX4031BT/DDX4031BTM - Kenwood DDX4031 | User Manual - Page 43
Input Menu item AV Input R-CAM Interrupt Navigation Selectable setting/item Initial: Underlined You can determine the use of AV-IN input terminal. ♦ from the rear view camera when you shift the gear to the reverse (R) position. : Cancels. Change the navigation settings. (☞ page 32) English 43 - Kenwood DDX4031 | User Manual - Page 44
Information Displays the version information on the software. You can update the software. (☞ page 6) * "Please power off" appears when the setting is changed. Turn off the power, then turn on to enable the change. 44 DDX6031BT/DDX6031BTM/DDX6031/DDX6031M/DDX4031BT/DDX4031BTM/DDX4031/DDX4031M - Kenwood DDX4031 | User Manual - Page 45
memorized settings. • To cancel, press [Cancel]. 2 Touch the center of the marks at the lower left and at the upper right as instructed. Confirmation message appears. Press [Yes]. • To cancel the current operation, press [Cancel]. • To reset to the initial setting, press [Reset]. English - Kenwood DDX4031 | User Manual - Page 46
BLUETOOTH OPERATIONS (Only for DDX6031BT/DDX6031BTM/DDX4031BT/DDX4031BTM) Information for using Bluetooth® devices • While driving, do beforehand. (☞ page 70) DDX6031BT/DDX6031BTM Bluetooth adaptor (KS-UBT1) DDX4031BT/DDX4031BTM Bluetooth adaptor (KS-UBT1) 46 DDX6031BT/DDX6031BTM/DDX6031/DDX6031M - Kenwood DDX4031 | User Manual - Page 47
the connection is established, it is registered in the unit even if you reset the unit. Up to 5 devices can be registered in total. • Only the device. • The maximum digit of the PIN code that can be set is 16. 1 Display the Bluetooth setting screen. On : Mobile phone For connecting - Kenwood DDX4031 | User Manual - Page 48
device through the unit. Connecting/disconnecting a registered Bluetooth device 1 Display the Bluetooth setting screen. (☞ page 47) • For Bluetooth mobile phone: • For the device you want to connect. 48 DDX6031BT/DDX6031BTM/DDX6031/DDX6031M/DDX4031BT/DDX4031BTM/DDX4031/DDX4031M - Kenwood DDX4031 | User Manual - Page 49
the rear view camera is displayed. (☞ page 39) When is set to The unit answers the incoming call automatically. (☞ page 55) • Checking SMS reception If the mobile phone is compatible with SMS (Short Message Service), the unit tells you a message has been received. To read a - Kenwood DDX4031 | User Manual - Page 50
(For presetting, ☞ page 52) Voice dialing (☞ the right column) Speak the name you want to call. To cancel, press [Cancel]. 50 DDX6031BT/DDX6031BTM/DDX6031/DDX6031M/DDX4031BT/DDX4031BTM/DDX4031/DDX4031M - Kenwood DDX4031 | User Manual - Page 51
Using the phonebook/call lists 1 2 Select the initial. If the initial is not a letter or number, press [Others]. Outgoing From dialled call list. Incoming From received call list. Missed From missed call list. Phonebook From phonebook. • For copying the phonebook, ☞ page 52. 3 Select a phone - Kenwood DDX4031 | User Manual - Page 52
a preset number to store. PIN code (initial: 0000) • You can instruction manual supplied with your mobile phone. • To cancel the transfer, press [Finish]. 5 Finish the procedure. The phonebook memory is copied from the mobile phone. 52 DDX6031BT/DDX6031BTM/DDX6031/DDX6031M/DDX4031BT/DDX4031BTM - Kenwood DDX4031 | User Manual - Page 53
the phonebook/call list you want to delete. (☞ page 51) 2 About mobile phones compatible with Phone Book Access Profile (PBAP) If your mobile phone supports PBAP, the phonebook and call lists are automatically copied to the unit when the mobile phone is connected. • Phonebook: up to 5 000 entries - Kenwood DDX4031 | User Manual - Page 54
setting screen. (☞ below) Displays screen. * Available only for the devices compatible with AVRCP 1.3. Bluetooth device settings For Bluetooth mobile phone: 1 On : For Bluetooth audio player: 1 On : 2 2 54 DDX6031BT/DDX6031BTM/DDX6031/DDX6031M/DDX4031BT/DDX4031BTM - Kenwood DDX4031 | User Manual - Page 55
setting/item Initial: Underlined Connection ♦ Connect : ☞ page 48 ♦ Disconnect : ☞ page 48 PIN Code Changes the PIN code of the unit. • Enter a new PIN code, then press [Enter]. Device Name Shows the device name to be shown on the Bluetooth device - "KENWOOD Answer the calls manually. : The unit - Kenwood DDX4031 | User Manual - Page 56
DDX6031BT (Region 3)/DDX6031BTM/DDX6031 (Region 3)/DDX6031M/DDX4031BT (Region 3)/ DDX4031BTM/DDX4031 (Region 3)/DDX4031M: This unit can 4/6)/DDX4031BT (Region 4/6)/DDX4031 (Region 4/6): Optional Remote Controller KNA-RCDV331 is designed for controlling this unit. Refer to the instruction manual that - Kenwood DDX4031 | User Manual - Page 57
the key once to lower the volume. Press again to restore the previous volume. Function Switches the function screen. NAV/V.SEL Switches to the navigation screen. MODE Switches the screen mode. Screen mode changes each time you press this key. Cursor key Moves the cursor when displaying menu - Kenwood DDX4031 | User Manual - Page 58
slow forward/backward during pause. DVD Top Menu Returns to the DVD top menu. DVD Menu Displays the DVD menu. 58 DDX6031BT/DDX6031BTM/DDX6031/DDX6031M/DDX4031BT/DDX4031BTM/DDX4031/DDX4031M - Kenwood DDX4031 | User Manual - Page 59
SUBTITLE Switches the subtitle language. Track search and file search Selects the track or file to be played. ZOOM Switches the zoom ratio each time you press this key. Play/Pause Pauses the track. Press again to resume playing. Picture Angle Switches the picture angle each time you press this - Kenwood DDX4031 | User Manual - Page 60
Numeric keypad File search Selects the file to be played. Play/Pause Pauses the file. Press again to resume playing. 60 DDX6031BT/DDX6031BTM/DDX6031/DDX6031M/DDX4031BT/DDX4031BTM/DDX4031/DDX4031M - Kenwood DDX4031 | User Manual - Page 61
REFERENCE Maintenance Caution on cleaning the unit Do not use any solvent (for example, thinner, benzine, etc.), detergent, or insecticide. This may damage the monitor or the unit. Recommended cleaning method: Gently wipe the panel with a soft, dry cloth. Moisture condensation Moisture may - Kenwood DDX4031 | User Manual - Page 62
while using this unit. Playing MP3/WMA/WAV/AAC files • This unit can play back files with the extension code , , , or (regardless of the letter case- upper/lower). • This unit AIFF, ATRAC3, etc. 62 DDX6031BT/DDX6031BTM/DDX6031/DDX6031M/DDX4031BT/DDX4031BTM/DDX4031/DDX4031M - Kenwood DDX4031 | User Manual - Page 63
2-channel signal is emitted. When playing multi-channel encoded disc, multi-channel signals are downmixed. Language codes (for DVD/DivX language selection) Code Language Code Language Code Language Code Language AA Afar GL Galician MI Maori SO Somali AB Abkhazian GN Guarani MK Macedonian SQ - Kenwood DDX4031 | User Manual - Page 64
Troubleshooting What appears to be trouble is not always serious. Check the following points before calling a service center. • For operations with the external components, refer also to the instructions supplied with the adapters used for the connections (as well as the instructions supplied with - Kenwood DDX4031 | User Manual - Page 65
• Adjust the volume to the optimum level. • Check the cords and connections. Turn on the screen. (☞ page 11) Reset the unit. (☞ page 3) Replace the battery. Store stations manually. (☞ page 28) Connect the antenna firmly. • Insert a finalized disc. • Finalize the discs with the component which you - Kenwood DDX4031 | User Manual - Page 66
connecting cable and its connection. • Update the firmware version. • Charge the battery. • Check whether the iPod control mode is correctly selected. (☞ page 25) • Reset the iPod/iPhone. Sound is distorted again. USB 66 DDX6031BT/DDX6031BTM/DDX6031/DDX6031M/DDX4031BT/DDX4031BTM/DDX4031/DDX4031M - Kenwood DDX4031 | User Manual - Page 67
/ DDX4031BT/DDX4031BTM) Symptom be controlled. Check whether the connected audio player supports AVRCP (Audio Video Remote Control Profile). Bluetooth code for both the unit and with the Bluetooth device. target device. If the PIN code of the device is not indicated on its instructions - Kenwood DDX4031 | User Manual - Page 68
/DDX4031 of sale in Australia only. *2 DDX6031BT/DDX6031/ DDX4031BT/DDX4031 of sale in Australia, China only. *3 DDX6031BT/ DDX6031BTM/ DDX4031BT/ DDX4031BTM only. ..........1 2WARNING • If you connect the ignition wire (red) and the battery wire (yellow) to the car chassis (ground), you may - Kenwood DDX4031 | User Manual - Page 69
the ignition key. If you connect the ignition wire to a power source with a constant voltage supply, such as with battery wires, the battery may be drained. • If the internal temperature and result in malfunction. Cooling fan DDX4031BT/DDX4031BTM only • Install the Bluetooth adaptor (KS-UBT1) - Kenwood DDX4031 | User Manual - Page 70
navigation manual.) Not used Orange/White (Dimmer control wire) To car light control switch Red (Ignition wire) ACC Yellow (Battery wire) Black (Ground wire) - (To car chassis) Ignition key switch Car fuse box (Main fuse) Battery 70 DDX6031BT/DDX6031BTM/DDX6031/DDX6031M/DDX4031BT/DDX4031BTM - Kenwood DDX4031 | User Manual - Page 71
Optional Accessory) USB terminal (0.8 m) KCA-iP202 (Optional Accessory) (1.8 m) Audio Visual input 2 (iPod/AV Input 2 switchable) For DDX4031BT/DDX4031BTM/DDX4031/DDX4031M USB terminal USB device (commercially available) iPod (commercially available) CA-U1EX (Optional Accessory) Audio Visual - Kenwood DDX4031 | User Manual - Page 72
kenwood.com/cs/ce/. Rear View Camera Input • Visual input (Yellow) Audio/Visual Output • Visual output (Yellow) • Audio output (3.5φ mini plug) Resistance-free stereo type mini plug Connection cable (Included in the Navigation /DDX6031BTM/DDX6031/DDX6031M/DDX4031BT/DDX4031BTM/DDX4031/DDX4031M - Kenwood DDX4031 | User Manual - Page 73
accessory 3 to the unit. For Toyota/Scion 1 Cut out accessory 4 as illustrated. Cutting line Accessory 4 Accessory 3 ⁄ • Make sure that the unit is installed securely in place. If the unit is unstable, it may malfunction (eg, the sound may skip). For General Motors 1 Cut out accessory 4 to meet - Kenwood DDX4031 | User Manual - Page 74
Unit (DDX6031BT/DDX6031BTM/ DDX4031BT/DDX4031BTM only) 1 Check the installation position of the microphone (accessory 8). 2 Remove oil and other dirt from the installation surface. 3 Install the microphone. 4 Wire the microphone cable up to the unit with it secured at several positions using - Kenwood DDX4031 | User Manual - Page 75
Specifications Monitor section Picture Size : 6.95 inches (diagonal) wide 156.6 mm (W) × 81.6 mm (H) (DDX6031BT/DDX6031BTM/DDX6031/ DDX6031M) : 6.1 inches (diagonal) wide 136.2 mm (W) × 72 mm (H) (DDX4031BT/DDX4031BTM/DDX4031/ DDX4031M) Display System : Transparent TN LCD panel Drive System : TFT - Kenwood DDX4031 | User Manual - Page 76
2.5 kg (DDX6031BT/DDX6031BTM/DDX6031/ DDX6031M) 2.0 kg (DDX4031BT/DDX4031BTM/DDX4031/ DDX4031M) • Although the effective pixels for the liquid crystal panel is given as 99.99% or more, 0.01% of pixels may not light or may light incorrectly. • Specifications are subject to change without notice. 76 - Kenwood DDX4031 | User Manual - Page 77
for iPhone" mean that an electronic accessory has been designed to connect specifically to iPod, or iPhone, respectively, and has been certified by the play purchased DivX Video-on-Demand (VOD) movies. To obtain your registration code, locate the DivX VOD section in your device setup menu. Go to vod - Kenwood DDX4031 | User Manual - Page 78
SIG, Inc. and any use of such marks by JVC KENWOOD Corporation is under license. Other trademarks and trade names are those of their respective owners. Specifications Bluetooth Version: Bluetooth 2.0 Certified Power Class: Class2 Radio Service Area: 10 m (10.9 yd) USB Standards: USB V1 - Kenwood DDX4031 | User Manual - Page 79
Declaration of Conformity with regard to the R&TTE Directive 1999/5/EC Manufacturer: JVC KENWOOD Corporation 3-12 Moriya-cho, Kanagawa-ku, Yokohama-shi, Kanagawa, 221-0022, Japan EU Representative's: Kenwood Electronics Europe BV Amsterdamseweg 37, 1422 AC UITHOORN, The Netherlands English - Kenwood DDX4031 | User Manual - Page 80
-
 1
1 -
 2
2 -
 3
3 -
 4
4 -
 5
5 -
 6
6 -
 7
7 -
8
-
9
-
10
-
11
-
12
-
13
-
14
-
15
-
16
-
17
-
18
-
19
-
20
-
21
-
22
-
23
-
24
-
25
-
26
-
27
-
28
-
29
-
30
-
31
-
32
-
33
-
34
-
35
-
36
-
37
-
38
-
39
-
40
-
41
-
42
-
43
-
44
-
45
-
46
-
47
-
48
-
49
-
50
-
51
-
52
-
53
-
54
-
55
-
56
-
57
-
58
-
59
-
60
-
61
-
62
-
63
-
64
-
65
-
66
-
67
-
68
-
69
-
70
-
71
-
72
-
73
-
74
-
75
-
76
-
77
-
78
-
79
-
80
 |
 |

DDX6031BT
DDX6031BTM
DDX6031
DDX6031M
DDX4031BT
DDX4031BTM
DDX4031
DDX4031M
MONITOR WITH DVD RECEIVER
INSTRUCTION MANUAL
LVT2271-001A (MN/M2N/XN)
© 2011 JVC KENWOOD Corporation
This instruction manual is used to describe models listed
below. Model availability and features (functions) may differ
depending on the country and sales area.
• Region 2 (DVD Region Code 2 area)
• Region 3 (DVD Region Code 3 area)
• Region 4 (DVD Region Code 4 area)
• Region 6 (DVD Region Code 6 area)