Kenwood DDX4031BTM User Manual
Kenwood DDX4031BTM Manual
 |
View all Kenwood DDX4031BTM manuals
Add to My Manuals
Save this manual to your list of manuals |
Kenwood DDX4031BTM manual content summary:
- Kenwood DDX4031BTM | User Manual - Page 1
DDX6031BT DDX6031BTM DDX6031 DDX6031M DDX4031BT DDX4031BTM DDX4031 DDX4031M MONITOR WITH DVD RECEIVER INSTRUCTION MANUAL This instruction manual is used to describe models Region 4 (DVD Region Code 4 area) • Region 6 (DVD Region Code 6 area) © 2011 JVC KENWOOD Corporation LVT2271-001A (MN/M2N/XN) - Kenwood DDX4031BTM | User Manual - Page 2
45 BLUETOOTH OPERATIONS (Only for DDX6031BT/DDX6031BTM/ DDX4031BT/DDX4031BTM) Information for using Bluetooth® devices 46 Bluetooth operations 57 REFERENCE Maintenance 61 More about this unit 62 Troubleshooting 64 Accessories/Installation Procedure 68 Connecting Wires to Terminals...70 - Kenwood DDX4031BTM | User Manual - Page 3
mainly used for explanation. • This manual mainly explains operations using the buttons on the monitor panel and touch panel. For operations using the remote controller (RCDV340: supplied only for DDX6031BT/ DDX6031/DDX4031BT/DDX4031 (Region 3), DDX6031BTM/DDX6031M/ DDX4031BTM/DDX4031M), ☞ page 56 - Kenwood DDX4031BTM | User Manual - Page 4
USE OF CERTAIN HAZARDOUS SUBSTANCES IN ELECTRICAL AND ELECTRONIC EQUIPMENT". DDX6031BTM/DDX6031M/DDX4031BTM/ DDX4031M: Declaration of Conformity with regard to the EMC Directive 2004/108/EC Manufacturer: JVC KENWOOD Corporation 3-12 Moriya-cho, Kanagawa-ku, Yokohamashi, Kanagawa, 221-0022, Japan - Kenwood DDX4031BTM | User Manual - Page 5
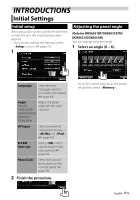
INTRODUCTIONS Initial Settings Initial setup When you power on the unit for the first time or reset the unit, the initial setting screen appears. • You can also change the settings on the screen. (☞ page 41) 1 Adjusting the panel angle (Only for DDX6031BT/DDX6031BTM/ DDX6031/DDX6031M) You - Kenwood DDX4031BTM | User Manual - Page 6
update, you can restart the update after the power is turned on. The update will be performed from the beginning. 3 6 DDX6031BT/DDX6031BTM/DDX6031/DDX6031M/DDX4031BT/DDX4031BTM/DDX4031/DDX4031M - Kenwood DDX4031BTM | User Manual - Page 7
Setting the security function You can set a security code to protect your receiver system against theft. Registering the security code 1 Display the security code setting screen. On : 2 Enter a four-digit number (1), then confirm the entry (2). Deletes the last entry Cancels the setting - Kenwood DDX4031BTM | User Manual - Page 8
screen. (☞ page 12) 9 0 (Eject) button • Ejects the disc (Tilts the monitor panel fully). • Opens/Closes the monitor panel. p Remote sensor 8 DDX6031BT/DDX6031BTM/DDX6031/DDX6031M/DDX4031BT/DDX4031BTM/DDX4031/DDX4031M - Kenwood DDX4031BTM | User Manual - Page 9
AV/AV OUT button • Displays the current source screen. (Press) • Selects the AV source for external monitor or amplifier. (Hold) 7 For DDX4031BT/DDX4031BTM: TEL/V.OFF button • Displays the screen. (Press) (☞ page 47) • Turns off/on the screen. (Hold) (☞ page 11) For DDX4031/DDX4031M: AUD - Kenwood DDX4031BTM | User Manual - Page 10
unit. *2 time with FM Radio Data System. Sets the clock manually. (☞ below) 1 Adjust the hour 2 Adjust the minute [Reset]: Sets the minute to "00." Region 4/6 models. 10 DDX6031BT/DDX6031BTM/DDX6031/DDX6031M/DDX4031BT/DDX4031BTM/DDX4031/DDX4031M - Kenwood DDX4031BTM | User Manual - Page 11
Turning off the power DDX6031BT/ DDX4031BT/ DDX6031BTM/ DDX4031BTM/ DDX6031/DDX6031M DDX4031/DDX4031M (Hold) (Hold) Adjusting ATT button (DDX6031BT/DDX6031BTM/ DDX6031/DDX6031M) or VOL/ATT knob (DDX4031BT/DDX4031BTM/DDX4031/ DDX4031M) again. The screen is turned off. To turn on the - Kenwood DDX4031BTM | User Manual - Page 12
no operation is done for about 5 seconds. * Not available for video from an external component and rear view camera. 12 DDX6031BT/DDX6031BTM/DDX6031/DDX6031M/DDX4031BT/DDX4031BTM/DDX4031/DDX4031M - Kenwood DDX4031BTM | User Manual - Page 13
DDX6031/DDX6031M DDX4031/DDX4031M (Hold) • For DDX6031BT/DDX6031BTM/DDX6031/DDX6031M, pressing and holding TEL hides the operation buttons. For DDX4031BT/DDX4031BTM/DDX4031/DDX4031M, pressing FNC/RCAM hides the operation buttons. • The operation buttons disappear by touching the screen or when no - Kenwood DDX4031BTM | User Manual - Page 14
the disc. Inserting a disc To eject a disc DDX6031BT/DDX6031BTM/DDX6031/DDX6031M DDX6031BT/DDX6031BTM/DDX6031/DDX6031M Label side DDX4031BT/DDX4031BTM/DDX4031/DDX4031M DDX4031BT/DDX4031BTM/DDX4031/DDX4031M Label side • You can eject a disc when playing another AV source. • If the ejected disc - Kenwood DDX4031BTM | User Manual - Page 15
DVD DVD-Video *1 Region Code: • For DDX6031BT/DDX6031/DDX4031BT/ DDX4031: 3/4/6 (depending on the country and sales area) • For DDX6031BTM/DDX6031M/DDX4031BTM/ DDX4031M: 2 DVD-Audio/DVD-ROM DVD Recordable/ Rewritable (DVD-R/-RW *2, +R/+RW *3) • DVD Video: UDF bridge • DVD-VR • DivX/MPEG1 - Kenwood DDX4031BTM | User Manual - Page 16
/DVD-VR/VCD. *4 Search speed varies depending on the type of disc or file. *5 Does not appear for VCD. 16 DDX6031BT/DDX6031BTM/DDX6031/DDX6031M/DDX4031BT/DDX4031BTM/DDX4031/DDX4031M - Kenwood DDX4031BTM | User Manual - Page 17
To display the source control screen, ☞ page 13. For CD/MP3/WMA/WAV/AAC Track/file information • Pressing [ - Kenwood DDX4031BTM | User Manual - Page 18
. Displays picture adjustment screen. (☞ page 37) Selects aspect ratio. (☞ page 38) Displays the picture size selecting screen. (☞ page 38) 18 DDX6031BT/DDX6031BTM/DDX6031/DDX6031M/DDX4031BT/DDX4031BTM/DDX4031/DDX4031M - Kenwood DDX4031BTM | User Manual - Page 19
Only for VCD 1 2 • To deactivate the PBC function, press [7] then the direct selecting buttons to select a track number. Selecting playback mode For DVD/DVD-VR Selects Repeat playback mode For VCD (without PBC)/CD/DivX/MPEG1/ MPEG2/MP3/WMA/WAV/AAC Direct selecting buttons (☞ below) [Audio] [ - Kenwood DDX4031BTM | User Manual - Page 20
files of the selected type, the existing files are played in the following order: audio, video, then still image. 20 DDX6031BT/DDX6031BTM/DDX6031/DDX6031M/DDX4031BT/DDX4031BTM/DDX4031/DDX4031M - Kenwood DDX4031BTM | User Manual - Page 21
USB operations Playing a USB device • This unit can play JPEG/DivX/MPEG1/ MPEG2/MP3/WMA/WAV/AAC files stored in a USB mass storage class device. • This unit can recognize a total of 5 000 files and 250 folders (a maximum of 999 files per folder). • Make sure all important data has been backed up to - Kenwood DDX4031BTM | User Manual - Page 22
[Next] to switch to another USB device when multiple USB devices are connected via a USB hub or the like. 22 DDX6031BT/DDX6031BTM/DDX6031/DDX6031M/DDX4031BT/DDX4031BTM/DDX4031/DDX4031M - Kenwood DDX4031BTM | User Manual - Page 23
Listening to the iPod/iPhone device Preparation • Connect iPod/iPhone. (☞ page 71) • Use the following cables: - To watch the video and to listen to the music (analog): USB Audio and Video cable for iPod/iPhone-KCA-iP202 (optional accessory) - To listen to the music (digital): USB Audio cable for - Kenwood DDX4031BTM | User Manual - Page 24
"iPod" as the source. (☞ page 13) • The operations explained in this manual are under the condition when the unit is selected for controlling playback. (☞ below) While of iPod/iPhone, see: www.kenwood.com/cs/ce/ipod 24 DDX6031BT/DDX6031BTM/DDX6031/DDX6031M/DDX4031BT/DDX4031BTM/DDX4031/DDX4031M - Kenwood DDX4031BTM | User Manual - Page 25
Selecting a track/video from menu on the iPod/iPhone 1 Operating in iPod/iPhone control mode You can play back the audio/video using iPod/iPhone itself instead of the unit. 2 Select the menu (Music or Video) (1), a category (2), then a desired item (3). • Select the item in the selected layer - Kenwood DDX4031BTM | User Manual - Page 26
• AUTO1: Auto Search • AUTO2: Tunes in stations in memory one after another. • MANU: Manual Search Searches for a station. • The search method differs according to the selected seek mode (☞ above) selected as the source. 26 DDX6031BT/DDX6031BTM/DDX6031/DDX6031M/DDX4031BT/DDX4031BTM/DDX4031/DDX4031M - Kenwood DDX4031BTM | User Manual - Page 27
Displaying the information of the current station • This feature is available only for Region 2/3 models. Setting the antenna control • This feature is available only for Region 2/3 models. You can store the antenna automatically when the source is changed from the tuner to another. • The antenna - Kenwood DDX4031BTM | User Manual - Page 28
code for your favorite programs. 1 Local stations with the strongest signals are searched and stored automatically. Manual presetting 1 Tune in to a station you want to preset. (☞ page 26) 2 Select a is set to English. 28 DDX6031BT/DDX6031BTM/DDX6031/DDX6031M/DDX4031BT/DDX4031BTM/DDX4031/DDX4031M - Kenwood DDX4031BTM | User Manual - Page 29
Activating/deactivating TI/News Standby Reception • This feature is available only for Region 2/3 models. TI Standby Reception News Standby Reception 1 TI indicator TI indicator TI Standby Reception Lights in white The unit will temporarily switch to Traffic Information (TI) if available. - Kenwood DDX4031BTM | User Manual - Page 30
indicator lights up when the Network-Tracking Reception is activated and an FM Radio Data System station is found. 30 DDX6031BT/DDX6031BTM/DDX6031/DDX6031M/DDX4031BT/DDX4031BTM/DDX4031/DDX4031M - Kenwood DDX4031BTM | User Manual - Page 31
Using other external components To display the source control screen, ☞ page 13. AV-IN name (☞ below) ☞ page 32 [Mode] [MENU] Changes the AV-IN name. • Press [2] or [3] to select an AV-IN name. • This setting does not affect the source name "AV-IN 1"/ "AV-IN 2" displayed on . Displays < - Kenwood DDX4031BTM | User Manual - Page 32
sound coming through speakers other than the front speakers during navigation guidance. Press [Enter] to display the setup screen for the navigation unit. See the instruction manual supplied for the navigation unit. 32 DDX6031BT/DDX6031BTM/DDX6031/DDX6031M/DDX4031BT/DDX4031BTM/DDX4031/DDX4031M - Kenwood DDX4031BTM | User Manual - Page 33
Sound adjustment Using the sound equalization • The adjustment is memorized for each source until you adjust the sound again. If the source is a disc, the adjustment is stored for each of the following categories. - DVD/DVD-VR - VCD/CD - DivX/MPEG1/MPEG2/MP3/WMA/WAV/AAC • You cannot adjust the - Kenwood DDX4031BTM | User Manual - Page 34
subwoofer level. *1 Adjustable only when the subwoofer is activated. (☞ page 41) *2 Not selectable when is set to . 34 DDX6031BT/DDX6031BTM/DDX6031/DDX6031M/DDX4031BT/DDX4031BTM/DDX4031/DDX4031M - Kenwood DDX4031BTM | User Manual - Page 35
Changing the display design You can change the background and panel color. 1 On : To select a panel color Variable color illumination • Illumination color changes gradually. 2 3 Select an item to change ( or ). For making your own color adjustment, ☞ below - Kenwood DDX4031BTM | User Manual - Page 36
captured image. (The existing image is replaced with the new one.) • Press [No] to return to the previous screen. 36 DDX6031BT/DDX6031BTM/DDX6031/DDX6031M/DDX4031BT/DDX4031BTM/DDX4031/DDX4031M - Kenwood DDX4031BTM | User Manual - Page 37
Setting for video playback You can change the setting for video playback. Picture adjustment You can adjust the picture quality. 1 Display the adjustment menu. 3 Adjust the picture (-15 to +15). Adjusts the brightness Adjusts the contrast Adjusts the black Adjusts the color Adjusts the tint* - Kenwood DDX4031BTM | User Manual - Page 38
• For "DISC"/"USB" only: Aspect ratio is automatically selected to match to the incoming signals. [5] [∞] [2] [3] : Moves the zooming frame. 38 DDX6031BT/DDX6031BTM/DDX6031/DDX6031M/DDX4031BT/DDX4031BTM/DDX4031/DDX4031M - Kenwood DDX4031BTM | User Manual - Page 39
2 3 To deactivate, select . • To erase the caution message, touch the screen. To display the picture from the rear view camera manually DDX6031BT/ DDX4031BT/ DDX6031BTM/ DDX4031BTM/ DDX6031/DDX6031M DDX4031/DDX4031M (Hold) (Hold) When displaying the picture from the rear view camera - Kenwood DDX4031BTM | User Manual - Page 40
settings 1 In step 2 in the left column: 4 Press a steering remote controller button to register/ change. 2 5 Select a function to assign. 40 DDX6031BT/DDX6031BTM/DDX6031/DDX6031M/DDX4031BT/DDX4031BTM/DDX4031/DDX4031M - Kenwood DDX4031BTM | User Manual - Page 41
Setting menu items • You cannot change settings when the unit is in standby. Menu item Selectable setting/item Initial: Underlined Fader/Balance Fader : Adjust the front and rear speaker output balance. ♦ F6 to R6; Initial 0 • When using a two-speaker system, set the fader to the - Kenwood DDX4031BTM | User Manual - Page 42
power off" appears when the setting is changed. Turn off the power, then turn on to enable the change. 42 DDX6031BT/DDX6031BTM/DDX6031/DDX6031M/DDX4031BT/DDX4031BTM/DDX4031/DDX4031M - Kenwood DDX4031BTM | User Manual - Page 43
Input Menu item AV Input R-CAM Interrupt Navigation Selectable setting/item Initial: Underlined You can determine the use of AV-IN input terminal. ♦ AV-IN2 : Select to play an AV component connected to the AV-IN input terminal. ♦ iPod : Select when connecting the iPod/iPhone using the USB - Kenwood DDX4031BTM | User Manual - Page 44
power off" appears when the setting is changed. Turn off the power, then turn on to enable the change. 44 DDX6031BT/DDX6031BTM/DDX6031/DDX6031M/DDX4031BT/DDX4031BTM/DDX4031/DDX4031M - Kenwood DDX4031BTM | User Manual - Page 45
memorized settings. • To cancel, press [Cancel]. 2 Touch the center of the marks at the lower left and at the upper right as instructed. Confirmation message appears. Press [Yes]. • To cancel the current operation, press [Cancel]. • To reset to the initial setting, press [Reset]. English 45 - Kenwood DDX4031BTM | User Manual - Page 46
BLUETOOTH OPERATIONS (Only for DDX6031BT/DDX6031BTM/DDX4031BT/DDX4031BTM) Information for using Bluetooth® devices • While driving, do . (☞ page 70) DDX6031BT/DDX6031BTM Bluetooth adaptor (KS-UBT1) DDX4031BT/DDX4031BTM Bluetooth adaptor (KS-UBT1) 46 DDX6031BT/DDX6031BTM/DDX6031/DDX6031M/DDX4031BT - Kenwood DDX4031BTM | User Manual - Page 47
Connecting Bluetooth devices Connecting a new Bluetooth device for the first time When you connect a Bluetooth device to the unit for the first time, make pairing between the unit and the device. Pairing allows Bluetooth devices to communicate each other. To make pairing, you may need to enter - Kenwood DDX4031BTM | User Manual - Page 48
column): 2 Select a device to delete the registration. Confirmation message appears. Press [Yes]. Select the device you want to connect. 48 DDX6031BT/DDX6031BTM/DDX6031/DDX6031M/DDX4031BT/DDX4031BTM/DDX4031/DDX4031M - Kenwood DDX4031BTM | User Manual - Page 49
, the talking method is switched ( : handsfree mode / : phone mode). Checking SMS reception If the mobile phone is compatible with SMS (Short Message Service), the unit tells you a message has been received. To read a received message, operate the mobile phone after stopping the car in a safe - Kenwood DDX4031BTM | User Manual - Page 50
presetting, ☞ page 52) Voice dialing (☞ the right column) Speak the name you want to call. To cancel, press [Cancel]. 50 DDX6031BT/DDX6031BTM/DDX6031/DDX6031M/DDX4031BT/DDX4031BTM/DDX4031/DDX4031M - Kenwood DDX4031BTM | User Manual - Page 51
Using the phonebook/call lists 1 2 Select the initial. If the initial is not a letter or number, press [Others]. Outgoing From dialled call list. Incoming From received call list. Missed From missed call list. Phonebook From phonebook. • For copying the phonebook, ☞ page 52. 3 Select a phone - Kenwood DDX4031BTM | User Manual - Page 52
from in . (☞ page 55) Numbers of the phonebook entries copied 4 Operate the target mobile phone. • Refer to the instruction manual supplied with your mobile phone. • To cancel the transfer, press [Finish]. 5 Finish the procedure. The phonebook memory is copied from the - Kenwood DDX4031BTM | User Manual - Page 53
the phonebook/call list you want to delete. (☞ page 51) 2 About mobile phones compatible with Phone Book Access Profile (PBAP) If your mobile phone supports PBAP, the phonebook and call lists are automatically copied to the unit when the mobile phone is connected. • Phonebook: up to 5 000 entries - Kenwood DDX4031BTM | User Manual - Page 54
with AVRCP 1.3. Bluetooth device settings For Bluetooth mobile phone: 1 On : For Bluetooth audio player: 1 On : 2 2 54 DDX6031BT/DDX6031BTM/DDX6031/DDX6031M/DDX4031BT/DDX4031BTM/DDX4031/DDX4031M - Kenwood DDX4031BTM | User Manual - Page 55
Name Shows the device name to be shown on the Bluetooth device - "KENWOOD BT MM-6U2." Device Address Shows the device address of the unit. Phone : The unit does not answer the calls automatically. Answer the calls manually. : The unit answers the incoming calls automatically within 5 seconds. SMS - Kenwood DDX4031BTM | User Manual - Page 56
(Region 3)/DDX6031BTM/DDX6031 (Region 3)/DDX6031M/DDX4031BT (Region 3)/ DDX4031BTM/DDX4031 (Region 3)/DDX4031M: This unit can be operated using KNA-RCDV331 is designed for controlling this unit. Refer to the instruction manual that comes with the remote controller. CAUTION • Put the Remote - Kenwood DDX4031BTM | User Manual - Page 57
Operations from the remote controller Common operations (AUD mode) Source switching Switches to the source to be played. Hangs up the incoming/current call. ENTER Enters options. Volume control Adjusts the volume. Hands-free communication When a call comes in, it answers the call. Volume - Kenwood DDX4031BTM | User Manual - Page 58
forward/backward during pause. DVD Top Menu Returns to the DVD top menu. DVD Menu Displays the DVD menu. 58 DDX6031BT/DDX6031BTM/DDX6031/DDX6031M/DDX4031BT/DDX4031BTM/DDX4031/DDX4031M - Kenwood DDX4031BTM | User Manual - Page 59
SUBTITLE Switches the subtitle language. Track search and file search Selects the track or file to be played. ZOOM Switches the zoom ratio each time you press this key. Play/Pause Pauses the track. Press again to resume playing. Picture Angle Switches the picture angle each time you press this - Kenwood DDX4031BTM | User Manual - Page 60
keypad File search Selects the file to be played. Play/Pause Pauses the file. Press again to resume playing. 60 DDX6031BT/DDX6031BTM/DDX6031/DDX6031M/DDX4031BT/DDX4031BTM/DDX4031/DDX4031M - Kenwood DDX4031BTM | User Manual - Page 61
REFERENCE Maintenance Caution on cleaning the unit Do not use any solvent (for example, thinner, benzine, etc.), detergent, or insecticide. This may damage the monitor or the unit. Recommended cleaning method: Gently wipe the panel with a soft, dry cloth. Moisture condensation Moisture may - Kenwood DDX4031BTM | User Manual - Page 62
-protected with FairPlay (except those stored on an iPod). - Files which have the data such as AIFF, ATRAC3, etc. 62 DDX6031BT/DDX6031BTM/DDX6031/DDX6031M/DDX4031BT/DDX4031BTM/DDX4031/DDX4031M - Kenwood DDX4031BTM | User Manual - Page 63
Sound signals emitted through the rear terminals Through the analog terminals (Speaker out/Front Preout/Rear Preout) 2-channel signal is emitted. When playing multi-channel encoded disc, multi-channel signals are downmixed. Language codes (for DVD/DivX language selection) Code Language Code - Kenwood DDX4031BTM | User Manual - Page 64
Troubleshooting What appears to be trouble is not always serious. Check the following points before calling a service center. • For operations with the external components, refer also to the instructions supplied with the adapters used for the connections (as well as the instructions supplied with - Kenwood DDX4031BTM | User Manual - Page 65
to be a problem Symptom No sound ) Reset the unit. (☞ page 3) Replace the battery. Store stations manually. (☞ page 28) Connect the antenna firmly. • Insert a finalized disc which you used for recording. The format of files is not supported by the unit. • Connect the video cord correctly. • Select - Kenwood DDX4031BTM | User Manual - Page 66
The tracks are not properly copied into the USB sometimes interrupted. device. Copy tracks again, and try again. USB 66 DDX6031BT/DDX6031BTM/DDX6031/DDX6031M/DDX4031BT/DDX4031BTM/DDX4031/DDX4031M - Kenwood DDX4031BTM | User Manual - Page 67
/ DDX4031BT/DDX4031BTM) Symptom Remedy cannot be controlled. Check whether the connected audio player supports AVRCP (Audio Video Remote Control Profile). Bluetooth device If the PIN code of the device is not indicated on its instructions, try "0000" or "1234." Echo or noise occurs. Adjust - Kenwood DDX4031BTM | User Manual - Page 68
of sale in Australia, China only. *3 DDX6031BT/ DDX6031BTM/ DDX4031BT/ DDX4031BTM only. ..........1 2WARNING • If you connect the ignition wire (red) installation, perform the Initial Setup by referring to the instruction manual. ..........6 ¤ • Mounting and wiring this product requires skills - Kenwood DDX4031BTM | User Manual - Page 69
unit are blocked. Blocking these openings will inhibit the cooling of the internal temperature and result in malfunction. Cooling fan DDX4031BT/DDX4031BTM only • Install the Bluetooth adaptor (KS-UBT1) besides the place enclosed by the metal. Bluetooth adaptor (KS-UBT1) DDX6031BT/DDX6031BTM/DDX6031 - Kenwood DDX4031BTM | User Manual - Page 70
DDX4031BTM only Antenna Cord Extension cable (Accessory 9) Connect to vehicle's steering remote harness. Contact your Kenwood the telephone rings or during conversation. (To connect the Kenwood navigation system, consult your navigation manual.) Not used Orange/White (Dimmer control wire) To - Kenwood DDX4031BTM | User Manual - Page 71
Optional Accessory) USB terminal (0.8 m) KCA-iP202 (Optional Accessory) (1.8 m) Audio Visual input 2 (iPod/AV Input 2 switchable) For DDX4031BT/DDX4031BTM/DDX4031/DDX4031M USB terminal USB device (commercially available) iPod (commercially available) CA-U1EX (Optional Accessory) Audio Visual - Kenwood DDX4031BTM | User Manual - Page 72
(As of December, 2011): • KNA-G630 • KNA-G630CN For latest information, access the www.kenwood.com/cs/ce/. Rear View Camera Input • Visual input (Yellow) Audio/Visual Output • Visual (White) • Audio right input (Red) 72 DDX6031BT/DDX6031BTM/DDX6031/DDX6031M/DDX4031BT/DDX4031BTM/DDX4031/DDX4031M - Kenwood DDX4031BTM | User Manual - Page 73
Installing the Unit For Volkswagen 1 Attach accessory 3 to the unit. For Toyota/Scion 1 Cut out accessory 4 as illustrated. Cutting line Accessory 4 Accessory 3 ⁄ • Make sure that the unit is installed securely in place. If the unit is unstable, it may malfunction (eg, the sound may skip). For - Kenwood DDX4031BTM | User Manual - Page 74
6 (M5x6mm) or Accessory 7 (M5x7mm) Car Bracket Accessory 6 (M5x6mm) or Accessory 7 (M5x7mm) Installing the Microphone Unit (DDX6031BT/DDX6031BTM/ DDX4031BT/DDX4031BTM only) 1 Check the installation position of the microphone (accessory 8). 2 Remove oil and other dirt from the installation surface - Kenwood DDX4031BTM | User Manual - Page 75
Bit Video Decoder : MPEG1/MPEG2/DivX Audio Decoder : MP3/WMA/AAC/WAV (Linear PCM) Bluetooth section (DDX6031BT/ DDX6031BTM/DDX4031BT/DDX4031BTM) Technology : Bluetooth 2.0 Certified Frequency : 2.402 - 2.480 GHz Output Power : +4dBm (MAX), 0dBm (AVE), Power Class2 Maximum Communication range : Line - Kenwood DDX4031BTM | User Manual - Page 76
/ DDX4031M) Operational Temperature Range : -10°C - +60°C Storage Temperature Range : -20°C - +85°C Weight : 2.5 kg (DDX6031BT/DDX6031BTM/DDX6031/ DDX6031M) 2.0 kg (DDX4031BT/DDX4031BTM/DDX4031/ DDX4031M) • Although the effective pixels for the liquid crystal panel is given as 99.99% or more, 0.01 - Kenwood DDX4031BTM | User Manual - Page 77
• "DVD Logo" is a trademark of DVD Format/Logo Licensing Corporation registered in the US, Japan and other countries. • The "AAC" logo is a trademark of Dolby Laboratories. • Microsoft and Windows Media are either registered trademarks or trademarks of Microsoft Corporation in the United States and/ - Kenwood DDX4031BTM | User Manual - Page 78
KS-UBT1 (USB Bluetooth Adapter) Instruction Manual CAUTION Changes or modifications not approved by us could void the user's authority to operate the equipment. • This adapter has been designed exclusively for use with Kenwood car receivers. Do not use this adapter with any other car receiver. For - Kenwood DDX4031BTM | User Manual - Page 79
deze KS-UBT1 voldoet aan de essentiële eisen en aan de overige relevante bepalingen van Richtlijn 1999/5/EC. Italiano Con la presente Kenwood dichiara che questo KS-UBT1 è conforme ai requisiti essenziali ed alle altre disposizioni pertinenti stabilite dalla direttiva 1999/5/CE. Español Por medio - Kenwood DDX4031BTM | User Manual - Page 80
-
 1
1 -
 2
2 -
 3
3 -
 4
4 -
 5
5 -
 6
6 -
 7
7 -
8
-
9
-
10
-
11
-
12
-
13
-
14
-
15
-
16
-
17
-
18
-
19
-
20
-
21
-
22
-
23
-
24
-
25
-
26
-
27
-
28
-
29
-
30
-
31
-
32
-
33
-
34
-
35
-
36
-
37
-
38
-
39
-
40
-
41
-
42
-
43
-
44
-
45
-
46
-
47
-
48
-
49
-
50
-
51
-
52
-
53
-
54
-
55
-
56
-
57
-
58
-
59
-
60
-
61
-
62
-
63
-
64
-
65
-
66
-
67
-
68
-
69
-
70
-
71
-
72
-
73
-
74
-
75
-
76
-
77
-
78
-
79
-
80
 |
 |

DDX6031BT
DDX6031BTM
DDX6031
DDX6031M
DDX4031BT
DDX4031BTM
DDX4031
DDX4031M
MONITOR WITH DVD RECEIVER
INSTRUCTION MANUAL
LVT2271-001A (MN/M2N/XN)
© 2011 JVC KENWOOD Corporation
This instruction manual is used to describe models listed
below. Model availability and features (functions) may differ
depending on the country and sales area.
• Region 2 (DVD Region Code 2 area)
• Region 3 (DVD Region Code 3 area)
• Region 4 (DVD Region Code 4 area)
• Region 6 (DVD Region Code 6 area)