Kenwood DDX419 Instruction Manual
Kenwood DDX419 Manual
 |
View all Kenwood DDX419 manuals
Add to My Manuals
Save this manual to your list of manuals |
Kenwood DDX419 manual content summary:
- Kenwood DDX419 | Instruction Manual - Page 1
DDX719 DDX7049BT DDX419 DDX4049BT DDX319 DDX3049 MONITOR WITH DVD RECEIVER INSTRUCTION MANUAL Take the time to read through this instruction manual. Familiarity with installation and operation procedures will help you obtain the best performance from your new DVD Receiver. For your records Record - Kenwood DDX419 | Instruction Manual - Page 2
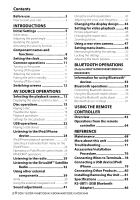
61 Bluetooth device settings 61 USING THE REMOTE CONTROLLER Overview 63 Operations from the remote controller 64 REFERENCE Maintenance 68 More about this unit 69 Troubleshooting 71 Accessories/Installation Procedure 76 Connecting Wires to Terminals...78 Connecting a USB device/iPod/ iPhone - Kenwood DDX419 | Instruction Manual - Page 3
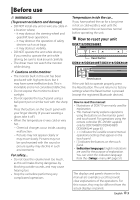
the Reset button is pressed (except the registered Bluetooth devices). How to read this manual: • Illustrations of DDX719 are mainly used for explanation. • This manual mainly explains operations using the buttons on the monitor panel and touch panel. For operations using the remote controller (RC - Kenwood DDX419 | Instruction Manual - Page 4
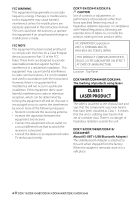
in the instruction manual. The receiver is connected. • Consult the dealer or an experienced radio/ TV technician for help. DDX719X/DDX419/DDX319: CAUTION Use of controls unit. DDX719/DDX7049BT/DDX419/ DDX4049BT: About KS-UBT1 (USB Bluetooth Adapter) The USB Bluetooth Adapter is attached to this unit - Kenwood DDX419 | Instruction Manual - Page 5
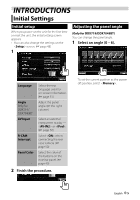
the panel angle. (☞ the right column) Select an external component to play - or . (☞ page 50) R-CAM Interrupt Panel Color Select when connecting the rear view camera. (☞ page 50) Select the color of the buttons on the monitor panel. (☞ page 43) 2 Finish the procedure. To set - Kenwood DDX419 | Instruction Manual - Page 6
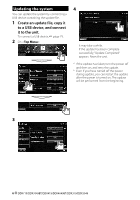
USB device containing the update file. 1 Create an update file, copy it to a USB device, and connect it to the unit. To connect a USB device, ☞ page 79. 2 On : 4 It may take a while. If the update has been complete successfully, "Update Completed" appears. Reset the unit. * If the update - Kenwood DDX419 | Instruction Manual - Page 7
Activating the security 2 function You can activate the security indicator to protect your receiver system against theft. 1 On : The security indicator on the monitor panel flashes when the vehicle ignition is off. To cancel, select . English 7 - Kenwood DDX419 | Instruction Manual - Page 8
screen. (☞ page 41) R-CAM button (Hold) • Displays the picture from the rear view camera. 6 AV button (Press) • Displays the current source screen. AV OUT button (Hold) • Selects the AV source for external monitor or amplifier. 7 MENU/ button • Turns off the power. (Hold) • Turns on the - Kenwood DDX419 | Instruction Manual - Page 9
the audio volume. (Turn) For DDX419/DDX4049BT only: AUD button • Displays the screen. (Hold) (☞ page 41) 9 FNC/R-CAM button • Displays the source control screen. (Press) (☞ page 12) • Displays the picture from the rear view camera. (Hold) p USB input terminal q iPod/AV-IN2 input terminal - Kenwood DDX419 | Instruction Manual - Page 10
Set the clock time. 2 Display screen. 3 * Synchronizes the clock time with the connected navigation unit. time with FM RBDS. Sets the clock manually. (☞ below) 1 Adjust the hour 2 Adjust the minute [Reset]: Sets the minute to "00 - Kenwood DDX419 | Instruction Manual - Page 11
DDX719/ DDX7049BT DDX419/ DDX4049BT/ DDX319/DDX3049 Putting the unit in standby Turning off the power DDX719/ DDX7049BT DDX419/ DDX4049BT/ DDX319 DDX419/DDX4049BT/DDX319/DDX3049 Decrease Increase (Hold) DDX419/DDX4049BT DDX319/DDX3049 To attenuate the sound DDX719/ DDX7049BT DDX419/ - Kenwood DDX419 | Instruction Manual - Page 12
track.* Displays the source control screen while playing a video. • The operation buttons disappear by touching the screen or when no operation is done for about 5 seconds. * Not available for video from an external component and rear view camera. 12 DDX719/DDX7049BT/DDX419/DDX4049BT/DDX319/DDX3049 - Kenwood DDX419 | Instruction Manual - Page 13
AV-IN 1/AV-IN 2*5 (☞ page 39) Bluetooth*4 (☞ page 61) PANDORA*6 (☞ page 27) SiriusXM*6 (☞ page 32) Displays the navigation screen when a navigation unit is connected. Plays a disc. Displays the phone control screen. Plays files on a USB device. Plays an iPod/iPhone. Switches to the radio broadcast - Kenwood DDX419 | Instruction Manual - Page 14
Displaying the source control screen On each playback screen, perform the following: DDX719/DDX7049BT or DDX419/DDX4049BT/DDX319/ DDX3049 (Hold) • For DDX719/DDX7049BT, pressing and holding TEL hides the operation buttons. For DDX419/ DDX4049BT/DDX319/DDX3049, pressing FNC/R-CAM hides the - Kenwood DDX419 | Instruction Manual - Page 15
DDX719/DDX7049BT DDX719/DDX7049BT Label side DDX419/DDX4049BT/DDX319/DDX3049 DDX419/DDX4049BT/DDX319/DDX3049 Label side • monitor panel closes. The source changes to "DISC" and playback starts. • The IN indicator lights up while a disc is inserted. • If " " appears on the screen, the unit - Kenwood DDX419 | Instruction Manual - Page 16
Disc type Recording format, file type, etc Playable DVD DVD-Video *1 Region Code: • For DDX719/DDX419/DDX319: 1 • For DDX7049BT/DDX4049BT/DDX3049: 4 DVD-Audio/DVD-ROM DVD Recordable/ Rewritable (DVD-R/-RW *2, +R/+RW *3) • DVD Video: UDF bridge • DVD-VR • DivX *5/MPEG1/MPEG2/ JPEG/MP3/WMA - Kenwood DDX419 | Instruction Manual - Page 17
display the source control screen, ☞ page 14. For DVD/DVD-VR/VCD/DivX/MPEG1/MPEG2/JPEG Media type Playing time • DVD Video: Title no./Chapter no. • DVD-VR: Program track. (Press) • Reverse/forward search.*4 (Hold) [1] [¡] [Mode]*5 [MENU] • Reverse/forward search during playback.*4 • Plays back in - Kenwood DDX419 | Instruction Manual - Page 18
control screen, ☞ page 14. For CD/MP3/WMA/WAV/AAC Track/file information • Pressing [ - Kenwood DDX419 | Instruction Manual - Page 19
DVD-VR: Selects the audio channel (ST: stereo, L: left, R: right). Selects the subtitle type. Selects view angle. Displays the disc menu (DVD)/playlist (DVD-VR). Displays the disc menu (DVD)/original program (DVD screen. Switches to the direct menu selection mode. Press the target item to select. - Kenwood DDX419 | Instruction Manual - Page 20
DVD/DVD-VR Selects Repeat playback mode For VCD (without PBC)/CD/DivX/MPEG1/ MPEG2/MP3/WMA/WAV/AAC Direct selecting buttons (☞ below) [Audio] [Return] [MENU] [Picture Adjust] [Aspect] [ZOOM] [Direct] Selects the audio channel (ST: stereo . 20 DDX719/DDX7049BT/DDX419/DDX4049BT/DDX319/DDX3049 - Kenwood DDX419 | Instruction Manual - Page 21
and/or rear speakers. ♦ Dolby : Select this to enjoy multi-channel surround Surround audio with Dolby Surround. ♦ Stereo : Normally select this. Dynamic Range Control You can change the dynamic range while playing Dolby Digital software. ♦ Wide : Select this to enjoy a powerful sound at - Kenwood DDX419 | Instruction Manual - Page 22
then reset this unit and the USB device. • Operation and power supply may not work as intended for some USB devices. • Do not leave a USB device in the car, or expose to direct sunlight or high temperature to avoid deformation or damage to the device. 22 DDX719/DDX7049BT/DDX419/DDX4049BT/DDX319 - Kenwood DDX419 | Instruction Manual - Page 23
on the external monitor. 16:9 4:3 LB (Letterbox) Setting Audio Plays back audio files. Still Image Plays back JPEG files. Video Plays back DivX/MPEG1/ MPEG2 files. Audio&Video Plays back audio files and DivX/MPEG1/MPEG2 files. 4:3 PS (PanScan) • If the USB device contains - Kenwood DDX419 | Instruction Manual - Page 24
Video cable for iPod/iPhone-KCA-iP22F/KCAiP202 (optional accessory) - To listen to the music (digital): USB Audio cable for iPod/iPhone-KCA-iP102 (optional accessory) • Do not use extension cables. iPod/iPhone that can be connected to this unit: Made for - iPod with video - iPod classic - iPod nano - Kenwood DDX419 | Instruction Manual - Page 25
abnormal or unstable during operation. In this case, disconnect the iPod/iPhone device, then check its condition. If the performance is not improved or is slow, reset your iPod/iPhone. • For the latest compatible list and software version of iPod/iPhone, see: www.kenwood.com/cs/ce/ipod English 25 - Kenwood DDX419 | Instruction Manual - Page 26
depending on the type of your iPod/iPhone. • The current position of your vehicle appears on the map. When the vehicle runs, the map scrolls. • The screens of the iPhone and unit are not the same. • To return to the normal mode, press [APP]. 26 DDX719/DDX7049BT/DDX419/DDX4049BT/DDX319/DDX3049 - Kenwood DDX419 | Instruction Manual - Page 27
® operations (Only for DDX719/DDX419/DDX319) • You can operate PANDORA using the remote controller. Only playing, pausing, and skipping are available. • Install the latest version of the PANDORA® application on your iPhone. The picture data is displayed if available from the current content. Song - Kenwood DDX419 | Instruction Manual - Page 28
internet radio The requirements for listening to Pandora are as follows: • Use an Apple iPhone or iPod touch running under iOS3 or later. • Search for "Pandora" in the Apple iTunes App Store to find and install the most current version of the Pandora® application on your device. • In the application - Kenwood DDX419 | Instruction Manual - Page 29
indicator TI indicator Seek mode indicator • The ST indicator lights up when receiving an FM stereo broadcast with sufficient mode. (☞ page 31) Selects AM band. Selects FM band. Changes the seek mode. • AUTO1: Auto Search • AUTO2: Tunes in stations in memory one after another. • MANU: Manual - Kenwood DDX419 | Instruction Manual - Page 30
Displaying the information of the current station Manual presetting 1 Tune in to a station you want to preset. (☞ page 29) 2 Select a preset number. 2 (Hold) Local stations with the strongest signals are searched and stored automatically. 30 DDX719/DDX7049BT/DDX419/DDX4049BT/DDX319/DDX3049 - Kenwood DDX419 | Instruction Manual - Page 31
The following features are available only for FM RBDS stations. Searching for FM signals. Deactivated. • The volume adjustment for Traffic Information is automatically memorized. The next time the unit switches to Traffic Information, the volume is set to the previous level. Changes the page PTY - Kenwood DDX419 | Instruction Manual - Page 32
DDX419/DDX319) Everything worth listening to is on SiriusXM, getting over 130 channels, including the most commercial-free music, plus the best channel. (☞ page 35) Changes the band. SXM1 SXM2 SXM4 SXM3 Changes the seek mode. • SEEK1: Skip to another available channel. • SEEK2: Skip to another preset - Kenwood DDX419 | Instruction Manual - Page 33
To confirm your Radio ID, tune to channel 0. • The letters I, O, S and F are not used in any Radio ID. 2 How to activate your SiriusXM Service Go to www.siriusxm.com/ activatenow or call 1-866-6352349 to activate your SiriusXM Vehicle Connect Tuner. 3 When the following screen appears, press [Enter - Kenwood DDX419 | Instruction Manual - Page 34
confirm (2). • To clear the entry, press [Clear]. • To cancel selecting the channel, press [Cancel]. (Hold) The channel selected in step 1 is stored. 34 DDX719/DDX7049BT/DDX419/DDX4049BT/DDX319/DDX3049 - Kenwood DDX419 | Instruction Manual - Page 35
Displaying information on channels You can obtain information on channels or select a category and then a channel. 1 Channel List Select a category (1) and then a channel (2). 2 Select [Preset List] or [Channel List]. - To list all the channels, select [All Channels]. - Pressing the info change - Kenwood DDX419 | Instruction Manual - Page 36
If you have already recorded 30 minutes, the entire bar is indicated in blue. • Updated every second. This display shows you how many minutes into a recording that are being played Exiting the Instant Replay mode (Returning to the normal display) 36 DDX719/DDX7049BT/DDX419/DDX4049BT/DDX319/DDX3049 - Kenwood DDX419 | Instruction Manual - Page 37
restrictions Display the SiriusXM Mode screen to configure the order to, for example, restrict children from receiving adult channels. Setting/Changing the parental code classed as "adult" by SiriusXM™. • To enable the parental control based on Mature channels, press [ON] next to "Parental Mature - Kenwood DDX419 | Instruction Manual - Page 38
allows you to pick the channels to be locked by the parental control feature. 1 Skipping unwanted channels If you do not want to receive some channels, you can skip them. Activating the channel skipping 1 the locked channels will be deactivated. 38 DDX719/DDX7049BT/DDX419/DDX4049BT/DDX319/DDX3049 - Kenwood DDX419 | Instruction Manual - Page 39
Using other external components To display the source control screen, ☞ page 14. AV-IN name (☞ below) [Mode] [MENU] Changes the AV-IN name. • Press [2] or [3] to select an AV-IN name. • This setting does not affect the source name "AV-IN 1"/ "AV- - Kenwood DDX419 | Instruction Manual - Page 40
) Select to attenuate the sound coming through speakers other than the front speakers during navigation guidance. Press [Enter] to display the setup screen for the navigation unit. See the instruction manual supplied for the navigation unit. 40 DDX719/DDX7049BT/DDX419/DDX4049BT/DDX319/DDX3049 - Kenwood DDX419 | Instruction Manual - Page 41
. - DVD/DVD-VR - VCD/CD - DivX/MPEG1/MPEG2/MP3/WMA/WAV/AAC • You cannot adjust the sound when the unit is in standby. Selecting a preset sound mode 1 On : 2 Storing your own adjustment Customizing preset sound mode 1 Select a sound mode. (☞ "Selecting a preset sound mode") 2 Set - Kenwood DDX419 | Instruction Manual - Page 42
Perform steps 1 and 2 of "Selecting a preset sound mode," then... Adjusting the cross over frequency 1 On : 2 2 3 Adjust the sound of each band. 3 Select the item to adjust, then make adjustment. Adjusts the cross over for front or rear speakers (high pass filter). Flat Changes level - Kenwood DDX419 | Instruction Manual - Page 43
display design You can change the background and panel color. 1 On : To select a panel color Variable color illumination • Illumination color changes gradually. 2 3 Select an item to change ( or ). For making your own color adjustment, ☞ below Making your own - Kenwood DDX419 | Instruction Manual - Page 44
, you can capture an image and use the captured image as a background. • You cannot capture copyrighted content and images from iPod/iPhone. • When using a JPEG file as the background, make sure that the resolution is 800 x 600 pixels. • The color of the captured image may look different from that - Kenwood DDX419 | Instruction Manual - Page 45
setting for video playback. Picture adjustment You can adjust the picture quality. 1 Display the adjustment menu. 3 Adjust the picture (-15 to +15). Adjusts the brightness Adjusts the contrast Adjusts the black Adjusts the color Adjusts the tint* Adjusts the sharpness * Adjustable only when the - Kenwood DDX419 | Instruction Manual - Page 46
played back with set to (for disc: ☞ page 21/ for USB: ☞ page 23), the aspect ratio is not set correctly. Zooming picture You can zoom the 4:3 original pictures Auto: 4:3 signal 16:9 signal • For "DISC"/"USB" only: Aspect ratio is automatically selected to match to the incoming - Kenwood DDX419 | Instruction Manual - Page 47
the caution message, touch the screen. To display the picture from the rear view camera manually DDX719/ DDX7049BT DDX419/ DDX4049BT/ DDX319/DDX3049 (Hold) (Hold) When displaying the picture from the rear view camera manually, you can change the setting of the picture. (☞ page 45) To cancel - Kenwood DDX419 | Instruction Manual - Page 48
a well-balanced sound at a low volume level. The LOUD indicator lights up. Adjust the cross over frequency. (☞ page 42) Volume Offset Adjust and store the auto-adjustment volume level for each source. (For discs, the adjustment is stored for each of the following categories: DVD/DVD-VR, VCD/CD - Kenwood DDX419 | Instruction Manual - Page 49
dimmer mode ( or ) for adjustment, then change the following settings: ♦ Bright ♦ Black : Adjusts brightness (-15 to +15; Initial +15). : Adjusts black (-15 to +15; Initial 0). Video Output* Angle Only for DDX719/ DDX7049BT Select the color system of the external monitor. ♦ NTSC - Kenwood DDX419 | Instruction Manual - Page 50
USB Audio and Video cable for iPod/iPhone. (☞ page 24) Input R-CAM Interrupt Navigation DDX7049BT/ DDX4049BT/DDX3049 ♦ ON : Displays the picture from the rear view camera when you shift the gear to the reverse (R) position. ♦ OFF : Cancels. Change the navigation settings. (☞ page 40) NAV - Kenwood DDX419 | Instruction Manual - Page 51
language for external monitors will be remote sensor. : Cancels. SETUP Memory You can memorize, recall, clear, or lock the settings you have made. (☞ page 52) DivX(R) VOD Only for DDX7049BT/ DDX4049BT/DDX3049 This unit version information on the software. You can update the software. (☞ page 6) - Kenwood DDX419 | Instruction Manual - Page 52
Memorizing/recalling the settings You can memorize the settings changed in the menu and recall the memorized settings anytime. • The memorized settings are kept even when the unit is reset. 1 On : 2 Locking the settings You can lock the settings to prevent them from being changed. • - Kenwood DDX419 | Instruction Manual - Page 53
devices can be connected without cables and communicate with each other. Preparation: Be sure to connect Bluetooth adapter KS-UBT1 (supplied) and microphone (supplied) beforehand. (☞ page 78) DDX719/DDX7049BT Bluetooth adaptor (KS-UBT1) DDX419/DDX4049BT Bluetooth adaptor (KS-UBT1) English 53 - Kenwood DDX419 | Instruction Manual - Page 54
other. To make pairing, you may need to enter the PIN (Personal Identification Number) code of your Bluetooth device you want to connect. • Once the connection is established, it is registered in the unit even if you reset the unit. Up to 5 devices can be registered in total. • Only one device for - Kenwood DDX419 | Instruction Manual - Page 55
and you can use the Bluetooth device through the unit. Connecting/disconnecting a registered Bluetooth device 1 Display the Bluetooth setting screen. (☞ page 54) • For Bluetooth mobile phone: • For Bluetooth audio player: 2 To connect A confirmation message appears - Kenwood DDX419 | Instruction Manual - Page 56
compatible with SMS (Short Message Service), the unit tells you a message has been received. To read a received message, operate the mobile phone after stopping the car in a safe place. • You cannot read, edit, or send a message through the unit. 56 DDX719/DDX7049BT/DDX419/DDX4049BT/DDX319/DDX3049 - Kenwood DDX419 | Instruction Manual - Page 57
Making a call 1 On : Direct number entry Deletes last character 2 Select a method to make a call. Phonebook/Call lists (☞ page 58) Direct number entry (☞ the right column) Hold: Adds "+" Presets the entered phone number on the preset list (☞ page 59) • You can enter up to 32 numbers. - Kenwood DDX419 | Instruction Manual - Page 58
is not a letter or number, press [Others]. Outgoing From dialled call list. Incoming From received call list. Missed From missed call list. Phonebook From phonebook. • For copying the phonebook, 1 2 To make a call, select a phone number. 58 DDX719/DDX7049BT/DDX419/DDX4049BT/DDX319/DDX3049 - Kenwood DDX419 | Instruction Manual - Page 59
Menu>: Copying the phonebook You can copy the phonebook memory of a mobile phone into the unit (up to 400 entries). 1 On : 2 Select an item from phonebook/call Mode>. (☞ page 62) Numbers of the phonebook entries copied 4 Operate the target mobile phone. • Refer to the instruction manual - Kenwood DDX419 | Instruction Manual - Page 60
compatible with Phone Book Access Profile (PBAP) If your mobile phone supports PBAP, the phonebook and call lists are automatically copied to the unit when the mobile phone is connected. • Phonebook: up to 5 000 entries • Dialled calls, received calls, and missed calls: up to 50 entries each • You - Kenwood DDX419 | Instruction Manual - Page 61
screen differ depending on the connected device. [3] [8] [4][¢] Starts playback. Pauses. • Selects track. (Press) • Reverse/forward search* (Hold) [Mode] [MENU] Displays the Bluetooth setting screen. (☞ below) Displays screen. * Available only for the devices compatible with AVRCP - Kenwood DDX419 | Instruction Manual - Page 62
new PIN code, then press [Enter]. Device Name Shows the device name to be shown on the Bluetooth device - "KENWOOD BT MM-6U2." Device Address Shows the device address of the unit. Phone Device*1 Shows the connected phone device name. Audio Device*2 Shows the connected audio device name. Auto - Kenwood DDX419 | Instruction Manual - Page 63
be operated using the Remote Controller (RC-DV340) supplied with this unit. DDX719/DDX419/DDX319: Optional Remote Controller KNA-RCDV331 is designed for controlling this unit. Refer to the instruction manual that comes with the remote controller. CAUTION • Put the Remote Controller in a place where - Kenwood DDX419 | Instruction Manual - Page 64
Volume control Adjusts the volume. Hands-free communication When a call comes in, it answers the call. Volume attenuating Press the key once to lower the volume. Press again to restore the previous volume. Function Switches the function screen. NAV/V.SEL Switches to the navigation screen. MODE - Kenwood DDX419 | Instruction Manual - Page 65
DVD/VCD (DVD mode) Track search and file search Selects the track or file to be played. Play/Pause Pauses the track. Press again to resume playing. VCD 1.X, VCD 2.X (PBC OFF) Track number Cancel VCD 2.X (PBC ON) Track number Cancel Once you have switched to the direct search feature, specify the - Kenwood DDX419 | Instruction Manual - Page 66
mode) Folder search Selects the folder to be played. Direct search Pressing this key switches the features that can be searched directly. Music Disc Track number Cancel Audio files in DVD /CD disc Folder number File number Cancel Once you have switched to the direct search feature, specify - Kenwood DDX419 | Instruction Manual - Page 67
received by the unit. • To use preset tuning, press the number of a programmed broadcast station. ( 1 - ) 6MNO • Press the direct tuning key first, then specify the frequency of the station to receive. iPod (AUD mode broadcast station you wish to receive. USB (AUD mode) Folder search Selects the - Kenwood DDX419 | Instruction Manual - Page 68
monitor or the unit. Recommended cleaning method: Gently wipe the panel with a soft, dry cloth. Moisture condensation Moisture may condense on the lens inside the unit in the following cases: • After starting the heater in the car recording area 68 DDX719/DDX7049BT/DDX419/DDX4049BT/DDX319/DDX3049 - Kenwood DDX419 | Instruction Manual - Page 69
file encoded in the interlaced scanning mode may not be played back correctly. Playing MPEG1/MPEG2 files • This unit can play back MPEG1/MPEG2 files of data in an iPod/iPhone and USB mass storage class device while using this unit. Playing MP3/WMA/WAV/AAC files • This unit can play back files - Kenwood DDX419 | Instruction Manual - Page 70
Sound signals emitted through the rear terminals Through the analog terminals (Speaker out/Front Preout/Rear Preout) 2-channel signal is emitted. When playing multi-channel encoded disc, multi-channel signals are downmixed. Language codes (for DVD (MAY) SW Swahili AZ DDX419/DDX4049BT/DDX319/DDX3049 - Kenwood DDX419 | Instruction Manual - Page 71
contact with the car chassis. Wire or insulate the speaker cord as appropriate, then reset the unit (☞ page 3, 78). No playback picture is shown when the parking brake is not engaged. "Authorization Error" "USB Device Error" "No BT Dongle" Check whether the connected iPod/iPhone is compatible with - Kenwood DDX419 | Instruction Manual - Page 72
"No Signal" • "NoSignal" The SiriusXM Tuner is disconnected or the unit is having trouble communicating with the Tuner. Connect the Tuner or check the Tuner connection to the back of the unit. Your subscription status has been updated. The selected channel is not available. The selected channel has - Kenwood DDX419 | Instruction Manual - Page 73
a problem Symptom Remedy/Cause No sound comes out of the speakers. No picture is displayed on the screen. The unit does not work at all. • Adjust the volume to the optimum level. • Check the cords and connections. Turn on the screen. (☞ page 11) Reset the unit. (☞ page 3) The remote controller - Kenwood DDX419 | Instruction Manual - Page 74
Check the connecting cable and its connection. • Update the firmware version. • Charge the battery. • Check whether the iPod control mode is correctly selected. (☞ page 26) • Reset the iPod/iPhone. Sound is distorted. Deactivate the equalizer either on this unit or the iPod/iPhone. A lot of noise - Kenwood DDX419 | Instruction Manual - Page 75
, then turn on the unit. • (When the sound is not yet restored) connect the player again. The connected audio player cannot be controlled. Check whether the connected audio player supports AVRCP (Audio Video Remote Control Profile). Bluetooth device does not detect the unit. • Check whether the - Kenwood DDX419 | Instruction Manual - Page 76
harness connector to the unit. 6 Install the unit in your car. ¤ • Mounting and wiring this product requires skills and experience. For best safety, leave the mounting and wiring work to professionals. • Make sure to ground the unit to a negative 12V DC power supply. • Do not install the unit - Kenwood DDX419 | Instruction Manual - Page 77
the + connector of the left speaker to a front output terminal, do not connect the - connector to a rear output terminal. • After the unit is installed, check whether the brake lamps, blinkers, wipers, etc. on the car are working properly. • Mount the unit so that the mounting angle is 30° or less - Kenwood DDX419 | Instruction Manual - Page 78
Bluetooth Microphone (Accessory 9) DDX719/ DDX7049BT/DDX419/DDX4049BT only Purple/White (Reverse sensor wire) Antenna Cord Light Green Subwoofer Preout (monaural) Connect to vehicle's reverse lamp harness when using the optional rear view camera. Extension cable (Accessory 2) (Parking - Kenwood DDX419 | Instruction Manual - Page 79
/iPod/iPhone For DDX719/DDX7049BT iPod (commercially available) USB device (commercially available) CA-U1EX (Optional Accessory) USB terminal (0.8 m) KCA-iP202 (Optional Accessory) (1.8 m) Audio Visual input 2 (iPod/AV Input 2 switchable) For DDX419/DDX319/DDX4049BT/DDX3049 USB terminal USB - Kenwood DDX419 | Instruction Manual - Page 80
www.kenwood.com/cs/ce/. Rear View Camera Input • Visual input (Yellow) Audio/Visual Output • Visual output (Yellow) • Audio output (3.5φ mini plug) Resistance-free stereo type mini plug Connection cable (Included in the Navigation System) SiriusXM Tuner (commercially available) DDX719/DDX419/DDX319 - Kenwood DDX419 | Instruction Manual - Page 81
securely in place. If the unit is unstable, it may malfunction (eg, the sound may skip). Installation on Toyota, Nissan or Mitsubishi Car using Brackets Accessory 3 (M5x6mm) or Accessory 4 (M5x7mm) Car Bracket Accessory 5 Removing the Escutcheon (DDX419/DDX4049BT/ DDX319/DDX3049 only) 1 Engage - Kenwood DDX419 | Instruction Manual - Page 82
, as shown. Accessory 6 Installing the Microphone Unit (DDX719/DDX7049BT/ DDX419/DDX4049BT only) 1 Check the installation position of the microphone (accessory 9). 2 Remove oil and other dirt from the installation surface. 3 Install the microphone. 4 Wire the microphone cable up to the unit with it - Kenwood DDX419 | Instruction Manual - Page 83
USB interface section USB Standard : USB 2.0 Full Speed File System : FAT 16/32 Maximum Power Supply Current : DC 5 V 1 A D/A Converter : 24 Bit Video Decoder : MPEG1/MPEG2/ DivX (DDX7049BT/DDX4049BT/DDX3049) Audio Decoder : MP3/WMA/AAC/WAV (Linear PCM) Bluetooth section (DDX719/ DDX7049BT/DDX419 - Kenwood DDX419 | Instruction Manual - Page 84
Color System of External Video Input : NTSC/PAL External Video Input Level (RCA/mini jack) : 1 Vp-p/ 75 Ω External Audio Max Input Level (RCA/ mini jack) : 2 V/ 25 kΩ Video Output Level (RCA jack) : 1 Vp-p/ 75 Ω Audio Output ) 2.0 kg (4.4 lbs) (DDX419/DDX4049BT/DDX319/ DDX3049) • Although the - Kenwood DDX419 | Instruction Manual - Page 85
& DTS 2.0 Channel is a trademark of DTS, Inc. Product includes software. © DTS, Inc. All Rights Reserved. • "Made for iPod," and "Made for iPhone" mean that an electronic accessory has been designed to connect specifically to iPod, or iPhone, respectively, and has been certified by the developer to - Kenwood DDX419 | Instruction Manual - Page 86
KS-UBT1 (USB Bluetooth Adapter) Instruction Manual CAUTION Changes or modifications not approved by us could void the user's authority to operate the equipment. • This adapter has been designed exclusively for use with Kenwood car receivers. Do not use this adapter with any other car receiver. For - Kenwood DDX419 | Instruction Manual - Page 87
radio frequency energy. Changes or modifications to this equipment may cause harmful interference unless the modifications are expressly approved in the instruction manual. The user could lose the authority to operate this equipment if an unauthorized change or modification is made. FCC NOTE This - Kenwood DDX419 | Instruction Manual - Page 88
- Kenwood DDX419 | Instruction Manual - Page 89
M/DDX4031 BT/DDX4031 BTM/DDX4031/DDX4031 M English (page 22) CORRECTION Setting Incorrect Press [Next] to switch to another USB device when multiple USB devices are connected via a USB hub or the like. Correct Press [Next]. Switches between the internal and external memory source - Kenwood DDX419 | Instruction Manual - Page 90
page 23) CORRECTION Setting Incorrect Press [Next] to switch to another USB device when multiple USB devices are connected via a USB hub or the like. Correct Press [Next]. Switches between the internal and external memory source of the connected device (such as mobile phone). Fran~ais - Kenwood DDX419 | Instruction Manual - Page 91
Service Center: • Improper maintenance or repair, includingthe installalioo of parts or accessories that do not conform to the quality and specificalionsof the original parts. • Misuse, abuse, neglect, unauthorized product modification or failure to follow instruC1ions contained in the Owners Manual - Kenwood DDX419 | Instruction Manual - Page 92
FOR fW'f DEFECTIVE PRODUCT IS liMITEDTOTHEREPAIR OR REPLACEMENTOFTHEPRODUCT ATOUR OPTION. KENWOOD SHALLNOT BE LIABLE FOR: 1. INSTALLATION OR REMOVAL CHARGES, DAMAGE TO OTHER PROPERTY CAUSED BY ANY DEFECTS IN KENWOOD CAR STEREO COMPONENTS, DAMAGES BASED UPON INCONVENIENCE, LOSS OF USE OF THE
-
 1
1 -
 2
2 -
 3
3 -
 4
4 -
 5
5 -
 6
6 -
 7
7 -
8
-
9
-
10
-
11
-
12
-
13
-
14
-
15
-
16
-
17
-
18
-
19
-
20
-
21
-
22
-
23
-
24
-
25
-
26
-
27
-
28
-
29
-
30
-
31
-
32
-
33
-
34
-
35
-
36
-
37
-
38
-
39
-
40
-
41
-
42
-
43
-
44
-
45
-
46
-
47
-
48
-
49
-
50
-
51
-
52
-
53
-
54
-
55
-
56
-
57
-
58
-
59
-
60
-
61
-
62
-
63
-
64
-
65
-
66
-
67
-
68
-
69
-
70
-
71
-
72
-
73
-
74
-
75
-
76
-
77
-
78
-
79
-
80
-
81
-
82
-
83
-
84
-
85
-
86
-
87
-
88
-
89
-
90
-
91
-
92
 |
 |

DDX719
DDX7049BT
DDX419
DDX4049BT
DDX319
DDX3049
MONITOR WITH DVD RECEIVER
INSTRUCTION MANUAL
LVT2268-001A (KN/RN)
© 2011 JVC KENWOOD Corporation
Take the time to read through this instruction manual.
Familiarity with installation and operation procedures will help you obtain the best
performance from your new DVD Receiver.
For your records
Record the serial number, found on the back of the unit, in the spaces designated on the warranty
card, and in the space provided
below. Refer to the model and serial numbers whenever you call
upon your Kenwood dealer for information or service on the product.
Model DDX719/DDX7049BT/DDX419/DDX4049BT/DDX319/DDX3049 Serial number
US Residence Only
Register Online
Register your Kenwood product at
www.Kenwoodusa.com