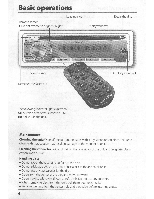
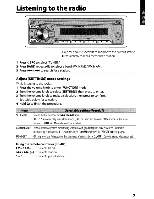
Kenwood KDC-108 Instruction Manual - Page 6
Getting, started - with speakers
 |
UPC - 019048190970
View all Kenwood KDC-108 manuals
Add to My Manuals
Save this manual to your list of manuals |
Page 6 highlights
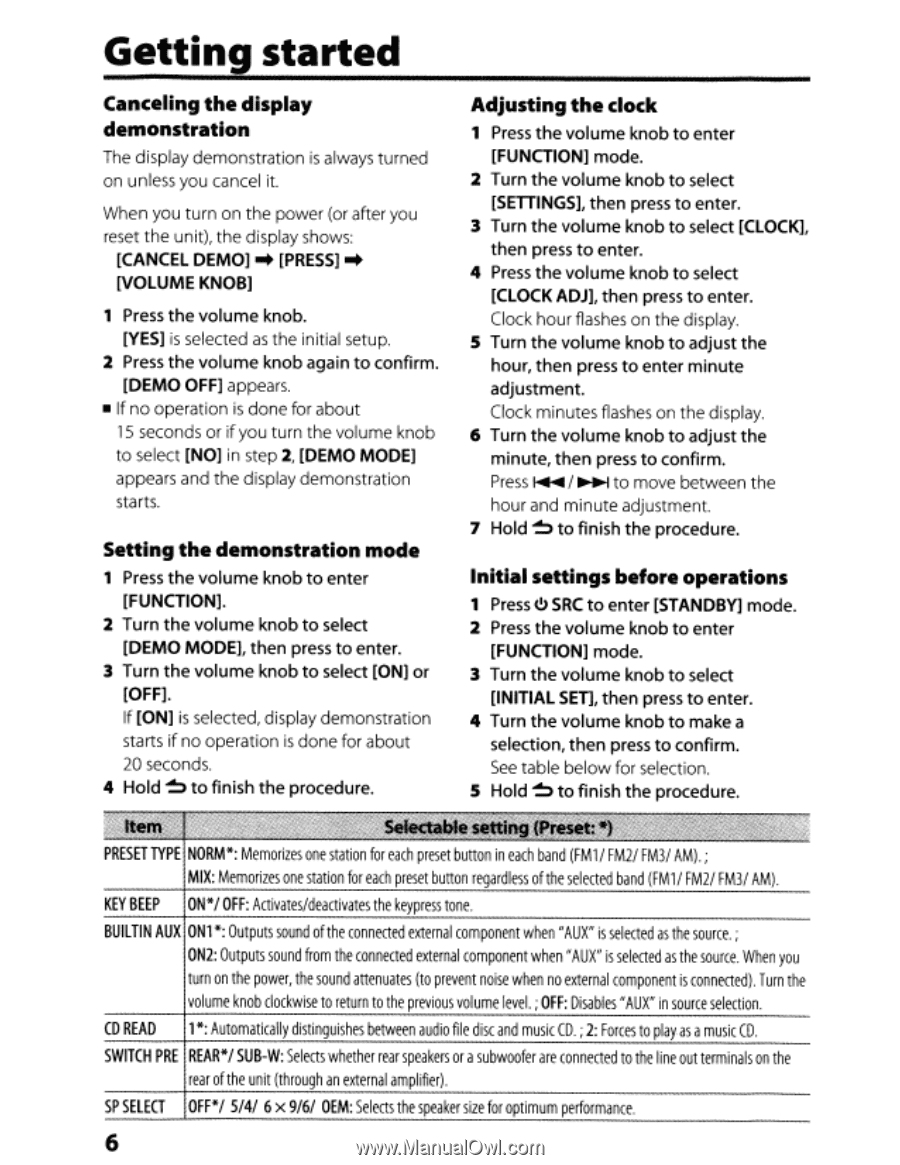
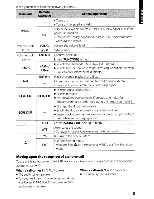
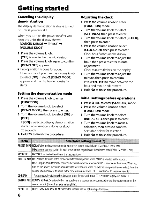
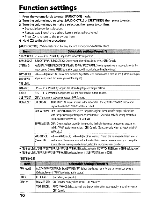
Getting started Canceling the display demonstration The display demonstration is always turned on unless you cancel it. When you turn on the power (or after you reset the unit), the display shows: [CANCEL DEMO] ~ [PRESS] ~ [VOLUME KNOB] 1 Press the volume knob. [YES] is selected as the initial setup. 2 Press the volume knob again to confirm. [DEMO OFF] appears. • If no operation is done for about 15 seconds or if you turn the volume knob to select [NO] in step 2, [DEMO MODE] appears and the display demonstration starts. Setting the demonstration mode 1 Press the volume knob to enter [FUNCTION]. 2 Turn the volume knob to select [DEMO MODE], then press to enter. 3 Turn the volume knob to select [ON] or [OFF]. If [ON] is selected, display demonstration starts if no operation is done for about 20 seconds. 4 Hold ~ to finish the procedure. Adjusting the clock 1 Press the volume knob to enter [FUNCTION] mode. 2 Turn the volume knob to select [SETTINGS], then press to enter. 3 Turn the volume knob to select [CLOCK], then press to enter. 4 Press the volume knob to select [CLOCK ADJ], then press to enter. Clock hour flashes on the display. S Turn the volume knob to adjust the hour, then press to enter minute adjustment. Clock minutes flashes on the display. 6 Turn the volume knob to adjust the minute, then press to confirm. Press ~ / ~ to move between the hour and minute adjustment. 7 Hold ~ to finish the procedure. Initial settings before operations 1 Press t!) SRC to enter [STANDBY] mode. 2 Press the volume knob to enter [FUNCTION] mode. 3 Turn the volume knob to select [INITIAL SEn, then press to enter. 4 Turn the volume knob to make a selection, then press to confirm. See table below for selection. S Hold ~ to finish the procedure. PRESET TYPE NORM*: Memorizes one station for each preset button in each band (FM1/ FM2/ FM3/ AM).; MIX: Memorizes one station for each preset button regardless ofthe selected band (FM1/ FM2/ FM3/ AM). KEY BEEP ON*/ OFF: Activates/deactivates the keypress tone. BUILTIN AUX ON1 *: Outputs sound ofthe connected external component when"AUX" is selected as the source. ; ON2: Outputs sound from the connected external component when"AUX" is selected as the source. When you turn on the power, the sound attenuates (to prevent noise when no external component is connected). Turn the vol ume knob clockwise to return to the previous volume level. ; OFF: Disables"AUX" in source selection. CD READ 1*: Automatically distinguishes between audio file disc and music CD. ; 2: Forces to playas amusic CD. SWITCH PRE REAR*/ SUB-W: Selects whether rear speakers or asubwoofer are connected to the line out terminals on the rear ofthe unit (through an external amplifier). SP SELECT OFF*/ 5/4/ 6x 9/6/ OEM: Selects the speaker size for optimum performance. 6
-
 1
1 -
 2
2 -
 3
3 -
 4
4 -
 5
5 -
 6
6 -
 7
7 -
 8
8 -
 9
9 -
 10
10 -
 11
11 -
 12
12 -
13
-
14
-
15
-
16
-
17
-
18
-
19
-
20
 |
 |