Kenwood KDC-2019 User Manual
Kenwood KDC-2019 Manual
 |
View all Kenwood KDC-2019 manuals
Add to My Manuals
Save this manual to your list of manuals |
Kenwood KDC-2019 manual content summary:
- Kenwood KDC-2019 | User Manual - Page 1
KDC-219 KDC-2019V KDC-2019 KDC-29MR KDC-119 KDC-119S KDC-217 KDC-217S CD-RECEIVER INSTRUCTION MANUAL AMPLI-TUNER-LECTEUR DE CD MODE D'EMPLOI REPRODUCTOR DE DISCOS COMPACTOS RECEPTOR DE FM/AM MANUAL DE INSTRUCCIONES RECEPTOR DE CD MANUAL DE INSTRUÇÕES Take the time to read through this instruction - Kenwood KDC-2019 | User Manual - Page 2
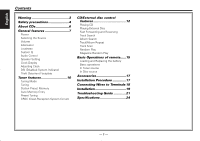
Play Basic Operations of remote......15 Loading and Replacing the battery Basic operations In Tuner source In Disc source Accessories 17 Installation Procedure 17 Connecting Wires to Terminals 18 Installation 19 Troubleshooting Guide 21 Specifications 24 -2- - Kenwood KDC-2019 | User Manual - Page 3
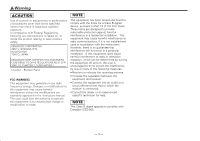
laser product safety. KENWOOD CORPORATION 2967-3, ISHIKAWA-CHO, HACHIOJI-SHI TOKYO, JAPAN KENWOOD CORP. CERTIFIES THIS EQUIPMENT radio frequency energy. Changes or modifications to this equipment may cause harmful interference unless the modifications are expressly approved in the instruction manual - Kenwood KDC-2019 | User Manual - Page 4
malfunction. • To prevent a short circuit when replacing a fuse, first disconnect the wiring harness. • Do not place any object between the faceplate and the unit. • displayed are generated. Note that none of the KDC-C100, KDC-C302, C205, C705, and non-Kenwood CD changers can be connected. You can - Kenwood KDC-2019 | User Manual - Page 5
pressing the reset button first. If that does not solve the problem, consult your Kenwood dealer. • Press the reset button if the Disc auto changer ˚C). • The illustrations of the display and the panel appearing in this manual are examples used to explain more clearly how the controls are used. - Kenwood KDC-2019 | User Manual - Page 6
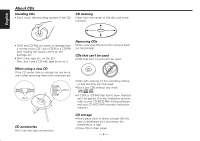
't been finalized can't be played. (For the finalization process refer to your CD-R/CD-RW writing software, and your CD-R/CD-RW recorder instruction manual.) CD accessories Don't use disc type accessories. CD storage • Don't place them in direct sunlight (On the seat or dashboard etc.) and where - Kenwood KDC-2019 | User Manual - Page 7
Turning OFF the Power Press the [SRC] button for at least 1 second. SRC ATT/ #1 #3 LOUD CLK/ ADJ Q/ AUD KDC-219/KDC-2019V/KDC-2019/KDC-29MR/KDC-217/KDC-217S ATT indicator LOUD indicator Selecting the Source Press the [SRC] button. Source required Display Tuner "TUnE" CD "CD" External - Kenwood KDC-2019 | User Manual - Page 8
English General features Loudness Compensating for low and high tones during low volume. Press the [LOUD] button for at least 1 second. Each time the button is pressed for at least 1 second the Loudness turns ON or OFF. When it's ON, "LOUD" indicator is ON. System Q You can recall the best sound - Kenwood KDC-2019 | User Manual - Page 9
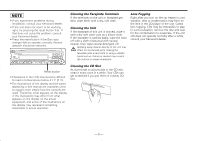
When it's ON, the clock indicator is ON. 4 Exit clock adjustment mode Press the [CLK] button. Function of the KDC-219/KDC-2019V/KDC-2019/KDC-29MR/KDC-217/KDC-217S DSI (Disabled System Indicator) A red indicator will blink on the unit after the faceplate is removed, warning potential thieves. 1 Turn - Kenwood KDC-2019 | User Manual - Page 10
the projections on the unit with the grooves on the faceplate. Tuner features FM/ AM CRSC 4¢ SRC #1 - 6 AUTO/ AME KDC-219/KDC-2019V/KDC-2019/KDC-29MR/KDC-217/KDC-217S ST indicator Preset station number CRSC indicator 2 Push the faceplate in until it clicks. The faceplate is locked in - Kenwood KDC-2019 | User Manual - Page 11
the [AUTO] button. Each time the button is pressed the Tuning mode switches as shown below. Tuning mode Display Operation Auto seek Preset station seek Manual "AUTO 1" indicator "AUTO 2" indicator - Automatic search for a station. Search in order of the stations in the Preset memory. Normal - Kenwood KDC-2019 | User Manual - Page 12
ON. CD/External disc control features DISC- DISC+ 0 4¢ SRC SCAN REP M.RDM RDM KDC-219/KDC-2019V/KDC-2019/KDC-29MR/KDC-217/KDC-217S Disc number Track number IN indicator Track time KDC-119/KDC-119S SCN indicator REP indicator RDM indicator Track number Track time - 12 - IN indicator - Kenwood KDC-2019 | User Manual - Page 13
play the disc at that point. Track Search Selecting the song you want to hear. Press the [4] or [¢] button. Function of the KDC-219/KDC-2019V/KDC-2019/KDC-29MR Playing External Disc Playing discs set in the optional accessory disc player connected to this unit. Press the [SRC] button. Select the - Kenwood KDC-2019 | User Manual - Page 14
, the "RDM" indicator is ON and the track number blinks. When the [¢] button is pressed, the next song select starts. Function of the KDC-219/KDC-2019V/KDC-2019/KDC-29MR Magazine Random Play (Function of disc changer) Play the songs on all the discs in the disc changer in random order. Press the - Kenwood KDC-2019 | User Manual - Page 15
Basic Operations of remote Accessory of the KDC-219/KDC-2019V/KDC-2019 Loading and Replacing the battery Use one lithium battery (CR2025). Insert the batteries with the + and - poles aligned properly, following the illustration inside the - Kenwood KDC-2019 | User Manual - Page 16
English Basic Operations of remote Accessory of the KDC-219/KDC-2019V/KDC-2019 In Tuner source [FM]/ [AM] buttons Select the band. Each time the [FM] button is pressed it switches between the FM1, FM2, and FM3 - Kenwood KDC-2019 | User Manual - Page 17
2 .........2 4 .........4 5 .........1 (KDC-219/KDC-2019V/KDC-2019/ KDC-217/KDC-217S only) The use of any accessories - battery. 8. Press the reset button. 2WARNING If you connect the ignition wire (red) and the battery wire (yellow) to the car chassis (ground), you may cause a short circuit - Kenwood KDC-2019 | User Manual - Page 18
only) 27 Rear left output (White) 23 2 KENWOOD disc changer control input (KDC-219/2019V/2019/29MR only) To connect the Disc changer, consult your Disc changer manual. 3 REAR L Rear right output (Red) 28 Fuse (10A) 24 R If no connections are made, do not let the wire come out from the tab - Kenwood KDC-2019 | User Manual - Page 19
Installation ■ Installation Firewall or metal support Screw (M4X8) (commercially available) Self-tapping screw (commercially available) Metal mounting strap (commercially available) Bend the tabs of the mounting sleeve with a screwdriver or similar - Kenwood KDC-2019 | User Manual - Page 20
English Installation ■ Removing the hard rubber frame 1 Engage the catch pins on the removal tool and remove the two locks on the lower level. Lower the frame and pull it forward as shown in the figure. Lock Catch Accessory2 Removal tool 2 When the lower level is removed, remove the upper two - Kenwood KDC-2019 | User Manual - Page 21
Troubleshooting Guide What might seem to be a malfunction in your unit may just be the result of slight misoperation or miswiring. Before calling service, first check the following table for possible problems. General ? The power does not turn ON.01 ✔ The fuse has blown. ☞ After checking for short - Kenwood KDC-2019 | User Manual - Page 22
Troubleshooting Guide Disc source ? "AVin" is displayed without achieving External disc control mode.50 ✔ O-N switch is set to "O" side. ☞ Set the switch to "N" side. ✔ Unsupported disc changer is connected.51 ☞ Connect the supported , consult your nearest service center: • Even though the - Kenwood KDC-2019 | User Manual - Page 23
: The unit is malfunctioning for some reason.E77 ➪ Press the reset button on the unit. If the "E-77" code does not disappear, consult your nearest service center. E-99: The unit is malfunctioning for some reason.E99A ➪ Press the reset button on the unit. If the "E-99" code does not disappear - Kenwood KDC-2019 | User Manual - Page 24
kHz 0.01 % Signal to Noise ratio (1 kHz 96 dB Dynamic range 93 dB Channel separation 85 dB Audio section Maximum output power KDC-219/2019V/2019 50 W x 4 KDC-29MR/217/217S/119/119S 45 W x 4 Full Bandwidth Power (at less than 1% THD 22 W x 4 Tone action Bass 100 Hz ±10 dB Middle 1 kHz ±10 - Kenwood KDC-2019 | User Manual - Page 25
-
 1
1 -
 2
2 -
 3
3 -
 4
4 -
 5
5 -
 6
6 -
 7
7 -
8
-
9
-
10
-
11
-
12
-
13
-
14
-
15
-
16
-
17
-
18
-
19
-
20
-
21
-
22
-
23
-
24
-
25
 |
 |

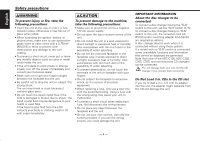
Take the time to read through this instruction manual. Familiarity with installa-
tion and operation procedures will help you obtain the best performance from
your new CD-receiver.
For your records
Record the serial number, found on the back of the unit, in the spaces designated on
the warranty card, and in the space provided
below. Refer to the model and serial
numbers whenever you call upon your KENWOOD dealer for information or service on
the product.
Model
KDC-219, KDC-2019V, KDC-2019, KDC-29MR, KDC-119,
KDC-119S, KDC-217, KDC-217S
Serial number
KDC-219
KDC-2019V
KDC-2019
KDC-29MR
KDC-119
KDC-119S
KDC-217
KDC-217S
© B64-2114-00 (KWN)
CD-RECEIVER
INSTRUCTION MANUAL
AMPLI-TUNER-LECTEUR DE CD
MODE D’EMPLOI
RECEPTOR DE CD
MANUAL DE INSTRUÇÕES
REPRODUCTOR DE DISCOS COMPACTOS RECEPTOR DE FM/AM
MANUAL DE INSTRUCCIONES