Kenwood KDC-BT948HD Quick Start Guide - Page 4
First step
 |
UPC - 019048193643
View all Kenwood KDC-BT948HD manuals
Add to My Manuals
Save this manual to your list of manuals |
Page 4 highlights
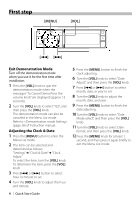
First step [MENU] [VOL] [4] [¢] Exit Demonstration Mode Turn off the demonstration mode when you use it for the first time after installation. 1 Press the [VOL] knob to quit the demonstration mode when the messages "To Cancel Demo Press the volume knob" are displayed (approx. 15 seconds). 2 Turn the [VOL] knob to select "YES", and then press the [VOL] knob. The demonstration mode can also be canceled in the Menu List mode. Refer to (page 38) of Instruction manual. Adjusting the Clock & Date 1 Press the [MENU] button to enter the Menu List mode. 2 The item can be selected and determined as follows. "Settings" ➜ "Clock & Date" ➜ "Clock Adjust" To select the item, turn the [VOL] knob. To determine the item, press the [VOL] knob. 3 Press [4] or [¢] button to select hour or minute to set. 4 Turn the [VOL] knob to adjust the hour and minute. 5 Press the [MENU] button to finish the clock adjusting. 6 Turn the [VOL] knob to select "Date Adjust", and then press the [VOL] knob. 7 Press [4] or [¢] button to select month, date, or year to set. 8 Turn the [VOL] knob to adjust the month, date, and year. 9 Press the [MENU] button to finish the date adjusting. 10 Turn the [VOL] knob to select "Date Mode select", and then press the [VOL] knob. 11 Turn the [VOL] knob to select Date format, and then press the [VOL] knob. 12 Press the [MENU] knob for at least 1 second, and then press it again briefly to exit the Menu List mode. 4 | Quick Start Guide
-
 1
1 -
 2
2 -
 3
3 -
 4
4 -
 5
5 -
 6
6 -
 7
7 -
 8
8 -
 9
9 -
 10
10 -
11
-
12
-
13
-
14
-
15
-
16
-
17
-
18
-
19
-
20
-
21
-
22
-
23
-
24
-
25
-
26
-
27
-
28
-
29
-
30
-
31
-
32
-
33
-
34
-
35
-
36
-
37
-
38
-
39
-
40
-
41
-
42
-
43
-
44
-
45
-
46
-
47
-
48
 |
 |