Kenwood KDC-BT948HD kdcx995 (pdf) - Page 6
Component names and functions, KDC-X995/ KDC-BT948HD - microphone
 |
UPC - 019048193643
View all Kenwood KDC-BT948HD manuals
Add to My Manuals
Save this manual to your list of manuals |
Page 6 highlights
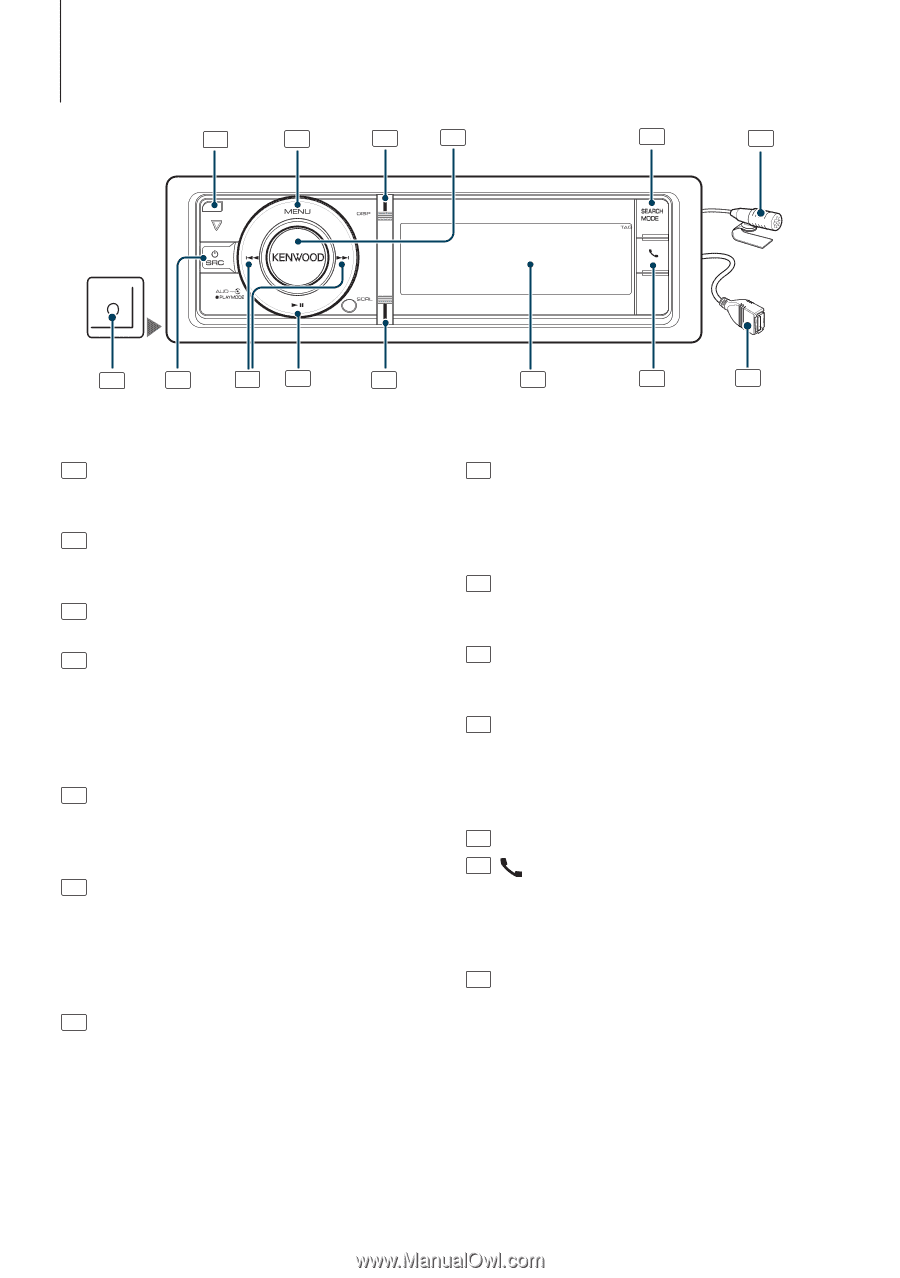
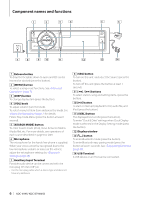
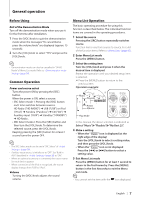
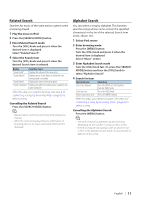
Component names and functions 1 2 3 4 5 6 AUX 7 8 9 10 11 12 13 14 1 Release button To drop the faceplate down to open and CD can be inserted or ejected (press the button). 2 [MENU] button To select a song or set functions. See (page 7). 3 [DISP] button To change display item (press the button). 4 [VOL] knob To adjust volume (turn the knob). To select menu list item (turn and press the knob). See (page 7) for details. Enters Play mode Menu (press the button at least 1 second). 5 [SEARCH MODE] button To enter Search mode (iPod), move between folders (Audio file), etc. For more details, see operations of each source described in page 8 or later. 6 Microphone The microphone for the hands free phone is supplied. When your voice cannot be recognized due to the low microphone volume or noises in the vehicle, adjust the microphone settings by (page 48). 7 Auxiliary Input Terminal Portable audio device can be connected with the mini-plug (3.5 mm (1/8") ø). • Use the mini-plug cable which is stereo type and does not have any resistance. 8 [SRC] button To turn on this unit and select the Source (press the button). To turn off this unit (press the button at least 1 second). 9 [4] / [¢] buttons To select station, song and setting items. (press the button). 10 [38] button To start or interrupt playback for CD, audio file, and iPod (press the button). 11 [SCRL] button The displayed text scrolls (press the button). To enter "Clock & Date" settings when Clock Display mode is selected in the Display Setting mode (press the button). 12 Display window 13 [ ] button To enter Bluetooth mode (press the button). To enter Bluetooth easy pairing mode (press the button at least 1 second). See (page 48). 14 USB Terminal A USB device or an iPod can be connected. 6 | KDC-X995/ KDC-BT948HD
-
 1
1 -
 2
2 -
 3
3 -
 4
4 -
 5
5 -
 6
6 -
 7
7 -
 8
8 -
 9
9 -
 10
10 -
 11
11 -
 12
12 -
13
-
14
-
15
-
16
-
17
-
18
-
19
-
20
-
21
-
22
-
23
-
24
-
25
-
26
-
27
-
28
-
29
-
30
-
31
-
32
-
33
-
34
-
35
-
36
-
37
-
38
-
39
-
40
-
41
-
42
-
43
-
44
-
45
-
46
-
47
-
48
-
49
-
50
-
51
-
52
-
53
-
54
-
55
-
56
-
57
-
58
-
59
-
60
-
61
-
62
-
63
-
64
-
65
-
66
-
67
-
68
-
69
-
70
-
71
-
72
-
73
-
74
-
75
-
76
 |
 |