Kenwood KVT819DVD Installation Manual
Kenwood KVT819DVD Manual
 |
View all Kenwood KVT819DVD manuals
Add to My Manuals
Save this manual to your list of manuals |
Kenwood KVT819DVD manual content summary:
- Kenwood KVT819DVD | Installation Manual - Page 1
KVT-819DVD KVT-839DVD MONITOR WITH DVD RECEIVER INSTALLATION MANUAL MONITOR CON RECEPTOR DVD MANUAL DE INSTALACIÓN © B54-4552-00/00 (KV/RV) - Kenwood KVT819DVD | Installation Manual - Page 2
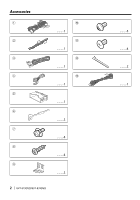
Accessories 1 2 3 4 5 6 7 8 9 0 ..........1 ! ..........1 @ ..........1 # ..........1 ..........1 ..........2 ..........4 ..........4 ..........2 2 | KVT-819DVD/KVT-839DVD ..........4 ..........4 ..........2 ..........1 - Kenwood KVT819DVD | Installation Manual - Page 3
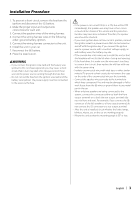
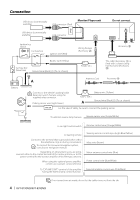
ɹ connections for each unit. 3. Connect the speaker wires of the wiring harness. 4. Connect the wiring harness wires in the following order: ground, battery, ignition. 5. Connect the wiring harness connector to the unit. 6. Install the unit in your car. 7. Reconnect the - battery. 8. Press the reset - Kenwood KVT819DVD | Installation Manual - Page 4
(Purple/White) To car light control switch Dimmer control wire (Orange/White) To steering remote Connect to the terminal that is grounded when either the telephone rings or during conversation. To connect the Kenwood navigation system, consult your navigation manual. Depending on what antenna you - Kenwood KVT819DVD | Installation Manual - Page 5
+ Gray Green/Black + Green Purple/Black Purple + To front left speaker To front right speaker To rear left speaker To rear right speaker REAR L REAR R If you connect the ignition wire (red) and the battery wire (yellow) to the car chassis (ground), you may cause a short circuit, that in turn - Kenwood KVT819DVD | Installation Manual - Page 6
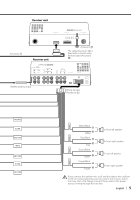
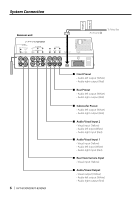
Connection Receiver unit RELAY 2 RELAY 1 Accessory # To Relay Box 6 | KVT-819DVD/KVT-839DVD ■ Front Preout • Audio left output (White) • Audio right output (Red) ■ Rear Preout • Audio left output (White) • Audio right output (Red) ■ Subwoofer Preout • Audio left output (White) • Audio right - Kenwood KVT819DVD | Installation Manual - Page 7
) KCA-iP300V (Optional Accessory) Audio Input Resistance-free stereo type mini plug (3.5Ф) iPod VIDEO IN Audio Output (Black) Visual Output (Yellow) Visual Input Resistance-free mini plug (3.5Ф) Monitor/Player unit iPod USB terminal iPod cannot be connected. Receiver unit USB terminal (iPod - Kenwood KVT819DVD | Installation Manual - Page 8
the installation brackets 9 to the sides of the receiver unit using the sems bolts 7. Sems bolts (M4 × 8 mm) (Accessory 7) Installation brackets (Accessory 9) 2. Use the tapping screw 8 to secure the receiver unit to the audio board. Tapping screw (ø4 × 16 mm) (Accessory 8) 8 | KVT-819DVD/KVT - Kenwood KVT819DVD | Installation Manual - Page 9
screw with integral washer (M4 × 8) on the back panel. 3. Insert the two removal tools 6 deeply into the slots on each side, as shown. Removal Tool (Accessory 6) Catch Lock ⁄ • The frame can be removed from the top side in the same manner. 2. When the lower level is removed, remove the upper two - Kenwood KVT819DVD | Installation Manual - Page 10
Car Bracket Accessory 0 (M5x6mm) or Accessory ! (M5x7mm) Screws (included in audio unit package) Audio unit or others Screws (included in audio unit package) ⁄ • Do not use your own screws. Use only the screws provided. If you use the wrong screws, you could damage the unit. 10 | KVT-819DVD/KVT - Kenwood KVT819DVD | Installation Manual - Page 11
0 (M5x6mm) Car Bracket Screws (included in audio unit package) 2. Bend each end of case to fix the bracket. Accessory 0 (M5x6mm) Screws (included in audio unit package) Use a flat-blade screwdriver or pliers, and bend each case tab into the hole of installation bracket to fix the bracket - Kenwood KVT819DVD | Installation Manual - Page 12
Accesorios 1 2 3 4 5 6 7 8 9 0 ..........1 ! ..........1 @ ..........1 # ..........1 ..........1 ..........2 ..........4 ..........4 ..........2 12 | KVT-819DVD/KVT-839DVD ..........4 ..........4 ..........2 ..........1 - Kenwood KVT819DVD | Installation Manual - Page 13
de cables. 4. Conecte los cables del mazo en el siguiente orden: tierra, batería, encendido. 5. Conecte el mazo de cables a la unidad. 6. Instale la unidad en el automóvil. 7. Reconnect the - battery. 8. Haga una reposición del sistema (reposición). 2ADVERTENCIA • Si conecta el cable de encendido - Kenwood KVT819DVD | Installation Manual - Page 14
masa ya sea al sonar el teléfono o durante la conversación. Para conectar el sistema de navegación Kenwood, consulte el manual de navegación. En función de la antena que utilice, conéctelo al terminal de control de la antena no deje que el cable sobresalga de la lengüeta. 14 | KVT-819DVD/KVT-839DVD - Kenwood KVT819DVD | Installation Manual - Page 15
Receptor Accesorio 3 Receptor Accesorio @ Un cable óptico (Accesorio 3) está fijo a un chasis mediante una banda preformada (Accesorio @) Entrada de antena FM/AM Mazo de conductores (Accesorio1) REVERSE ILLUMI REMO.CONT MUTE ANT CONT P. CONT EXT. CONT FRONT L FRONT R Blanco/Negro Blanco + - Kenwood KVT819DVD | Installation Manual - Page 16
Accesorio # A la caja de relés 16 | KVT-819DVD/KVT-839DVD ■ Salida previa delantera • Salida izquierda de audio (Blanca) • Salida derecha de audio (Roja) ■ Salida previa trasera • Salida izquierda de audio (Blanca) • Salida derecha de audio (Roja) ■ Salida previa del subwoofer • Salida izquierda - Kenwood KVT819DVD | Installation Manual - Page 17
IN iPod (disponible en el comercio) KCA-iP300V (Accesorio opcional) Entrada de audio Toma mini tipo estéreo sin resistencia (3,5Ф) iPod VIDEO IN Salida de audio (Negro) Salida visual (Amarillo) Entrada visual Toma mini sin resistencia (3,5Ф) Pantalla/Reproductor iPod Terminal USB El iPod no - Kenwood KVT819DVD | Installation Manual - Page 18
ejemplo, el sonido puede interrumpirse). Instalación para la unidad receptora 1. Instale los soportes de instalación 9 a los lados de la unidad escondida utilizando 8 para asegurar la unidad escondida al panel de audio. Tornillo autorroscante (ø4 × 16 mm) (Accesorio 8) 18 | KVT-819DVD/KVT-839DVD - Kenwood KVT819DVD | Installation Manual - Page 19
Desinstalación de monitor/reproductor Desinstalación del marco duro de goma (escudete) 1. Enganche la uña en la herramienta de extracción 6 ay retire los dos cierres provistos en dos lugares de la parte inferior. Tal como se muestra en la figura, baje el marco y extráigalo hacia adelante. - Kenwood KVT819DVD | Installation Manual - Page 20
(incluidos en el paquete de la unidad de audio) Unidad de audio y otros Tornillos (incluidos en el paquete de la unidad de audio) ⁄ • No utilice sus propios tornillos. Utilice únicamente los tornillos suministrados. Si utiliza tornillos erróneos, podría dañar la unidad. 20 | KVT-819DVD/KVT-839DVD - Kenwood KVT819DVD | Installation Manual - Page 21
derecho e izquierdo de la unidad. 1. Monte la abrazadera a cada lado. Accesorio 0 (M5x6mm) Abrazadera Tornillos (incluidos en el paquete de la unidad de audio) 2. Doble cada extremo de la cubierta para fijar el corchete. Accesorio 0 (M5x6mm) Tornillos (incluidos en el paquete de la unidad de - Kenwood KVT819DVD | Installation Manual - Page 22
- Kenwood KVT819DVD | Installation Manual - Page 23
- Kenwood KVT819DVD | Installation Manual - Page 24
-
 1
1 -
 2
2 -
 3
3 -
 4
4 -
 5
5 -
 6
6 -
 7
7 -
8
-
9
-
10
-
11
-
12
-
13
-
14
-
15
-
16
-
17
-
18
-
19
-
20
-
21
-
22
-
23
-
24
 |
 |

©
B54-4552-00/00 (KV/RV)
KVT-819DVD
KVT-839DVD
MONITOR WITH DVD RECEIVER
INSTALLATION MANUAL
MONITOR CON RECEPTOR DVD
MANUAL DE INSTALACIÓN