Kenwood MP6025 Instruction Manual
Kenwood MP6025 - Radio / CD Manual
 |
UPC - 019048151322
View all Kenwood MP6025 manuals
Add to My Manuals
Save this manual to your list of manuals |
Kenwood MP6025 manual content summary:
- Kenwood MP6025 | Instruction Manual - Page 1
KDC-X679 KDC-MP6025 KDC-MP625 CD-RECEIVER INSTRUCTION MANUAL Take the time to read through this instruction manual. Familiarity with installation and operation you call upon your KENWOOD dealer for information or service on the product. Model KDC-X679/MP6025/MP625 Serial number © B64-2764-00/00 (KW) - Kenwood MP6025 | Instruction Manual - Page 2
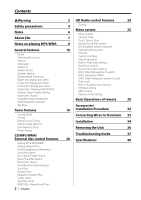
Play Folder Select Text/Title Scroll DNPP (Disc Name Preset Play) 2 | English 3 HD Radio control features 24 4 Tuning Menu system 25 6 Menu System 7 Security Code Touch Sensor Tone 8 Manual Clock Adjustment DSI (Disabled System Indicator) 10 Selectable Illumination Dimmer System - Kenwood MP6025 | Instruction Manual - Page 3
product safety. KENWOOD CORPORATION 2967-3, ISHIKAWA-CHO, HACHIOJI-SHI TOKYO, JAPAN KENWOOD CORP. CERTIFIES THIS use radio frequency energy. Changes or modifications to this equipment may cause harmful interference unless the modifications are expressly approved in the instruction manual. The user - Kenwood MP6025 | Instruction Manual - Page 4
your Kenwood dealer. • Make sure not to get your fingers caught between the faceplate and Using a fuse with the wrong rating may cause your unit to malfunction. • To prevent a short circuit when replacing a fuse, first disconnect the wiring harness. • Do not place any object between the faceplate - Kenwood MP6025 | Instruction Manual - Page 5
used and the information that can be displayed will differ depending on the models being connected. NOTE • If you experience problems during installation, consult your Kenwood panel appearing in this manual are examples used to explain more clearly how the controls are used. Therefore, what appears - Kenwood MP6025 | Instruction Manual - Page 6
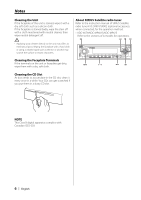
tuner Refer to the instruction manual of SIRIUS Satellite radio tuner KTC-SR901/SR902 (optional accessory), when connected, for the operation method. • KDC-X679/KDC-MP6025/KDC-MP625 Refer to the sections of A models for operations. SRC 4 FM ¢ Cleaning the Faceplate Terminals If the terminals - Kenwood MP6025 | Instruction Manual - Page 7
• CDs with coloring on the recording surface or that are dirty can't be used. • This unit can only play the CDs with . It may not correctly refer to your CD-R/CD-RW writing software, and your CDR/CD-RW recorder instruction manual.) CD storage • Don't place them in direct sunlight (On the seat or - Kenwood MP6025 | Instruction Manual - Page 8
KDC-X679/MP6025/MP625 can play MP3 (MPEG1, 2 Audio list of available characters, see the instruction manual of the writing software and the used. Entering ID3 tag The Displayable ID3 tag is ID3 version 1.x. For the character code, refer to the List of Codes. Entering file and folder names The code - Kenwood MP6025 | Instruction Manual - Page 9
MP3/WMA playing order When selected for play, Folder Search, File Search, or for Folder Select, files and folders are accessed in the order in which they were written by the CD writer. Because of this, the order in which they are expected to be played may not match the order in which they are - Kenwood MP6025 | Instruction Manual - Page 10
(Optional accessory) Tuner or HD Radio (Optional accessory) CD External disc (Optional accessory) Auxiliary input KDC-6025 KDC-X679/MP625 (Optional accessory) Standby (Illumination only mode) Display "SIRIUS" "TUNER" or "HD RADIO" "CD" "CD CH"/ "MD CH" "AUX" "AUX EXT" "STANDBY" Attenuator Turning - Kenwood MP6025 | Instruction Manual - Page 11
Hz Normal (0°)/ Reverse (180°) -8 - ±0 ON/OFF • User memory: The values set on the 'Audio Control' (page 11). • Each setting value is changed with the set to "SWPRE Sub-W". (KDC-MP6025/ 625 only) • *² Function of the KDC-X679 • *³ Function of the KDC-MP6025/MP625 5 Exit Audio Control mode Press the - Kenwood MP6025 | Instruction Manual - Page 12
switches as shown below. Display Mode Display "Display Type A" 3 1 3 2 "Display Type B" 1 2 "Display Type C" 3 4 3 1 Upper text display part 2 Lower text display part 3 Level meter display part 4 Demonstration • You can display the information that will be shown in the Upper text display - Kenwood MP6025 | Instruction Manual - Page 13
Number" In HD Radio source Information Station name Title Frequency Display "Station Name" "Title" "Frequency" • You cannot display the same information as the one in the Lower text display. • During Standby, the upper part always displays "STANDBY". • When you use Auxiliary input source, the - Kenwood MP6025 | Instruction Manual - Page 14
"File Name" In STANDBY/Auxilialy input source Information Indicator Clock Display Composer Name" "Category Name" Label Comment In HD Radio source Information Indicator Clock Station name Title " this manual is displayed only when you chose the "Indicator" item of "Lower text display part select - Kenwood MP6025 | Instruction Manual - Page 15
to attach a title to • Refer to the 'Upper text display part select' (page 12) and select either "DNPS" or "SNPS or [AM] button. • Characters can be entered by using a remote with a number buttons. Example: If "DANCE" is entered manual. • The title of station/CD can be changed by the same operation - Kenwood MP6025 | Instruction Manual - Page 16
auxiliary input or the auxiliary input of optional KCA-S210A is used. Subwoofer Output Turning the Subwoofer output ON or OFF. Press the [SW] button for at least 1 second. Each time the button is pressed Subwoofer output switches ON or OFF. When it's ON, "Sub-W ON" is displayed. • The faceplate is - Kenwood MP6025 | Instruction Manual - Page 17
in until it clicks. The faceplate is locked in place, allowing you to use the unit. TEL Mute The audio system automatically mutes when a call comes in. When a call comes in "CALL" is displayed. The audio system pauses. Listening to the audio during a call Press the [SRC] button. The "CALL" display - Kenwood MP6025 | Instruction Manual - Page 18
between the FM1, FM2, and FM3 bands. 3 Tune up or down band Press the [4] or [¢] button. • During reception of stereo stations the "ST" indicator is ON. Function of remote Direct Access Tuning Entering the frequency and tuning. 1 Select the band Press the [FM] or [AM] button. 2 Enter Direct Access - Kenwood MP6025 | Instruction Manual - Page 19
Desired frequency 92.1 MHz (FM) 810 kHz (AM) Press button [0], [9], [2], [1] [0], [8], [1], [0] Canceling Direct Access Tuning Press the [DIRECT] button on the remote. Station Preset Memory Putting the station in the memory. 1 Select the band Press the [FM] or [AM] button. 2 Select the frequency - Kenwood MP6025 | Instruction Manual - Page 20
insert disc Press the [0] button. 2 Insert a disc. • When the faceplate has been slid open, it might interfere with the shift lever or something else position Press the [0] button. • 3 in. (8cm) disc can't be played. Using an adapter and inserting them into this unit can cause damage. • The MP3/WMA - Kenwood MP6025 | Instruction Manual - Page 21
button is pressed it pauses and plays. • The functions that can be used and the information that can be displayed will differ depending on the external MP3/WMA media. Press the [FM] or [AM] button. Function of remote Direct Track/File Search Doing Track/File Search by entering the track/file number - Kenwood MP6025 | Instruction Manual - Page 22
" In MP3/WMA source Repeat play File Repeat Folder Repeat OFF Display "File Repeat ON" "Folder Repeat ON" "Repeat OFF" Scan Play Playing the first part of each song on the disc or MP3/WMA folder you are listening to and searching for the song you want to listen to. 1 Start - Kenwood MP6025 | Instruction Manual - Page 23
[DISP] button for at least 1 second. Function of disc changers with remote DNPP (Disc Name Preset Play) Selecting the CD displayed in the DNPS of in the Disc changer. 1 Enter DNPP mode Press the [DNPP] button on the remote. When "DNPP" is displayed the DNPS display in order. Forward / Reverse display - Kenwood MP6025 | Instruction Manual - Page 24
Press the [4] or [¢] button. • When you connect an HD Radio, Tuner features of the unit are disabled and switched to HD Radio tuner features. A portion of the setting methods including the Tuning Mode will change. • With the HD Radio tuner, you can use the similar functions to 'Station Preset Memory - Kenwood MP6025 | Instruction Manual - Page 25
their setting content chart is entered. (Normally the uppermost setting in the chart is the original setting.) Also, the explanation for items that aren't applicable ('Manual Clock Adjustment' etc.) are entered step by step. English | 25 - Kenwood MP6025 | Instruction Manual - Page 26
4 through 7 operation, and enter the Security Code. "Approved" is displayed. The unit can be used. 26 | English Manual Clock Adjustment 1 Select Clock Adjustment mode red indicator will blink on the unit after the faceplate is removed, warning potential thieves. Display "DSI ON" "DSI OFF" - Kenwood MP6025 | Instruction Manual - Page 27
of the KDC-MP625/KDC-MP6025 In Standby mode Switching preout Switching the preout between the rear and subwoofer. (In subwoofer it outputs without effect from the fader control.) Display "SWPRE Rear" "SWPRE Sub-W" Setting Rear preout. Subwoofer preout. Function of the KDC-X679/KDC-MP6025 When the - Kenwood MP6025 | Instruction Manual - Page 28
for the SIRIUS tuner source, HD Radio source, including Channel name, etc. Function of the KDC-MP6025 Built-in Auxiliary input Setting Set the Built-in Auxiliary Input function. Display Setting "AUX OFF" When selecting the source there's no Auxiliary Input. "AUX ON" When selecting the source there - Kenwood MP6025 | Instruction Manual - Page 29
KDC of the AMP Control item, see the Instruction manual attached to the LX AMP. 4 Adjust the AMP Control item Press the [4] or [¢] button. 5 Exit AMP Control mode Press the [MENU] button. • You cannot use the LX AMP operation during standby mode. In HD Radio - Kenwood MP6025 | Instruction Manual - Page 30
remote VOL. FM/AM/DISC+/DISC- DNPP ✱ [0] - [9] SRC ATT VOL. 38 FM+ DISC 4 AM- ¢ DNPP DIRECT /SBF /OK ABC DEF GHI JKL MNO PRS TUV WXY QZ SRC ATT 38 4/¢ DIRECT/OK Loading and Replacing the battery Use Faceplate Angle. • Do not set the remote on hot places such as above the - Kenwood MP6025 | Instruction Manual - Page 31
down band. [0] - [9] buttons Press buttons [1] - [6] to recall preset stations. [DIRECT]/ [OK] button Enters and cancels the 'Direct Access Tuning' (page 18) mode. In HD Radio source [FM] button Select the HF band. Each time the [FM] button is pressed it switches between the HF1, HF2, and HF3 bands - Kenwood MP6025 | Instruction Manual - Page 32
disconnect the - battery. 2. Make the proper input and output wire connections for each unit. 3. Connect the speaker wires of the wiring harness. 4. Connect the wiring harness wires in the following order: ground, battery, ignition. 5. Connect the wiring harness connector to the unit. 6. Install the - Kenwood MP6025 | Instruction Manual - Page 33
) (KDC-MP625/MP6025 only) FM/AM antenna input KENWOOD disc changer input To connect the Disc changer, consult your Disc changer manual. Front left output (White) Front right output (Red) Fuse (10A) If no connections are made, do not let the wire come out from the tab. Wiring harness (Accessory1 - Kenwood MP6025 | Instruction Manual - Page 34
8 mm MAX. 4 ø5mm Accessory3...for Nissan car Accessory4 ...for Toyota car 8mm MAX. • Make sure that the unit is installed securely in place. If the unit is unstable, it may malfunction (for example, the sound may skip). • During installation, do not use any screws except for those provided. The - Kenwood MP6025 | Instruction Manual - Page 35
the Unit If you want to fasten the faceplate to the main unit so that it does not fall off, screw in the provided screws in the holes shown below. Bottom the one specified. If you screw them in another hole, it will contact and may cause damage to the mechanical parts inside the unit. English | 35 - Kenwood MP6025 | Instruction Manual - Page 36
Removing the Unit Removing the hard rubber frame 1 Engage the catch pins on the removal tool and remove the two locks on the upper level. Upper the frame and pull it forward as shown in the figure. Lock Catch Removing the Unit 1 Refer to the section 'Removing the hard rubber frame' (page 36) and - Kenwood MP6025 | Instruction Manual - Page 37
be the result of slight misoperation or miswiring. Before calling service, first check the following table for possible problems. General ? The power does not turn ON. ✔ The fuse has blown. ☞ After checking for short circuits in the wires, replace the fuse with one with the same rating. ✔ Speaker - Kenwood MP6025 | Instruction Manual - Page 38
Troubleshooting Guide Disc source ? "AUX EXT" is displayed without achieving External disc control mode. ✔ Unsupported disc changer is connected. ☞ Use the disc changer mentioned in the 'About CD players/disc changers connected to this unit' (page 5) of the section on 'Safety precautions'. ? The - Kenwood MP6025 | Instruction Manual - Page 39
magazine. TOC Error: No faceplate of the slave unit being connected to this unit has been removed. ➪ Replace it. Error 77: The unit is malfunctioning for some reason. ➪ Press the reset button on the unit. If the "Error 77" code does not disappear, consult your nearest service center. Mecha Error - Kenwood MP6025 | Instruction Manual - Page 40
level / Load (during disc play) KDC-X679: 5000 mV/10 kΩ KDC-MP6025/MP625: 2000 mV/10 kΩ Preout impedance KDC-X679: ≤80 Ω KDC-MP6025/MP625: ≤600 kΩ Auxiliary input (KDC-MP6025) Frequency response (±1 dB) : 20 Hz - 20 kHz Input Maximum Voltage : 1200 mV Input Impedance : 100 kΩ General Operating
-
 1
1 -
 2
2 -
 3
3 -
 4
4 -
 5
5 -
 6
6 -
 7
7 -
8
-
9
-
10
-
11
-
12
-
13
-
14
-
15
-
16
-
17
-
18
-
19
-
20
-
21
-
22
-
23
-
24
-
25
-
26
-
27
-
28
-
29
-
30
-
31
-
32
-
33
-
34
-
35
-
36
-
37
-
38
-
39
-
40
 |
 |
KDC-X679
KDC-MP6025
KDC-MP625
CD-RECEIVER
INSTRUCTION MANUAL
©
B64-2764-00/00 (KW)
Take the time to read through this instruction manual.
Familiarity with installation and operation procedures will help you
obtain the best performance from your new CD-receiver.
For your records
Record the serial number, found on the back of the unit, in the spaces
designated on the warranty card, and in the space provided
below. Refer to the
model and serial numbers whenever you call upon your KENWOOD dealer for
information or service on the product.
Model KDC-X679/MP6025/MP625
Serial number