Kenwood XD-355 User Manual 1
Kenwood XD-355 Manual
 |
View all Kenwood XD-355 manuals
Add to My Manuals
Save this manual to your list of manuals |
Kenwood XD-355 manual content summary:
- Kenwood XD-355 | User Manual 1 - Page 1
COMPACT HI-FI SYSTEM XD-SERIES XD-655 / XD-655E XD-355 / XD-355E INSTRUCTION MANUAL KENWOOD CORPORATION This instruction manual is for some models.Model availability and features (functions) may differ depending on the country and sales area. B60-5010-00 00 MA (E2, T) KW 0010 TINSE0370AWZZ - Kenwood XD-355 | User Manual 1 - Page 2
. THE EXCLAMATION POINT WITHIN AN EQUILATERAL TRIANGLE IS INTENDED TO ALERT THE USER TO THE PRESENCE OF IMPORTANT OPERATING AND MAINTENANCE (SERVICING) INSTRUCTIONS IN THE LITERATURE ACCOMPANYING THE APPLIANCE. The marking of products using lasers (Except for some areas) CLASS 1 LASER PRODUCT The - Kenwood XD-355 | User Manual 1 - Page 3
CONTENTS Page Page BEFORE APPLYING POWER 2 SAFETY PRECAUTIONS 2 ACCESSORIES 3 HANDLING OF DISCS AND TAPES 4 NAMES OF CONTROLS AND INDICATORS 5 - 7 PREPARATION FOR USE 8 - 10 SETTING THE CLOCK 11 -12 SOUND CONTROL 13 COMPACT DISC OPERATION 14 - 18 RADIO OPERATION 19 - 21 RDS (RADIO DATA - Kenwood XD-355 | User Manual 1 - Page 4
. • Do not use a cassette with more than 90 minutes recording time, for the tape used in such a cassette is very thin and tends to cause troubles such as engantlement around the pinch roller or cutting of tape. 4 EN - Kenwood XD-355 | User Manual 1 - Page 5
NAMES OF CONTROLS AND INDICATORS FRONT PANEL 1 EX.BASS / DEMO button 2 STANDBY / TIMER indicator 3 REVERSE MODE button 4 ON / STANDBY button 5 VIDEO / AUX button 6 TAPE (A/B) button 7 TUNER (BAND) button 8 CD button 9 2 (Reverse play) button 0 7 STOP button ! 3 (Play / repeat) button @ - Kenwood XD-355 | User Manual 1 - Page 6
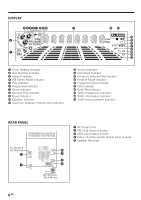
DISPLAY 34567 890 ! 2 1 @# 1 Timer Related Indicator 2 Disc Number Indicator 3 Repeat Indicator 4 FM Stereo Mode Indicator 5 Play Indicator 6 Programme Indicator 7 Pause Indicator 8 Random Play Indicator 9 Tuned Indicator 0 Equalizer Indicator ! Spectrum Analyzer / Volume level Indicator @ - Kenwood XD-355 | User Manual 1 - Page 7
REMOTE CONTROL 1 MEMORY / SET button 2 CLEAR button 3 CLOCK button 4 TIMER button 5 Disc Number Select buttons 6 TUNING / TIME (% fi) buttons 7 7 (Stop) button 8 2 (Reverse Play) button 9 CD button 0 TUNER (BAND) button ! POWER button @ AUTO MEMORY button # RDS DISPLAY button $ PTY - Kenwood XD-355 | User Manual 1 - Page 8
PREPARATION FOR USE • Unplug the AC power cord from the AC socket before connecting or disconnecting any component. Speakers (XD-655, XD-655E) Speakers (XD-355, XD-355E) Right speaker Left speaker Right speaker Left speaker Red Black Red Red Black Black Red Black Speaker connection - Kenwood XD-355 | User Manual 1 - Page 9
CAUTION Be sure to adhere the followings, or proper ventilation will be blocked causing damage or fire hazard. ÷ Do not place any objects impairing heat radiation onto the top of unit. ÷ Leave a space around the unit (from the largest outside dimension including projection) equal or greater - Kenwood XD-355 | User Manual 1 - Page 10
EX.BASS /DEMO • 2 "AA" size batteries (UM/SUM-3, R6, HP-7 or similar) 30 30 Demo mode When the AC power cord is first connected, the unit will enter the demonstration mode. To cancel the demonstration mode : Press the EX.BASS/DEMO button. • The demonstration mode will be cancelled and the unit will - Kenwood XD-355 | User Manual 1 - Page 11
SETTING THE CLOCK ON/ STANDBY MEMORY /SET CLOCK TUNING/TIME (fi %) POWER 2 3 4 5 6 7 8 9 In this example, the clock is set for the 24 hours (0:00) system. CLOCK MEMORY /SET TUNING/ TIME (%UP fiDOWN) 1 Press the ON/STANDBY button to enter the standby mode. 2 Press the CLOCK button. 3 Within 5 - Kenwood XD-355 | User Manual 1 - Page 12
To see the time display : Press the CLOCK button. • The time display will appear for about 5 seconds. Note : • The clock display will flash on and off at the push of the CLOCK button when the AC power supply is restored after a power failure occurs or after the AC power cord is disconnected. If this - Kenwood XD-355 | User Manual 1 - Page 13
SOUND CONTROL Main unit Remote control Main unit Remote control Volume (Main unit operation) When the VOLUME CONTROL is turned clockwise, the volume will increase. When it is turned anti-clockwise, the volume will decrease. (Remote control operation) Press the VOLUME up button (% ) to increase - Kenwood XD-355 | User Manual 1 - Page 14
COMPACT DISC OPERATION 12 cm (5") 8 cm (3") 7 STOP 7 8 CD playback 1 Press the ON/STANDBY button to turn the power on. 2 Press the CD button. 3 Press the 0 OPEN/CLOSE button to open the disc tray. 4 Place the CD(s) on the disc tray, label side up. • CDs can be placed on any open position - Kenwood XD-355 | User Manual 1 - Page 15
To interrupt playback : 1 Press the 8 button on the remote control. • "8" will light up. 2 Press the 3 button to resume playback from the same point. To stop playback : Press the 7 STOP button. To remove the CDs : Whilst in the stop mode, press the 0 OPEN/CLOSE button. • The disc tray will open. - Kenwood XD-355 | User Manual 1 - Page 16
7 3 3 16 EN RANDOM P.CALL 41 ¡¢ 3 Random play (Remote control operation) The tracks on the disc(s) can be played in random order automatically. 1 Load a disc(s) and close the disc tray. 2 Press the RANDOM button to begin random play. • "RDM" will light up. Notes : • If you press the P. CALL ¡ ¢ - Kenwood XD-355 | User Manual 1 - Page 17
7 STOP 7 P.CALL 4 1 ¡ ¢ P.CALL 41 ¡¢ Cue and review 1 Load a disc and begin playback. 2 Hold down the P. CALL ¡ ¢ button for audi- ble fast forward, and hold down the P. CALL 4 1 button for audible fast reverse. 3 Normal playback will resume when the P. CALL 4 1 or ¡ ¢ button is released. Notes : - Kenwood XD-355 | User Manual 1 - Page 18
5 3 1 3 2 CLEAR 2 5 Program playback You can playback the tracks on the CDs in the disc 1-3 position in any order desired. By specifying the disc numbers from 1 to 3, and the track numbers from 1 to 99, you can choose up to 32 selections for playback in the order you like. 1 When in the stop mode, - Kenwood XD-355 | User Manual 1 - Page 19
select the desired frequency band. (FM ST, FM or AM) 4 Press the TUNING/TIME (%UP or fiDOWN) but- ton to tune into the desired station. Manual tuning : Press the TUNING/TIME (%UP or fiDOWN) button 4 as many times as required to adjust the frequency shown on the display to the frequency - Kenwood XD-355 | User Manual 1 - Page 20
Preset tuning You can store up to 40 stations in memory (40 stations consisting of any combination of FM and AM stations you like) and recall them at the push of a button. MEMORY/ SET MEMORY/ SET P.CALL 4 1 ¡ ¢ P.CALL 41 ¡¢ To enter stations into memory : 1 Perform steps 1 - 6 in the "Tuning" - Kenwood XD-355 | User Manual 1 - Page 21
EX.BASS /DEMO ON/ STANDBY TUNER (BAND) Preset memory scan P.CALL 4 1 ¡ ¢ The stations saved in the preset memory can be scanned automatically. 1 To scan the preset stations, press the P. CALL (4 1 or ¡ ¢) button for more than 0.5 second. • The station preset number will flash and the pro- grammed - Kenwood XD-355 | User Manual 1 - Page 22
and information about what type of programme they broadcast, such as sports or music, etc. When tuned to an FM station which provide the RDS service, the RDS will appear, the station frequency and then the station name (if sent) is displayed. The TP (Traffic Programme) will appear on the display - Kenwood XD-355 | User Manual 1 - Page 23
Descriptions of the PTY (Programme Type) codes, TP (Traffic Programme) and TA (Traffic Announcement) NEWS : Short account of facts, events and publicly expressed views, reportage and actuality. AFFAIRS :Topical programme expanding or enlarging upon the new, generally in different presentation - Kenwood XD-355 | User Manual 1 - Page 24
concerned with travel to near and far destinations, package tours and travel ideas and opportunities. Not for use for Announcements about problems, delays, or roadworks affecting immediate travel where TP/TA should be used. LEISURE : Programmes concerned with recreational activities in which the - Kenwood XD-355 | User Manual 1 - Page 25
4 2,3 1 4 (4 seconds) (4 seconds) ASPM (Auto Station Programme Memory) It is recommended that you store stations in memory using ASPM. (This memory can be used for PTY searches, and station select.) When the AUTO MEMORY button is pressed, whilst turned to the FM band, the RDS function will - Kenwood XD-355 | User Manual 1 - Page 26
• If 40 stations have already been stored in memory and the AUTO MEMORY button is pressed, "END" will appear immediately and the scan will be aborted. If you want to redo the ASPM operation from the beginning, erase the preset memory, and then perform steps 1 - 4. • If the RDS station broadcast - Kenwood XD-355 | User Manual 1 - Page 27
2 1 3 4 5 3,5 4 To recall stations that have been stored in memory (PTY search) You can search for desired stations by specifying the programme type (see page 23 - 24) from among the stations that have been stored in memory. 1 Press the POWER button to turn the power on. 2 Press the TUNER (BAND) - Kenwood XD-355 | User Manual 1 - Page 28
is actually being made, the TA will appear. (When both the TP and TA will appear, an announcement is being made.) P.CALL 41 ¡¢ To manually recall the stations stored in memory Press the P. CALL (4 1 or ¡ ¢) button. • Each time the button is pressed, the station name will change. • After the - Kenwood XD-355 | User Manual 1 - Page 29
RDS DISPLAY (RDS display) (No RDS station display) To switch the display Each time the RDS DISPLAY button is pressed whilst an FM station is tuned in, the display will switch as follows: When the station you are tuning in is not an RDS station or even if it is an RDS station but it is very weak - Kenwood XD-355 | User Manual 1 - Page 30
CASSETTE OPERATION TAPE A or TAPE B playback REVERSE MODE 1 2,5 7 STOP 6 P.CALL 4 1 ¡ ¢ 1 Press the ON/STANDBY button to turn the power on. 2 Press the TAPE (A/B) button. 3 Open the cassette door by pushing the area marked "PUSH OPEN". 4 Load the cassette into the TAPE A or TAPE B cassette - Kenwood XD-355 | User Manual 1 - Page 31
RECORDING (TAPE B only) • When recording important selections, be sure to make a preliminary test to ensure that the desired material is being properly recorded. • The volume and sound quality can be adjusted with no effect on the recorded signals (Variable Sound Monitor). • Metal and CrO2 tapes - Kenwood XD-355 | User Manual 1 - Page 32
Note : • When the end of the tape is reached whilst re- cording, the CD player will display the track number which was being played at that time, and stop automatically. If you want to restart recording from the beginning of the interrupted track, turn over the tape, press the REC PAUSE button and - Kenwood XD-355 | User Manual 1 - Page 33
HOW TO USE THE BUILT-IN TIMER • Before setting the timer, make sure that the clock setting is correct. (page 11) Timer playback STANDBY/TIMER ON/ STANDBY VIDEO/AUX TUNER (BAND) CD TAPE (A/B) MEMORY /SET TIMER CD BAND / TUNER POWER TIMER MEMORY/ SET VOLUME CONTROL TUNING/ TIME (%UP fiDOWN) TUNING/ - Kenwood XD-355 | User Manual 1 - Page 34
STANDBY/TIMER ON/ STANDBY VIDEO /AUX TUNER (BAND) MEMORY /SET TIMER TUNER (BAND) POWER 3 REC 4 REC REC 5 REC Timer recording TIMER MEMORY/ SET VOLUME CONTROL TUNING/ TIME (%UP fiDOWN) TUNING/TIME (fi %) VIDEO / AUX VOLUME 1 Press the ON/STANDBY button to turn the power on. • Load a cassettle for - Kenwood XD-355 | User Manual 1 - Page 35
MEMORY /SET TIMER 2 3 Sleep operation TIMER MEMORY/ SET TUNING/TIME (%UP fiDOWN) TUNING/TIME (fi %) The radio, compact disc and cassette deck can all be turned off automatically. 1 Play back the desired sound source. 2 Press theTIMER button repeatedly until " " is displayed. To change the sleep - Kenwood XD-355 | User Manual 1 - Page 36
USING EXTERNAL UNITS To the line output socket RCA cord Video/Auxiliary (Audio signal) input To listen to or record signals from external sources through this unit : 1 Use a separately available RCA cord to connect the desired external unit to the VIDEO/AUX sockets. (red = right channel, white = - Kenwood XD-355 | User Manual 1 - Page 37
RESETTING THE MICROCOMPUTER ON/ STANDBY 7 STOP SOUND MODE Reset the microcomputer under the following con- ditions : • To erase all of the stored memory contents (clock and timer settings, and tuner and CD presets). • If the display is not correct. • If the operation is not correct. 1 Press - Kenwood XD-355 | User Manual 1 - Page 38
For maintaining the best condition of the deck and for longer Capstan service life, always keep the heads, capstan and pinch roller clean. To • There are precisely aligned parts around the heads, including the tape guides. When cleaning, pay special attention so as not to apply shock to - Kenwood XD-355 | User Manual 1 - Page 39
SPECIFICATIONS (XD-655 / XD-655E) Main Unit [Amplifier section] Rated power output 1 kHz, 0.7% T.H.D., 6 DIN) 70W + 70W Effective output power during STEREO operation 1 kHz, 10% T.H.D., 6 RMS) 100W + 100W Effective Music power (DIN) (One channel driven 180W + 180W Signal to noise ratio VIDEO/AUX - Kenwood XD-355 | User Manual 1 - Page 40
the warranty card, and in the space provided below. Refer to the model and serial numbers whenever you call upon your dealer for information or service on this product. Model Serial Number ___________
-
 1
1 -
 2
2 -
 3
3 -
 4
4 -
 5
5 -
 6
6 -
 7
7 -
8
-
9
-
10
-
11
-
12
-
13
-
14
-
15
-
16
-
17
-
18
-
19
-
20
-
21
-
22
-
23
-
24
-
25
-
26
-
27
-
28
-
29
-
30
-
31
-
32
-
33
-
34
-
35
-
36
-
37
-
38
-
39
-
40
 |
 |

COMPACT HI-FI SYSTEM
XD-SERIES
XD-655 / XD-655E
XD-355 / XD-355E
INSTRUCTION MANUAL
KENWOOD CORPORATION
This instruction manual is for some models.Model availability and features
(functions) may differ depending on the country and sales area.
B60-5010-00 00
MA
(E2, T)
KW
0010
TINSE
0370AWZZ