KitchenAid KCMS1555SSS Installation Guide
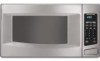
KitchenAid KCMS1555SSS - Countertop Microwave Oven Manual
 |
UPC - 883049119342
View all KitchenAid KCMS1555SSS manuals
Add to My Manuals
Save this manual to your list of manuals |
KitchenAid KCMS1555SSS manual content summary:
- KitchenAid KCMS1555SSS | Installation Guide - Page 1
27" (68,6 cm) : (Y)RBS275PD, (Y)GBS277PD, KEBI171D, (Y)KEBS177D 30" (76,2 cm) : (Y)RBS305PD, GBS307PD, (Y)KEBI101D, (Y)KEBS107D Table of Contents / Table des matières MICROWAVE OVEN SAFETY 1 INSTALLATION INSTRUCTIONS 2 Tools and Parts 2 Minimum Cutout Dimensions 2 Trim Kit Frame Dimensions - KitchenAid KCMS1555SSS | Installation Guide - Page 2
Bottom bracket (1) H. Upper duct (1) I. Template Minimum Cutout Dimensions A Width 15³⁄₄" (40.0 cm) B 3" (7.6 cm) A. Depth B. Width 2.1 cm) *For installation over 24" (61.0 cm) built-in oven **For installation over 27" (68.6 cm) built-in oven ***For installation over 30" (76.2 cm) built-in - KitchenAid KCMS1555SSS | Installation Guide - Page 3
short, have a qualified electrician or serviceman install an outlet near the microwave oven. SAVE THESE INSTRUCTIONS Microwave Oven Preparation 1. Unplug microwave oven before proceeding with installation. 2. Remove any loose items inside microwave oven. Bottom Duct Assembly 1. Fasten bottom bracket - KitchenAid KCMS1555SSS | Installation Guide - Page 4
trim kit frame and drill 4 pilot holes. (Use 5/64" drill.) 4. Attach trim kit frame using four 1" screws. Make sure orientation is correct as stated in Step 2. Installation is now complete. Replace any loose items that have been removed from microwave oven cavity. Save this installation instruction - KitchenAid KCMS1555SSS | Installation Guide - Page 5
installation. Lire et suivre les instructions fournies avec les outils indiqués ici. ■ Mètre-ruban ■ Crayon ■ Ciseaux ■ Tournevis Phillips Nº 2 ■ Foret de 5/64" Pièces fournies A B C D E Dimensions Largeur DIMENSIONS AU-DESSUS DU FOUR ENCASTRÉ 24" (61,0 CM) AU-DESSUS DU FOUR ENCASTRÉ 27" ( - KitchenAid KCMS1555SSS | Installation Guide - Page 6
Dimensions pour cadre de garniture 222963 6(87(6,530,7,c5mccm)m*)**)*** 18¹⁄₄" (46,4 cm) 12 30,6 cm) 22¹⁄₈" (56,2 cm) 2,1 cm) *Pour installation au-dessus du four encastré 24" (61,0 cm) **Pour installation au-dessus du four encastré 27" (68,6 cm) ***Pour installation ces instructions peut - KitchenAid KCMS1555SSS | Installation Guide - Page 7
le conduit inférieur avec deux vis existantes sur le côté droit du four à micro-ondes. (Vue avant du four à micro-ondes) Installation de la bride antibasculement 1. Sur le plancher de la cavité, utiliser le gabarit pour marquer la position du centre des trous de fixation de la - KitchenAid KCMS1555SSS | Installation Guide - Page 8
cadre de garniture à l'aide de quatre vis de 1". Veiller à ce que l'orientation soit correcte-voir l'étape 2. L'installation est maintenant terminée. Remettre à l'intérieur du four à micro-ondes tout article qui en a été enlevé. Conserver ces instructions d'installation pour consultation ultérieure
-
 1
1 -
 2
2 -
 3
3 -
 4
4 -
 5
5 -
 6
6 -
 7
7 -
8
 |
 |

MICROWAVE OVEN BUILT-IN TRIM KIT
INSTALLATION INSTRUCTIONS
Built-In Trim Kit Models MK1150XV, MK1154XV, MK1157XV
UL listed for use over built-in electric ovens:
24" (61.0 cm): RBS245PD, KEBI141D, KEBS147D
27" (68.6 cm): (Y)RBS275PD, (Y)GBS277PD, KEBI171D, (Y)KEBS177D
30" (76.2 cm): (Y)RBS305PD, GBS307PD, (Y)KEBI101D, (Y)KEBS107D
INSTRUCTIONS D’INSTALLATION
GARNITURE ENCASTRÉE POUR FOUR À MICRO-ONDES
Garniture encastrée pour modèles
MK1150XV, MK1154XV, MK1157XV
Homologations UL pour utilisation au-dessus des fours encastrés électriques :
24" (61,0 cm) : RBS245PD, KEBI141D, KEBS147D
27" (68,6 cm) : (Y)RBS275PD, (Y)GBS277PD, KEBI171D, (Y)KEBS177D
30" (76,2 cm) : (Y)RBS305PD, GBS307PD, (Y)KEBI101D, (Y)KEBS107D
MICROWAVE OVEN SAFETY
Table of Contents / Table des matières
MICROWAVE OVEN SAFETY
..................................................
1
INSTALLATION INSTRUCTIONS
.............................................
2
Tools and Parts
......................................................................
2
Minimum Cutout Dimensions
................................................
2
Trim Kit Frame Dimensions
....................................................
2
Electrical Requirements
.........................................................
2
Microwave Oven Preparation
................................................
3
Bottom Duct Assembly
..........................................................
3
Side Duct and Upper Duct Assembly
....................................
3
Anti-Tip Bracket Installation
...................................................
4
Microwave Oven Placement
..................................................
4
Trim Kit Frame Installation
.....................................................
4
SÉCURITÉ DU FOUR À MICRO-ONDES
...........................................
5
INSTRUCTIONS D'INSTALLATION
....................................................
5
Outillage et pièces
.............................................................................
5
Dimensions minimales pour le découpage
.......................................
5
Dimensions pour cadre de garniture
.................................................
6
Spécifications électriques
.................................................................
6
Préparation du four à micro-ondes
...................................................
6
Assemblage du conduit inférieur
......................................................
6
Assemblage du conduit latéral et du conduit supérieur
...................
7
Installation de la bride antibasculement
...........................................
7
Mise en place du four à micro-ondes
...............................................
8
Installation du cadre de garniture
....................................................
8
W10197613A
You can be killed or seriously injured if you don't immediately
You
can be killed or seriously injured if you don't follow
All safety messages will tell you what the potential hazard is, tell you how to reduce the chance of injury, and tell you what can
happen if the instructions are not followed.
Your safety and the safety of others are very important.
We have provided many important safety messages in this manual and on your appliance. Always read and obey all safety
messages.
This is the safety alert symbol.
This symbol alerts you to potential hazards that can kill or hurt you and others.
All safety messages will follow the safety alert symbol and either the word “DANGER” or “WARNING.”
These words mean:
follow instructions.
instructions.
DANGER
WARNING