KitchenAid KDSS907SSS Use & Care Guide
KitchenAid KDSS907SSS - 30" Slide-In Dual Fuel Range Manual
 |
UPC - 883049028361
View all KitchenAid KDSS907SSS manuals
Add to My Manuals
Save this manual to your list of manuals |
KitchenAid KDSS907SSS manual content summary:
- KitchenAid KDSS907SSS | Use & Care Guide - Page 1
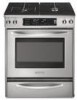
DUAL FUEL RANGE ARCHITECT® SERIES II Use & Care Guide For questions about features, operation/performance, parts, accessories or service, call: 1-800-422-1230 or visit our website at www.kitchenaid.com In Canada, call for assistance, installation and service, call: 1-800-807-6777 or visit our - KitchenAid KDSS907SSS | Use & Care Guide - Page 2
™ Conversion 17 Convection Bake 18 Convection Roast 18 Convection Broil 19 Proofing Bread 20 Timed Cooking 20 Warming Drawer 20 RANGE CARE 21 Self-Cleaning Cycle 21 General Cleaning 22 Oven Light(s 23 Oven Door 24 Warming Drawer 24 TROUBLESHOOTING 25 ASSISTANCE OR SERVICE 26 - KitchenAid KDSS907SSS | Use & Care Guide - Page 3
. • Do not touch any electrical switch. • Do not use any phone in your building. • Immediately call your gas supplier from a neighbor's phone. Follow the gas supplier's instructions. • If you cannot reach your gas supplier, call the fire department. - Installation and service must be performed by - KitchenAid KDSS907SSS | Use & Care Guide - Page 4
anti-tip bracket, if the range is moved. See the installation instructions for details. Failure to follow these instructions can result in death or serious burns to children and adults. Anti-Tip Bracket Range Foot Making sure the anti-tip bracket is installed: • Slide range forward. • Look for the - KitchenAid KDSS907SSS | Use & Care Guide - Page 5
. s User Servicing - Do not repair or replace any part of the range unless specifically recommended in the manual. All other servicing should be referred to a qualified technician. s Storage in or on the Range - Flammable materials should not be stored in an oven or near surface units. s Do Not Use - KitchenAid KDSS907SSS | Use & Care Guide - Page 6
PARTS AND FEATURES This manual covers several different models. The range you have purchased may have some or all of the items listed. The locations and appearances of the features shown here may not match those of your model. Control Panel A B MED LOW HI ON F C CONTROL LOCKED CLEAN TIME - KitchenAid KDSS907SSS | Use & Care Guide - Page 7
with your new range. Models with the TripleTier® Flame Burner will include a TripleTier® Burner LP Gas Conversion Kit and a kit for standard ranges. See "Installation Instructions" for details on making this conversion. Electric igniters automatically light the surface burners when control knobs are - KitchenAid KDSS907SSS | Use & Care Guide - Page 8
Flame Burner with InstaWok™ Grate is functioned by a dual valve control knob, which controls 2 separate burners. See "TripleTier® Burner with High Power Burner and Low Power Simmer Settings" in the "Cooktop Controls" section. The InstaWok™ Grate supports 12" to 14" (30.5 cm to 35.6 cm) Wok pans and - KitchenAid KDSS907SSS | Use & Care Guide - Page 9
. 2. Remove grate from cooktop and flip the grate over so that the wok supports are pointing up. Standard Burner A A B D B C A. Wok supports pointing up B. Cooktop grate with InstaWok™ Grate insert (left side of range only) C. Reversible InstaWok™ Grate insert 3. Place the wok grate within the - KitchenAid KDSS907SSS | Use & Care Guide - Page 10
light, do not service the sealed burner yourself. Contact a trained repair specialist. Cookware instructions. s Heats slowly, but unevenly. s Ideal results on low to medium heat settings. Copper s Heats very quickly and evenly. Earthenware s Follow manufacturer's instructions. s Use on low heat - KitchenAid KDSS907SSS | Use & Care Guide - Page 11
ELECTRONIC OVEN CONTROL C D E F G CLEAN TIME NIGHT F PROBE TEMP LIGHT MIN HR SEC MIN C DELAY B ON HR MIN CONTROL LOCKED COOK TIME START TIME STOP TIME MED LOW HI A H I A. EasyConvect™ conversion B. Convection oven settings C. Oven settings D. Proof bread setting E. Oven display - KitchenAid KDSS907SSS | Use & Care Guide - Page 12
. The oven display will scroll through the various options, starting at 1 and ending in 7. You can also press the OPTIONS selection pad and number pad to quickly enter the desired hidden function. OPTIONS SPECIAL FUNCTION 1 Fahrenheit and Celsius conversion 2 Tones On/Off 3 Tones High/Low - KitchenAid KDSS907SSS | Use & Care Guide - Page 13
for only part of the Sabbath. When the Sabbath Mode is set, only the number and start pads will function, no tones will sound, and the displays will not show messages or temperature changes. The heat sources icons will appear lit on the oven display throughout the Sabbath Mode. When the oven door is - KitchenAid KDSS907SSS | Use & Care Guide - Page 14
heating elements will not turn on or off for a random time, anywhere from 16 to 24 seconds. It may take up to ½ hour for the oven section for instructions on placing the oven into its Sabbath Mode compliant state. Once the oven is in following chart as a guide. BAKEWARE/ RESULTS RECOMMENDATIONS - KitchenAid KDSS907SSS | Use & Care Guide - Page 15
meat, poultry and fish in 2 or 3 different places. Temperature Probe (on convection models) WARNING Burn Hazard Use an oven mitt to remove temperature probe. Do not touch broil element. Failure to follow these instructions can result in burns. 1. Press the number pads to enter a probe temperature - KitchenAid KDSS907SSS | Use & Care Guide - Page 16
will turn off in 30 seconds to 2 minutes. They will come back on once the door is closed. To Bake or Roast: Before baking and roasting, position racks according to the "Positioning Racks and Bakeware" section. For baking, allow the range to preheat before placing food in the oven. When roasting, it - KitchenAid KDSS907SSS | Use & Care Guide - Page 17
control models) In a convection oven, the fan-circulated hot air continually distributes heat more evenly than the natural movement of air in a standard thermal oven ™ Conversion (on some models) oven will prompt a food check at the end of a non-delayed cook time. Use the following chart as a guide - KitchenAid KDSS907SSS | Use & Care Guide - Page 18
conversion for BAKED GOODS and OTHER FOODS, allow the oven to preheat before placing food in the oven Bake (on some models) Convection Bake can oven. Allow the range to preheat before placing food in the oven. During convection baking preheat, the broil elements and the bake element all heat the oven - KitchenAid KDSS907SSS | Use & Care Guide - Page 19
Convection Broil (on some models) Convection Broil is ideal oven door is opened during convection broiling, the broil elements and fan will turn off after 30 range can be set between 300°F and 500°F (149°C and 260°C). 2. Press START. The set oven temperature will appear on the oven display until oven - KitchenAid KDSS907SSS | Use & Care Guide - Page 20
. Empty serving dishes and ovenproof dishes can be heated while the warming drawer is preheating. Do not place food to be warmed directly on warming drawer surface. To Use: 1. Place cooked food(s) in warming drawer. 2. Press WARMING DRAWER ON button. "WARM-LOW" will appear on the display. To change - KitchenAid KDSS907SSS | Use & Care Guide - Page 21
MED HI Roasted Chicken MED HI Soft Rolls LOW RANGE CARE Self-Cleaning Cycle WARNING Burn Hazard Do not touch the oven during the Self-Cleaning cycle. Keep children away from oven during Self-Cleaning cycle. Failure to follow these instructions can result in burns. IMPORTANT: The health of - KitchenAid KDSS907SSS | Use & Care Guide - Page 22
cleaning, make sure all controls are off and the oven and cooktop are cool. Always follow label instructions on cleaning products. Soap, water and a soft cloth or sponge are suggested first unless otherwise noted. EXTERIOR PORCELAIN ENAMEL SURFACES (on some models) Food spills containing acids - KitchenAid KDSS907SSS | Use & Care Guide - Page 23
during the Self-Cleaning cycle (on some models). On some models, when the oven door is closed, press OVEN LIGHT to turn the light on or off. To Replace: Before replacing, make sure the oven and cooktop are cool and the control knobs are off. 1. Unplug range or disconnect power. 2. Turn the glass - KitchenAid KDSS907SSS | Use & Care Guide - Page 24
range use, it is not suggested to remove the oven door. However, if removal is necessary, make sure the oven is off and cool. Then, follow these instructions. The oven door is heavy. To Remove: 1. Open oven door all the way. 2. Flip up the hinge latch on each side. Warming Drawer (on some models - KitchenAid KDSS907SSS | Use & Care Guide - Page 25
repair specialist. Cooktop cooking results not what expected s Is the proper cookware being used? See "Cookware" section. s Is the control knob set to the proper heat level? See "Cooktop Controls" section. s Is the appliance level? Level the appliance. See the Installation Instructions. Oven - KitchenAid KDSS907SSS | Use & Care Guide - Page 26
service center. In the U.S.A. Call the KitchenAid Customer eXperience Center toll free: 1-800-422-1230. Our consultants provide assistance with: s Features and specifications on our full line of appliances. s Installation information. s Use and maintenance procedures. s Accessory and repair parts - KitchenAid KDSS907SSS | Use & Care Guide - Page 27
assistance with: s Features and specifications on our full line of appliances. s Use and maintenance procedures. s Accessory and repair parts sales. s Referrals to local dealers, repair parts distributors and service companies. KitchenAid Canada designated service technicians are trained to fulfill - KitchenAid KDSS907SSS | Use & Care Guide - Page 28
KITCHENAID® DUAL FUEL RANGE WARRANTY LIMITED WARRANTY For one year from the date of purchase, when this major appliance is operated and maintained according to instructions attached to or furnished with the product, KitchenAid brand of Whirlpool Corporation or Whirlpool Canada LP (hereafter " - KitchenAid KDSS907SSS | Use & Care Guide - Page 29
• Appeler immédiatement le fournisseur de gaz d'un téléphone voisin. Suivre ses instructions. • À défaut de joindre votre fournisseur de gaz, appeler les pompiers. - L'installation et l'entretien doivent être effectués par un installateur qualifié, une agence de service ou le fournisseur de gaz. 29 - KitchenAid KDSS907SSS | Use & Care Guide - Page 30
service instructions d'installation. Le non-respect de ces instructions installée : • Glisser la cuisinière vers l'avant. • Vérifier que la bride antibasculement est bien fixée au plancher. • Glisser de nouveau la cuisinière vers l'arrière de sorte que le pied est sous la bride antibasculement. 30 - KitchenAid KDSS907SSS | Use & Care Guide - Page 31
CORRECTEMENT INSTALLÉS. POUR VÉRIFIER SI LES DISPOSITIFS SONT CORRECTEMENT INSTALLÉS, du papier d'aluminium. Le non-respect de cette instruction empêche la circulation de l'air dans le surveillance dans la pièce où la cuisinière est en service. Ne jamais laisser les enfants s'asseoir ou se tenir - KitchenAid KDSS907SSS | Use & Care Guide - Page 32
Installation correcte - Une fois installée, la cuisinière doit être reliée à la terre conformément aux codes locaux, ou en l'absence de codes locaux, au National Electrical en marche. CONSERVEZ CES INSTRUCTIONS PIÈCES ET CARACTÉ commande A B MED LOW HI ON F C CONTROL LOCKED CLEAN TIME PROBE - KitchenAid KDSS907SSS | Use & Care Guide - Page 33
au gaz propane pour le brûleur TripleTier® ainsi qu'une trousse pour les cuisinières standard. Voir les "Instructions d'installation" pour des détails sur la conversion. Des allumeurs électriques allument automatiquement les brûleurs de surface lorsque les boutons de commande sont tournés à LITE - KitchenAid KDSS907SSS | Use & Care Guide - Page 34
. 2. Pousser et tourner le bouton dans le sens antihoraire n'importe où entre SIMMER BURNER HI et SIMMER BURNER LO. Utiliser le tableau suivant comme guide lors du réglage des niveaux de chaleur du brûleur de mijotage. RÉGLAGES DE MIJOTAGE UTILISATION RECOMMANDÉE LITE s Pour allumer le brûleur - KitchenAid KDSS907SSS | Use & Care Guide - Page 35
bouton n'importe où entre HI et LO. Utiliser le tableau suivant comme guide lors du réglage des niveaux de chaleur. RÉGLAGE UTILISATION RECOMMANDÉE HI section "Commandes de la table de cuisson". La grille InstaWok™ supporte des woks de 12" à 14" (30,5 cm à 35,6 cm) et peut être retournée pour - KitchenAid KDSS907SSS | Use & Care Guide - Page 36
grilles de brûleur. Alignement des chapeaux de brûleur Toujours garder le chapeau de brûleur correctement installé lors de l'utilisation d'un brûleur de surface. Un chapeau de brûleur propre aide à empêcher le mauvais allumage et des flammes inégales. Toujours nettoyer le chapeau du brûleur apr - KitchenAid KDSS907SSS | Use & Care Guide - Page 37
un technicien de réparation qualifié. 4. Réinstaller le chapeau du brûleur et s'assurer que suivant comme guide pour les ramique s Suivre les instructions du fabricant. s Terre cuite s Suivre les instructions du fabricant. s Utiliser des , communiquez avec votre service local d'agriculture. Les - KitchenAid KDSS907SSS | Use & Care Guide - Page 38
HR SEC MIN C DELAY B ON HR MIN CONTROL LOCKED COOK TIME START TIME STOP TIME MED LOW HI A H I A. Conversion EasyConvect™ B. Réglages du four à convection C. la minuterie), TIMER OFF (arrêt de la minuterie) et OVEN LIGHT (lampe du four) fonctionnent. Pour verrouiller/déverrouiller les - KitchenAid KDSS907SSS | Use & Care Guide - Page 39
mettre en marche ou d'éteindre les signaux sonores et les messages/ guides et d'ajuster le calibrage du four. Les modes Sabbath et Dehydrate peuvent FONCTION SPÉCIALE 1 Conversion Fahrenheit et Celsius 2 Signaux sonores On/Off (marche/arrêt) 3 Signaux sonores High/Low (élevé/bas) 4 Signaux - KitchenAid KDSS907SSS | Use & Care Guide - Page 40
Utiliser le tableau suivant comme guide. AJUSTEMENT EN °F (CHANGEMENT AUTOMATIQUE EN °C) CUIT 30°F (15°C) ...beaucoup plus -10°F (-5°C) ...un peu moins -20°F (-10°C) ...modérément moins -30 la cuisson. Le non-respect de cette instruction peut causer un empoisonnement alimentaire ou une - KitchenAid KDSS907SSS | Use & Care Guide - Page 41
mode Sabbat. Voir la section "Pour un réglage normal, non minuté" pour des instructions sur le réglage du four en mode Sabbat. Une fois que le four est en é dans la recette. Se servir du tableau suivant comme guide. USTENSILES DE CUISSON/RÉSULTATS RECOMMANDATIONS Aluminium légèrement coloré s - KitchenAid KDSS907SSS | Use & Care Guide - Page 42
de brûlures Utiliser des mitaines de four pour retirer la sonde thermométrique. Ne pas toucher l'élément du gril. Le non-respect de ces instructions peut causer des brûlures. La sonde thermométrique mesure précisément la température interne de la viande, de la volaille et des - KitchenAid KDSS907SSS | Use & Care Guide - Page 43
d'allumer le four. s Ne pas installer les grilles lorsque des ustensiles de cuisson Se servir de l'illustration et du tableau suivants comme guide. 5 4 3 2 1 Cuisson traditionnelle ALIMENT POSITION ment de cuisson au four s'éteint au bout de 30 secondes à 2 minutes. Ils se rallumeront une fois - KitchenAid KDSS907SSS | Use & Care Guide - Page 44
Lorsque la température réelle du four atteint 170°F (77°C), l'afficheur du four indique les augmentations de température par tranches de 1°. Lorsque la température réglée est atteinte, un signal sonore se fait entendre (si activé). 3. Appuyer sur OFF (arrêt) lorsque la cuisson est terminée. Cuisson - KitchenAid KDSS907SSS | Use & Care Guide - Page 45
déplacement de l'air chaud aide à maintenir une température de cuisson peut être réduite jusqu'à 30 pour cent, surtout pour les gros rôtis la catégorie choisie, la conversion EasyConvect™ peut réduire automatiquement érée. Utiliser le tableau suivant comme guide. RÉGLAGE TYPE D'ALIMENTS VIANDES - KitchenAid KDSS907SSS | Use & Care Guide - Page 46
côte (désossé) saignant à point bien cuit Rôti de croupe ou d'aloyau saignant à point bien cuit Pain de viande 20-25 25-30 30-35 22-25 27-30 32-35 20-25 25-30 30-35 20-25 300°F (149°C) 140°F (60°C) 160°F (71°C) 170°F (77°C) 300°F (149°C) 140°F (60°C) 160°F (71°C) 170°F (77°C) 300 - KitchenAid KDSS907SSS | Use & Care Guide - Page 47
au gril, les éléments du gril et le ventilateur s'arrêtent après 30 secondes. Ils se rallumeront une fois la porte fermée. Cuisson au gril par épare la pâte pour la cuisson en activant la levure. Suivre les instructions de la recette comme guide. Pour lever la pâte : Avant la première levée de pain - KitchenAid KDSS907SSS | Use & Care Guide - Page 48
Le non-respect de cette instruction peut causer un empoisonnement alimentaire pas garder plus de 30 minutes. Les aliments doivent être à la température de service avant d'être placés service idéale. Utiliser le tableau suivant comme guide. ALIMENT RÉGLAGE Hors-d'oeuvre HI (élevé) Biscuits LOW - KitchenAid KDSS907SSS | Use & Care Guide - Page 49
moyen élevé) MED HI (moyen élevé) LOW (bas) ENTRETIEN DE LA CUISINIÈRE Programme autonettoyage. Le non-respect de ces instructions peut causer des brûlures. IMPORTANT 30 pour des saletés légères et de 3 h 30 à 4 h 30 pour des saletés moyennes à abondantes. Utiliser le tableau ci-dessous comme guide - KitchenAid KDSS907SSS | Use & Care Guide - Page 50
, l'autonettoyage commence et "OVEN IS CLEANING" (le four peut être réglée entre 2 h 30 et 4 h 30. 2. Appuyer sur STOP TIME (heure froids. Toujours suivre les instructions sur les étiquettes KitchenAid® (échantillon inclus) : Voir la section "Assistance ou service Ne pas réinstaller les chapeaux sur - KitchenAid KDSS907SSS | Use & Care Guide - Page 51
pour acier inoxydable KitchenAid® (échantillon inclus) : Voir la section "Assistance ou service" pour placer une la porte du four est fermée, appuyer sur OVEN LIGHT pour allumer ou éteindre la lampe. le four est éteint et froid. Puis, suivre ces instructions. La porte du four est lourde. Dépose : 1. - KitchenAid KDSS907SSS | Use & Care Guide - Page 52
guides. 2. Pousser le tiroir complètement. 3. Ouvrir et fermer délicatement le tiroir pour s'assurer qu'il est bien installé sur les glissières. DÉPANNAGE Essayer les solutions suggérées ici d'abord afin d'éviter le coût d'une visite de service é ou voir les instructions d'installation. s Est-ce - KitchenAid KDSS907SSS | Use & Care Guide - Page 53
et contacter un technicien de service. Chaleur excessive autour des ustensiles est-il d'aplomb? Niveler l'appareil. Voir les instructions d'installation. Le four ne fonctionne pas s Le four des commandes est-il réglé? Voir la section "Control Lock (verrouillage des commandes)". s Sur certains modè - KitchenAid KDSS907SSS | Use & Care Guide - Page 54
Voir les instructions d'installation. s gril", "Conversion EasyConvect", " SERVICE Avant de faire un appel pour assistance ou service, consulter la section "Dépannage". Ce guide peut vous faire économiser le coût d'une visite de service. Si vous avez encore besoin d'aide, suivre les instructions - KitchenAid KDSS907SSS | Use & Care Guide - Page 55
une région éloignée où un service d'entretien KitchenAid autorisé n'est pas disponible. 9. La dépose et la réinstallation de votre gros appareil si celui-ci est installé dans un endroit inaccessible ou n'est pas installé conformément aux instructions d'installation fournies. 10. Les gros appareils - KitchenAid KDSS907SSS | Use & Care Guide - Page 56
© 2007. All rights reserved. ® Registered Trademark/TM Trademark of KitchenAid, U.S.A., KitchenAid Canada licensee in Canada Tous droits réservés. ® Marque déposée/TM Marque de commerce de KitchenAid, U.S.A., Emploi sous licence par KitchenAid Canada au Canada 10/07 Printed in U.S.A. Imprimé aux
-
 1
1 -
 2
2 -
 3
3 -
 4
4 -
 5
5 -
 6
6 -
 7
7 -
8
-
9
-
10
-
11
-
12
-
13
-
14
-
15
-
16
-
17
-
18
-
19
-
20
-
21
-
22
-
23
-
24
-
25
-
26
-
27
-
28
-
29
-
30
-
31
-
32
-
33
-
34
-
35
-
36
-
37
-
38
-
39
-
40
-
41
-
42
-
43
-
44
-
45
-
46
-
47
-
48
-
49
-
50
-
51
-
52
-
53
-
54
-
55
-
56
 |
 |

Models/Modèles KDRS807 KDSS907 YKDRS807 YKDSS907
W101
62199
A
DUAL FUEL RANGE
ARCHITECT
®
SERIES II
Use & Care Guide
For questions about features, operation/performance, parts, accessories or service, call:
1-800-422-1230
or visit our website at
www.kitchenaid.com
In Canada, call for assistance, installation and service, call:
1-800-807-6777
or visit our website at
www.KitchenAid.ca
CUISINIÈRE À BI-COMBUSTIBLE
ARCHITECT
®
SÉRIE II
Guide d’utilisation et d’entretien
Au Canada, pour assistance, installation ou service composez le
1-800-807-6777
ou visitez notre site web à
www.KitchenAid.ca
Table of Contents/Table des matières
.............................................................................
2