KitchenAid KDSS907SSS Installation Guide
KitchenAid KDSS907SSS - 30" Slide-In Dual Fuel Range Manual
 |
UPC - 883049028361
View all KitchenAid KDSS907SSS manuals
Add to My Manuals
Save this manual to your list of manuals |
KitchenAid KDSS907SSS manual content summary:
- KitchenAid KDSS907SSS | Installation Guide - Page 1
SLIDE-IN DUAL FUEL RANGES INSTRUCTIONS D'INSTALLATION DES CUISINIÈRES AUTOPORTANTES ET ENCASTRABLES À BI-COMBUSTIBLE DE 30" (76,2 CM) Table of Contents/Table des matières 2 IMPORTANT: Save for local electrical inspector's use. Installer: Leave installation instructions with the homeowner. Homeowner - KitchenAid KDSS907SSS | Installation Guide - Page 2
TABLE OF CONTENTS RANGE SAFETY 2 INSTALLATION REQUIREMENTS 4 Tools and Parts 4 Location Requirements 4 Electrical Requirements - U.S.A. Only 7 Electrical Requirements - Canada Only 8 Gas Supply Requirements 8 Countertop Preparation 9 INSTALLATION INSTRUCTIONS 10 Unpack Range 10 Measure for - KitchenAid KDSS907SSS | Installation Guide - Page 3
call your gas supplier from a neighbor's phone. Follow the gas supplier's instructions. • If you cannot reach your gas supplier, call the fire department. - Installation and service must be performed by a qualified installer, service agency or the gas supplier. WARNING: Gas leaks cannot always be - KitchenAid KDSS907SSS | Installation Guide - Page 4
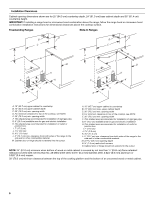
to comply with installation clearances specified on the model/serial rating plate. The model/serial rating plate is located inside the oven door on the right-hand side oven door trim. ■ The range should be located for convenient use in the kitchen. ■ Recessed installations must provide complete - KitchenAid KDSS907SSS | Installation Guide - Page 5
notch to rear of cooktop *Range can be raised approximately 1" (2.5 cm) by adjusting the leveling legs. **When installed in a 24" (61 cm) base cabinet with 25" (63.5 cm) countertop; front of oven door protrudes 1³⁄₄" (4.4 cm) (2 5.5 cm] on models KDRS807XSP and KDSS907XSP) beyond 24" (61.0 cm - KitchenAid KDSS907SSS | Installation Guide - Page 6
cm) countertop depth, 24" (61.0 cm) base cabinet depth and 36" (91.4 cm) countertop height. IMPORTANT: If installing a range hood or microwave hood combination above the range, follow the range hood or microwave hood combination installation instructions for dimensional clearances above the cooktop - KitchenAid KDSS907SSS | Installation Guide - Page 7
the outlet, have a proper outlet installed by a qualified electrician. Electrical Connection To properly install your range, you must determine the type of electrical connection you will be using and follow the instructions provided for it here. This range is manufactured with the ground connected - KitchenAid KDSS907SSS | Installation Guide - Page 8
In the absence of local codes, installation must conform with American National Standard, National Fuel Gas Code ANSI Z223.1 - latest edition or CAN/CGA B149 - latest edition. IMPORTANT: Leak testing of the range must be conducted according to the manufacturer's instructions. Type of Gas Natural gas - KitchenAid KDSS907SSS | Installation Guide - Page 9
sure about the inlet pressure. Burner Input Requirements Input ratings shown on the model/serial rating plate are for elevations up to 2,000 ft (609.6 14" WCP) or lower The range must be isolated from the gas supply piping system by closing its individual manual shutoff valve during any pressure - KitchenAid KDSS907SSS | Installation Guide - Page 10
under range. Remove oven racks and parts package from inside oven. 2. To place range on its back, take 4 cardboard corners from the carton. Stack one cardboard corner on top of another. Repeat with the other 2 corners. Place them lengthwise on the floor behind the range to support the range when - KitchenAid KDSS907SSS | Installation Guide - Page 11
covering installer for the best procedure for drilling mounting holes through your type of floor covering. Before moving range, slide range onto shipping base, cardboard or hardboard. 1. Remove template from the anti-tip bracket kit (found inside the oven cavity) or from the back of this manual - KitchenAid KDSS907SSS | Installation Guide - Page 12
can result in death, fire, or electrical shock. Electrical Shock Hazard Disconnect power before servicing. Use 8 gauge copper or 6 gauge aluminum wire. Electrically ground range. Failure to follow these instructions can result in death, fire, or electrical shock. 1. Disconnect power. 2. Remove the - KitchenAid KDSS907SSS | Installation Guide - Page 13
receptacle (NEMA type 14-50R) A UL listed, 250-volt minimum, 40-amp, range power supply cord 4-wire connection: Power supply cord 4-wire direct 5" (12.7 cm 1. Cut out and remove part of the metal ground strap (B). A B C 5. Complete installation following instructions for your type of electrical - KitchenAid KDSS907SSS | Installation Guide - Page 14
UL listed strain relief D. Power supply cord wires 4. Use a Phillips screwdriver to connect the green ground wire from the power supply cord to the range with the ground-link screw and ground-link section. The ground wire must be attached first. 5. Use ³⁄₈" nut driver to connect the neutral (white - KitchenAid KDSS907SSS | Installation Guide - Page 15
Installation: Copper or Aluminum Wire This range prohibit grounding through the neutral 1. Cut out and remove part of the metal ground strap (B). A B C A. Neutral (white) wire E. Line 1 (black) wire Bare Wire Torque Specifications Attaching terminal lugs to the terminal block - 20 lbs-in. (2.3 N-m) - KitchenAid KDSS907SSS | Installation Guide - Page 16
on cord/conduit plate on bottom of range. Allow enough slack to easily attach the as shown in the following Bare Wire Torque Specifications chart. A B C D E A. Terminal approved gas supply line. Install a shut-off valve. company personnel, and authorized service personnel. Failure to do - KitchenAid KDSS907SSS | Installation Guide - Page 17
B. Manual gas base. Burner caps should be level when properly positioned. A. Large flange with rounded corner 5. Plug in range or reconnect power. "Clock-Enter Time" should appear in the display. For further information, please refer to the user instructions located in the Use and Care Guide - KitchenAid KDSS907SSS | Installation Guide - Page 18
the flame at each setting. Verify Anti-Tip Bracket Location IMPORTANT: On models with a warming drawer, the rear range foot must be viewed from the front and slightly to one side of the range. 1. To check that the anti-tip bracket is installed, use a flashlight and look underneath the bottom of the - KitchenAid KDSS907SSS | Installation Guide - Page 19
and oven. See the Use and Care Guide for specific instruction on range operation. If range does not operate, check the following: ■ Household fuse is intact and tight, or circuit breaker has not tripped. ■ Range is plugged into an outlet. ■ Electrical supply is connected. ■ See the "Troubleshooting - KitchenAid KDSS907SSS | Installation Guide - Page 20
range or disconnect power. 3. Remove warming drawer. See the "Remove Warming Drawer" section for instructions the burner base. 3. Apply orifice spuds in plastic parts bag for future use models). See "To Convert TripleTier® Flame Burners" section. To Convert TripleTier® Flame Burners (on some models - KitchenAid KDSS907SSS | Installation Guide - Page 21
cap. 8. Place Natural gas orifice spuds in plastic parts bag for future use and keep with the package containing literature. 9. Reinstall the warming drawer. See the "Replace Oven Racks and Warming Drawer" section for instructions. 10. Complete installation. See "Make Gas Connection" and "Electronic - KitchenAid KDSS907SSS | Installation Guide - Page 22
Using a T20 TORX® screwdriver, remove the burner base. 3. Apply masking tape to the end of a B 5. Place LP gas orifice spuds in plastic parts bag for future use and keep with the package models). See "To Convert TripleTier® Flame Burners" section. To Convert TripleTier® Flame Burner (on some models - KitchenAid KDSS907SSS | Installation Guide - Page 23
cap. 8. Place LP gas orifice spuds in plastic parts bag for future use and keep with package containing literature. 9. Reinstall the warming drawer. See the "Replace Oven Racks and Warming Drawer" section for instructions. 10. Complete installation. See "Make Gas Connection" and "Electronic Ignition - KitchenAid KDSS907SSS | Installation Guide - Page 24
de gaz à partir du téléphone d'un voisin. Suivre ses instructions. • À défaut de joindre votre fournisseur de gaz, appeler les pompiers. - L'installation et l'entretien doivent être effectués par un installateur qualifié, une agence de service ou le fournisseur de gaz. AVERTISSEMENT : L'odorat ne - KitchenAid KDSS907SSS | Installation Guide - Page 25
et pièces nécessaires avant de commencer l'installation. Lire et suivre les instructions fournies avec les outils indiqués ici. Outillage du plan de travail Pour commander, voir la section "Assistance ou service" du Guide d'utilisation et d'entretien. Commander la pièce numéro W10113902A (noir - KitchenAid KDSS907SSS | Installation Guide - Page 26
Part 280). Lorsque cette norme n'est pas applicable, l'installation doit satisfaire aux critères de la norme Standard for Manufactured Home Installations de la poignée au support à l'arrière de la cuisinière : 27¼" (69,2 cm) (27 70,3 cm] sur le modèles KDRS807XSP and KDSS907XSP)** F. Du coin du - KitchenAid KDSS907SSS | Installation Guide - Page 27
de 25" (64,0 cm) de profondeur et 36" (91,4 cm) de hauteur. IMPORTANT : En cas d'installation d'une hotte ou d'un ensemble hotte/micro-ondes au-dessus de la cuisinière, suivre les instructions fournies avec la hotte ou l'ensemble hotte/micro-ondes concernant les dimensions de dégagement à respecter - KitchenAid KDSS907SSS | Installation Guide - Page 28
la prise de courant murale soit placée à portée de la position de service finale de la cuisinière. ■ Ne pas utiliser de câble de rallonge. instructions peut causer un décès, une explosion ou un incendie. Observer toutes les prescriptions des codes et règlements en vigueur. IMPORTANT : L'installation - KitchenAid KDSS907SSS | Installation Guide - Page 29
une canalisation d'alimentation en gaz rigide de ¾" (1,9 cm) jusqu'à l'emplacement d'installation de la cuisinière. L'emploi d'une canalisation de plus petit diamètre ou plus longue peut susciter une déficience du débit d'alimentation. Pour l'alimentation au - KitchenAid KDSS907SSS | Installation Guide - Page 30
une performance satisfaisante. INSTRUCTIONS D'INSTALLATION Déballage de la instruction peut causer une blessure au dos ou d'autre blessure. 1. Ôter les matériaux d'emballage, le ruban adhésif et le film de la cuisinière. Garder la base la cuisinière à titre de support de la cuisinière lorsque celle- - KitchenAid KDSS907SSS | Installation Guide - Page 31
sa partie postérieure ou qu'elle est supportée par 2 pieds après avoir été en plastique dans les trous à l'aide d'un marteau. 6. Aligner les raccordement électrique final. Retirer la base d'expédition, le carton installation de la cuisinière en utilisant les instructions d'installation suivantes. 31 - KitchenAid KDSS907SSS | Installation Guide - Page 32
arrivée de gaz approuvée par la CSA International. Installer un robinet d'arrêt. Bien serrer chaque organe de d'entretien autorisé. Le non-respect de ces instructions peut causer un décès, une explosion ou un incendie base de chaque brûleur. Un chapeau de brûleur correctement placé doit - KitchenAid KDSS907SSS | Installation Guide - Page 33
Base de brûleur B. Chapeau de brûleur C. Grille de brûleur 4. Placer les grilles de brûleur sur les brûleurs et chapeaux de brûleur tel qu'indiqué sur l'illustration. Lorsque les grilles sont bien install instructions pour l'utilisateur dans le Guide HI" sur le modèle KDSS907XSP) pour allumer le brû - KitchenAid KDSS907SSS | Installation Guide - Page 34
des grilles du four et du tiroir-réchaud Réinstaller les grilles dans la cavité du four. Réinstaller le tiroirréchaud ou le tiroir de remisage. Réinstallation du tiroir-réchaud : 1. Aligner les glissières du tiroir avec les guides. B A. Réglage du brûleur de mijotage B. Réglage du brûleur - KitchenAid KDSS907SSS | Installation Guide - Page 35
le four. Pour des instructions spécifiques concernant l'utilisation de la cuisinière, consulter le Guide d'utilisation et d'entretien. ou de service : Consulter la section "Assistance ou service" du Guide d'utilisation et ée par la CSA International. Installer un robinet d'arrêt. Bien serrer - KitchenAid KDSS907SSS | Installation Guide - Page 36
la section "Retrait du tiroirréchaud" pour des instructions. Identifier le détendeur à l'arrière du ces pièces avec les documents et manuels. 6. Réinstaller le chapeau de brûleur. 7. Répéter les leur. B 2. Avec un tournevis TORX® T20, enlever la base du brûleur. 3. Appliquer du ruban adhésif de - KitchenAid KDSS907SSS | Installation Guide - Page 37
tourner le gicleur dans le sens antihoraire. Conserver le gicleur interne à part. 6. Remplacer le gicleur pour gaz naturel par le gicleur pour installer le tiroir-réchaud. Voir la section "Réinstallation des grilles du four et du tiroir-réchaud" pour des instructions. 10. Achever l'installation - KitchenAid KDSS907SSS | Installation Guide - Page 38
Enlever le chapeau de brûleur. 2. Avec un tournevis TORX® T20, enlever la base du brûleur. 3. Appliquer du ruban adhésif de masquage à l'extrémité réutilisation ultérieure; conserver ces pièces avec les documents et manuels. 6. Réinstaller le chapeau de brûleur. 7. Répéter les étapes 1 à 6 pour - KitchenAid KDSS907SSS | Installation Guide - Page 39
le gicleur dans le sens antihoraire; conserver le gicleur interne à part. 6. Remplacer le gicleur pour propane par le gicleur pour gaz naturel installer le tiroir-réchaud. Voir la section "Réinstallation des grilles du four et du tiroir-réchaud" pour des instructions. 10. Achever l'installation - KitchenAid KDSS907SSS | Installation Guide - Page 40
. All rights reserved. Tous droits réservés. ® Registered Trademark/TM Trademark of KitchenAid, U.S.A., KitchenAid Canada licensee in Canada ® Marque déposée/TM Marque de commerce de KitchenAid, U.S.A., Emploi sous licence par KitchenAid Canada au Canada 1/11 Printed in U.S.A. Imprimé aux É.-U.
-
 1
1 -
 2
2 -
 3
3 -
 4
4 -
 5
5 -
 6
6 -
 7
7 -
8
-
9
-
10
-
11
-
12
-
13
-
14
-
15
-
16
-
17
-
18
-
19
-
20
-
21
-
22
-
23
-
24
-
25
-
26
-
27
-
28
-
29
-
30
-
31
-
32
-
33
-
34
-
35
-
36
-
37
-
38
-
39
-
40
 |
 |

INSTALLATION INSTRUCTIONS
30" (76.2 CM) FREESTANDING AND SLIDE-IN
DUAL FUEL RANGES
INSTRUCTIONS D'INSTALLATION DES
CUISINIÈRES AUTOPORTANTES ET
ENCASTRABLES À BI-COMBUSTIBLE
DE 30" (76,2 CM)
Table of Contents/Table des matières
..................................................................................
2
W10246120C
IMPORTANT:
Save for local electrical inspector's use.
Installer:
Leave installation instructions with the homeowner.
Homeowner:
Keep installation instructions for future reference.
IMPORTANT :
À conserver pour consultation par l'inspecteur local des installations électriques.
Installateur :
Remettre les instructions d'installation au propriétaire.
Propriétaire :
Conserver les instructions d'installation pour référence ultérieure.