KitchenAid KDTM354ESS Installation Guide
KitchenAid KDTM354ESS Manual
 |
View all KitchenAid KDTM354ESS manuals
Add to My Manuals
Save this manual to your list of manuals |
KitchenAid KDTM354ESS manual content summary:
- KitchenAid KDTM354ESS | Installation Guide - Page 1
INSTALLATION INSTRUCTIONS UNDERCOUNTER DISHWASHER INSTRUCTIONS D'INSTALLATION LAVE-VAISSELLE SOUS PLAN DE TRAVAIL Table of Contents 2 Table des matières 27 W10579129B - KitchenAid KDTM354ESS | Installation Guide - Page 2
as a result of the test. ■ Observe all governing codes and ordinances. ■ Install this dishwasher as specified in these instructions. ■ Installation should be performed by a qualified service technician. The dishwasher must be installed to meet all electrical and plumbing national and local codes and - KitchenAid KDTM354ESS | Installation Guide - Page 3
(1) Template (located inside Use and Care Guide bag assembly) (1) Instruction sheet (located inside Use and Care Guide bag assembly) NOTE: The screws supplied are wiring in dishwasher. Other useful items you may need: NOTES: ■ Moisture barrier tape is recommended when installing a dishwasher under - KitchenAid KDTM354ESS | Installation Guide - Page 4
operation, shims must be securely attached to the floor. If dishwasher will be left unused for a period of time or in a location where it may be subject to freezing, have it winterized by authorized service personnel. Make sure pipes, wires and drain hose are within the shaded area shown - KitchenAid KDTM354ESS | Installation Guide - Page 5
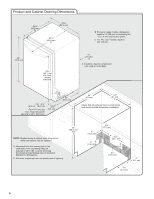
Product and Cabinet Opening Dimensions 24¹⁄₂" (62.2 cm) B 23⁷⁄₈" (62.6 cm) 27¹⁄₂" (68.8 cm) C B. For panel ready models, dishwasher depth is 24" (60 cm) not including the ³⁄₄" (1.9 cm) custom door panel. C. For Pro Line® handle, depth is 28" (70 cm). 30" (76.2 cm) 33¹⁄₂" ( - KitchenAid KDTM354ESS | Installation Guide - Page 6
heat and detergent, and fits the 1" (2.5 cm) drain connector of the dishwasher. ■ Make sure to connect drain hose to waste tee or disposer inlet the air gap should be installed in accordance with the air gap installation instructions. When you are connecting the air gap, a rubber hose (not provided) - KitchenAid KDTM354ESS | Installation Guide - Page 7
or circuit breaker box before installing dishwasher. Failure to do so can result in death or electrical shock. If the water line and the cable extend to the locations shown, proceed to the "Install Drain Hose" section. If they do not reach far enough, follow the instructions in the "Prepare Cabinet - KitchenAid KDTM354ESS | Installation Guide - Page 8
must extend to the right front side of cabinet opening). Tape cable to the floor in area shown. This will prohibit cable from moving when dishwasher is moved into cabinet opening. Prepare and Route Water Line Helpful Tip: Routing the water line through the left side of cabinet opening will make - KitchenAid KDTM354ESS | Installation Guide - Page 9
line) to the hot water line using a connection configuration that is in compliance with local codes and ordinances. The water supply to the dishwasher should have a manual shutoff valve located under the sink. Route water line and tape it to the floor in area shown. This will keep it from moving - KitchenAid KDTM354ESS | Installation Guide - Page 10
connection of the disposer or a waste tee must be made before the drain trap and at least 20" (50.8 cm) above the floor where the dishwasher will be installed. Helpful Tip: To reduce vibration of the hose, keep the hose away from the floor. Option A, Waste disposer - no air gap 1. Fit - KitchenAid KDTM354ESS | Installation Guide - Page 11
type clamps (not provided) to connect from waste tee to air gap. Install Moisture Barrier (under a wood countertop) Tip Over Hazard Do not use dishwasher until completely installed. Do not push down on open door. Doing so can result in serious injury or cuts. WARNING Excessive Weight Hazard Use two - KitchenAid KDTM354ESS | Installation Guide - Page 12
A, Power Supply Cord: Using a ¹⁄₄" hex-head socket, nut driver or Phillips screwdriver, remove 2 screws attaching access panel and lower panel to dishwasher. Do not remove tech sheet from access panel. Using a ¹⁄₄" hex-head socket, nut driver or Torx® T20® screwdriver, remove terminal box cover - KitchenAid KDTM354ESS | Installation Guide - Page 13
Electrically ground dishwasher. Connect ground wire to green ground connector in terminal box. Do not use an extension cord. Failure to follow these instructions can result in death, fire, or electrical shock. If needed, see website for animated representation of this step. Visit www.kitchenaid.com - KitchenAid KDTM354ESS | Installation Guide - Page 14
be installed (you will need to measure the lowest point on the underside of the countertop and the highest point on the floor). Refer to "Dishwasher Height Adjustment Chart" for wheel position and the number of turns needed. NOTE: If the minimum cabinet opening height is less than 34" (86.4 cm - KitchenAid KDTM354ESS | Installation Guide - Page 15
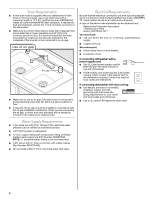
Install Door Handle (on some models) IMPORTANT: Do not scratch the front panel during this result in back or other injury. Using 2 or more people, stand the dishwasher up. NOTE: Do not install kick plate until instructed to do so. Install the custom hardware handle(s) on the front of the wooden - KitchenAid KDTM354ESS | Installation Guide - Page 16
Using the template provided, attach it to the backside of the custom panel with tape. Make sure that the center of the template is aligned with the center of the wooden panel and top of the template is aligned to the top face of the wooden panel. Check custom tape alignment with metal door slots; - KitchenAid KDTM354ESS | Installation Guide - Page 17
depth. Drill pilot holes approximately 1¹⁄₂" (3.8 cm) into the top corners of the door using hole in liner as a guide. Use 2 or more people to move and install dishwasher. IMPORTANT: The dishwasher must be secured to the cabinet. There are two brackets found in the parts bag. Attach the brackets - KitchenAid KDTM354ESS | Installation Guide - Page 18
base, frame or motor. Push the plastic buttons out of the side of the tub. NOTE: Save the buttons to cover the holes after dishwasher is installed. Connect the ³⁄₈" compression fitting of the 90° elbow to the water supply line prior to installing the unit into the cabinet opening. Attach - KitchenAid KDTM354ESS | Installation Guide - Page 19
a nut driver or hex socket, remove the screw from the tensioner. The screw can be put into one of 3 holes (1, 2, 3) in the front leg of dishwasher. If the door closes by itself, move the tensioner to a lower-numbered hole and replace screw. Reattach door spring to rear leg. NOTE: Tensioners on - KitchenAid KDTM354ESS | Installation Guide - Page 20
blanket - the blanket reduces the sound level. ■ If using power cord, make sure to route end through hole in cutout before sliding dishwasher into cabinet opening. ■ For models with water softener, make sure that the drain hose stays on the hanger that is on the right-hand side and is tucked in - KitchenAid KDTM354ESS | Installation Guide - Page 21
tub. Check that dishwasher is level from side-to-side. If dishwasher is not level, adjust front legs up or down until dishwasher is level. Connect If needed, see website for animated representation of this step. Visit www.kitchenaid.com/watersupply under FAQ tab. NOTE: Do not use Teflon® tape with - KitchenAid KDTM354ESS | Installation Guide - Page 22
in terminal box. Do not use an extension cord. Failure to follow these instructions can result in death, fire, or electrical shock. Route cable so that it does not touch dishwasher motor or lower part of dishwasher tub. Pull cable through UL Listed/CSA Approved strain relief in terminal box - KitchenAid KDTM354ESS | Installation Guide - Page 23
in Cabinet Opening If needed, see website for animated representation of this step. Visit www.kitchenaid.com/electrical under FAQ tab. Tighten strain relief screws to secure cable. Check that dishwasher is still level front-to-back and side-to-side in cabinet opening. Place wires inside - KitchenAid KDTM354ESS | Installation Guide - Page 24
door do not rub against the screw heads. If they do, dishwasher must be re-centered. When dishwasher is properly centered, replace plastic buttons. If needed, see website for animated representation of this step. Visit www.kitchenaid.com/anchoring under FAQ tab. Using a flat-blade screwdriver, turn - KitchenAid KDTM354ESS | Installation Guide - Page 25
lower panel. Position the lower panel behind the access panel. On some models there is insulation on the access panel that must fall behind the access panel screws. Hold the 2 panels together and place them against dishwasher leg. Using a Phillips or ¹⁄₄" screwdriver, reinstall the screws through - KitchenAid KDTM354ESS | Installation Guide - Page 26
possible solutions work, please see your Use and Care Guide for service contact information. Additional Tips Expect longer wash times. Your new dishwasher will average 2-3 hours per load, but use nearly 40% less energy than older models. Designed with a low wattage, low energy consumption motor - KitchenAid KDTM354ESS | Installation Guide - Page 27
pas utiliser le lave-vaisselle jusqu'à ce qu'il soit complètement installé. Ne pas appuyer sur la porte ouverte. Le non-respect de ces instructions peut causer des blessures graves ou des coupures. Il faut : ■ Ouvrir lentement la porte du lave-vaisselle tandis qu'une autre personne saisit l'arrière - KitchenAid KDTM354ESS | Installation Guide - Page 28
) (4 )vis courtes (10-16, tête hexagonale) (4) vis longues (8-18, Torx®) (1) gabarit (dans le sachet du Guide d'utilisation et d'entretien) (1) fiche d'instructions (dans le sachet du Guide d'utilisation et d'entretien) REMARQUE : Les vis fournies sont utilisées seulement sur des panneaux de bois de - KitchenAid KDTM354ESS | Installation Guide - Page 29
Exigences d'emplacement Une source d'électricité avec liaison à la terre est nécessaire. Ne pas placer de canalisation d'évacuation, canalisation d'eau ou câblage électrique à un endroit où cela susciterait interférence ou contact avec les pieds ou le moteur du lave-vaisselle. Inspecter l' - KitchenAid KDTM354ESS | Installation Guide - Page 30
Dimensions du produit et de l'ouverture d'encastrement du placard 24¹⁄₂" (62,2 cm) B 23⁷⁄₈" (62,6 cm) 27¹⁄₂" (68,8 cm) C 30" (76,2 cm) 33¹⁄₂" (85,1 cm) min. avec roulettes retirées B. Pour un modèle prêt pour la pose de panneaux, la profondeur du lave-vaisselle est de 24" (60 cm) ceci n'inclut - KitchenAid KDTM354ESS | Installation Guide - Page 31
(50,8 cm) au-dessus du sous-plancher ou du plancher. ■ Si nécessaire, le dispositif de brise-siphon doit être installé conformément aux instructions d'installation de ce dernier. Lors du raccordement du dispositif de brise-siphon à la canalisation d'égout en T ou au raccord de broyeur à déchets, un - KitchenAid KDTM354ESS | Installation Guide - Page 32
l'alimentation électrique avant d'installer le lave-vaisselle (au niveau du tableau de distribution fusible ou disjoncteur) Le non-respect de cette instruction peut causer un décès ou un choc électrique. Si la canalisation d'eau et le câble dépassent des emplacements indiqués, passer à la section - KitchenAid KDTM354ESS | Installation Guide - Page 33
Option A, cordon d'alimentation : REMARQUE : On doit disposer d'une prise à trois alvéoles, reliée à la terre, située dans un placard qui se trouve près de l'ouverture du lave-vaisselle. Option B, raccordement direct : Conseil utile : Le raccordement au lave-vaisselle sera plus facile si l'on - KitchenAid KDTM354ESS | Installation Guide - Page 34
Préparation et acheminement de la canalisation d'eau Conseil utile : Le raccordement du circuit d'eau sera plus facile si l'on achemine la canalisation d'eau par le côté gauche de l'ouverture du placard. Percer un trou de ¹⁄₂" (1,3 cm) dans la paroi latérale ou arrière du placard. Faire passer - KitchenAid KDTM354ESS | Installation Guide - Page 35
Installation du tuyau d'évacuation IMPORTANT : Utiliser toujours un tuyau d'évacuation neuf. Vérifier les codes locaux pour déterminer si un dispositif de brisesiphon est nécessaire. Option A, Broyeur à déchets - sans brise-siphon Si nécessaire, percer un trou de 1¹⁄₂" (3,8 cm) de diamètre dans - KitchenAid KDTM354ESS | Installation Guide - Page 36
Option B, Pas de broyeur à déchets - sans brise-siphon Option C, Broyeur à déchets - avec brise-siphon 1. Raccorder l'extrémité en caoutchouc du tuyau d'évacuation à la canalisation d'égout en T et couper si nécessaire. REMARQUE : Ne pas couper la section ondulée. 2. Fixer l'extrémité en - KitchenAid KDTM354ESS | Installation Guide - Page 37
utiliser le lave-vaisselle jusqu'à ce qu'il soit complètement installé. Ne pas appuyer sur la porte ouverte. Le non-respect de ces instructions peut causer des blessures graves ou des coupures. AVERTISSEMENT Risque du poids excessif Utiliser deux personnes ou plus pour déplacer et installer le lave - KitchenAid KDTM354ESS | Installation Guide - Page 38
Option A : Retrait du panneau d'accès - Panneau en plastique À l'aide d'un tournevis à lame plate, tourner les dispositifs de fixation en plastique d'un quart de tour dans le sens antihoraire pour les déverrouiller. Retirer le panneau. Ne pas retirer la fiche technique du panneau d'accès. Option B - KitchenAid KDTM354ESS | Installation Guide - Page 39
au connecteur vert relié à la terre dans la boîte de la borne. Ne pas utiliser un câble de rallonge. Le non-respect de ces instructions peut causer un décès, un incendie ou un choc électrique. Ôter la vis de liaison à la terre et la placer à travers la borne en anneau du - KitchenAid KDTM354ESS | Installation Guide - Page 40
besoin, visiter le site Web pour une représentation vidéo de cette étape. Visiter www.kitchenaid.com/electrical sous l'onglet FAQ. Resserrer les vis de serre-câble pour fixer le cordon. Mesurer retirée. REMARQUE : Ne pas brancher dans une prise avant que les instructions ne le spécifient. 40 - KitchenAid KDTM354ESS | Installation Guide - Page 41
clé hexagonale dans les vis de blocage. Serrer les vis d'un quart de tour au-delà de la butée. Conserver la clé hexagonale avec les instructions d'installation. Dimensions du panneau personnalisé Planchers surélevés : Si la hauteur du plancher de la cuisine est supérieure à celle du plancher de - KitchenAid KDTM354ESS | Installation Guide - Page 42
panneau. AVERTISSEMENT Risque du poids excessif Utiliser deux personnes ou plus pour déplacer et installer le lave-vaisselle. Le non-respect de cette instruction peut causer une blessure au dos ou d'autre blessure. Fixer le gabarit fourni à l'arrière du panneau personnalisé avec du ruban adhésif - KitchenAid KDTM354ESS | Installation Guide - Page 43
profondeur à ne pas dépasser pour les trous. Percer les avant-trous à une profondeur d'environ 1¹⁄₂" (3,8 cm) dans les angles supérieurs de la porte (utiliser comme guide le trou dans la doublure de la porte). 43 - KitchenAid KDTM354ESS | Installation Guide - Page 44
panneau en utilisant le trou de la doublure de la porte comme guide. Installer les 2 vis longues restantes. Choix de l'option de fixation trouvera deux attaches dans le sachet de pièces. Fixer les attaches en suivant les instructions de l'option A si le plan de travail est en bois, en revêtement - KitchenAid KDTM354ESS | Installation Guide - Page 45
Préparation de la canalisation d'alimentation en eau Pousser sur les boutons en plastique pour les extraire du côté de la cuve. REMARQUE : Conserver les boutons à part pour recouvrir les trous une fois le lave-vaisselle installé. Canalisation en cuivre uniquement : Enfiler l'écrou puis la virole sur - KitchenAid KDTM354ESS | Installation Guide - Page 46
placard AVERTISSEMENT Risque du poids excessif Utiliser deux personnes ou plus pour déplacer et installer le lave-vaisselle. Le non-respect de cette instruction peut causer une blessure au dos ou d'autre blessure. Utiliser deux personnes ou plus pour déplacer et installer le lavevaisselle. Alors qu - KitchenAid KDTM354ESS | Installation Guide - Page 47
le lave-vaisselle dans l'ouverture du placard. ■ Pour les modèles équipés d'un adoucisseur d'eau, s'assurer que le tuyau de vidange reste accroché sur le support situé du côté droit et qu'il est rangé sur le côté de l'appareil. Vérifier que chaque pied de réglage de l'aplomb est fermement en appui - KitchenAid KDTM354ESS | Installation Guide - Page 48
se produit, répéter l'étape précédente. Au besoin, visiter le site Web pour une représentation vidéo de cette étape. Visiter www.kitchenaid.com/watersupply sous l'onglet FAQ. REMARQUE : Ne pas utiliser de ruban adhésif Teflon®avec les raccords de compression. Raccordement au circuit d'évacuation - KitchenAid KDTM354ESS | Installation Guide - Page 49
Web pour une représentation vidéo de cette étape. Visiter www.kitchenaid.com/drain sous l'onglet FAQ. Raccordement électrique direct REMARQUE : borne. Ne pas utiliser un câble de rallonge. Le non-respect de ces instructions peut causer un décès, un incendie ou un choc électrique. Former un crochet - KitchenAid KDTM354ESS | Installation Guide - Page 50
-vaisselle dans l'ouverture d'encastrement du placard Au besoin, visiter le site Web pour une représentation vidéo de cette étape. Visiter www.kitchenaid.com/electrical sous l'onglet FAQ. Resserrer les vis de serre-câble pour fixer le câble. Vérifier que le lave-vaisselle est toujours d'aplomb - KitchenAid KDTM354ESS | Installation Guide - Page 51
les bouchons d'obturation de plastique. Au besoin, visiter le site Web pour une représentation vidéo de cette étape. Visiter www.kitchenaid.com/anchoring sous l'onglet FAQ. Achever l'installation Option A : Installation du panneau d'accès - Panneau en plastique Ouvrir la porte et vérifier que - KitchenAid KDTM354ESS | Installation Guide - Page 52
Option B : Installation du panneau d'accès - Panneau métallique Vérifier que la rive inférieure du panneau d'accès est au contact du plancher. La réajuster au besoin. Vérifier que l'agrafe de liaison à la terre est fixée sur le panneau inférieur. Placer le panneau inférieur derrière le panneau d'acc - KitchenAid KDTM354ESS | Installation Guide - Page 53
pas enlever la broche de liaison à la terre. Ne pas utiliser un adaptateur. Ne pas utiliser un câble de rallonge. Le non-respect de ces instructions peut causer un décès, un incendie ou un choc électrique. Serrer les vis du panneau d'accès. Brancher sur une prise de courant à 3 alvéoles reli - KitchenAid KDTM354ESS | Installation Guide - Page 54
Contrôle du fonctionnement ■ Lire les instructions d'utilisation du lave-vaisselle fournies avec le lave- d'eau ouverte? Si aucune de ces vérifications ne résout le problème, consulter le Guide d'utilisation et d'entretien pour obtenir les coordonnées. Conseils supplémentaires Prévoir des dur - KitchenAid KDTM354ESS | Installation Guide - Page 55
55 - KitchenAid KDTM354ESS | Installation Guide - Page 56
W10579129B ®/™ ©2013 KitchenAid. All rights reserved. Used under license in Canada. Tous droits réservés. Utilisé sous licence au Canada. 11/13 Printed in U.S.A. Imprimé aux É.-U.
-
 1
1 -
 2
2 -
 3
3 -
 4
4 -
 5
5 -
 6
6 -
 7
7 -
8
-
9
-
10
-
11
-
12
-
13
-
14
-
15
-
16
-
17
-
18
-
19
-
20
-
21
-
22
-
23
-
24
-
25
-
26
-
27
-
28
-
29
-
30
-
31
-
32
-
33
-
34
-
35
-
36
-
37
-
38
-
39
-
40
-
41
-
42
-
43
-
44
-
45
-
46
-
47
-
48
-
49
-
50
-
51
-
52
-
53
-
54
-
55
-
56
 |
 |
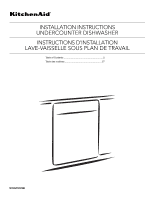
INSTALLATION INSTRUCTIONS
UNDERCOUNTER DISHWASHER
INSTRUCTIONS D'INSTALLATION
LAVE-VAISSELLE SOUS PLAN DE TRAVAIL
Table of Contents
..............................................................
2
Table des matières
..........................................................
27
W10579129B