KitchenAid KEBS209BSS Use & Care Guide - Page 5
Electronic Oven Control - manual
 |
View all KitchenAid KEBS209BSS manuals
Add to My Manuals
Save this manual to your list of manuals |
Page 5 highlights
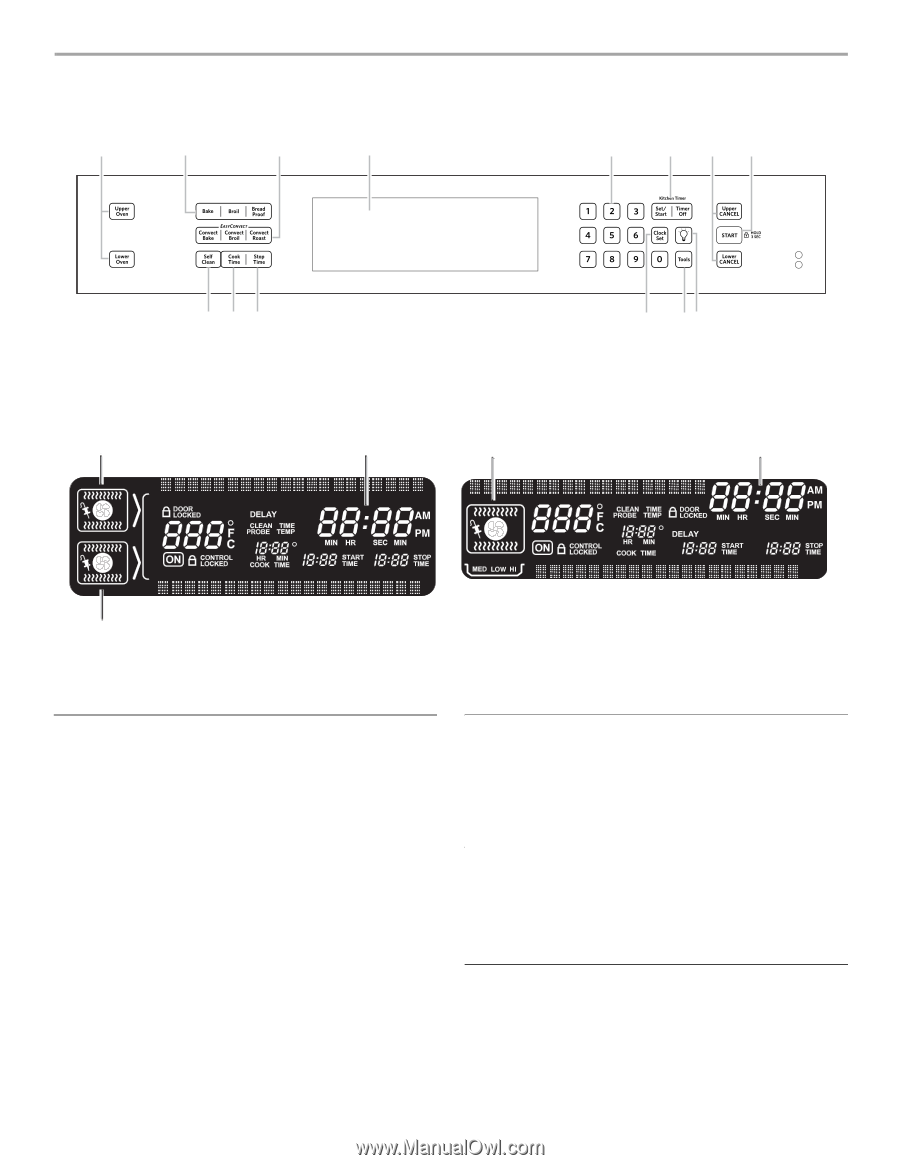
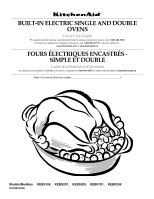
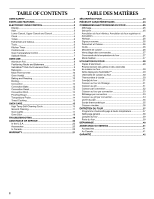
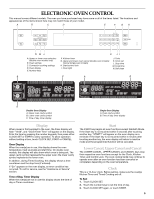
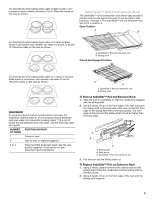
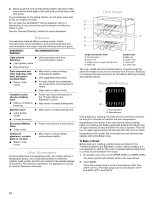
ELECTRONIC OVEN CONTROL This manual covers different models. The oven you have purchased may have some or all of the items listed. The locations and appearances of the items shown here may not match those of your model. A B C D E F GH NML A. Upper or lower oven selectors (double oven models only) B. Oven settings C. Convection cooking settings D. Oven display E. Number keys K JI F. Kitchen timer G. Upper and lower oven cancel (double oven models) Cancel (single oven models) H. Start/control lock I. Oven light J. Tools K. Clock set L. Stop time M. Cook time N. Self clean A C A B B Double Oven Display A. Upper oven cavity symbol B. Lower oven cavity symbol C. Time of day, timer display Single Oven Display A. Oven cavity symbol B. Time of day, timer display Display When power is first supplied to the oven, the timer display will flash "12:00", and "Clock-Enter Time" will appear on the display. Enter the time by pressing the number keypads, then press either CLOCK SET or START to allow operation. To allow operation without setting a time, touch CLOCK SET, START or CANCEL. Oven Display When the oven(s) are in use, this display shows the oven temperature, heat source(s) and start time. On double oven models, this display will also show which oven is being set. The upper cavity symbol represents the upper oven; the lower cavity symbol represents the lower oven. In addition, during Timed Cooking, this display shows a time countdown and the stop time (if entered). If "Err" appears on the oven display, an error condition has occurred. To call for service, see the "Assistance or Service" section. Time of Day, Timer Display When the oven(s) are not in use this display shows the time of day or Timer countdown. Start The START key begins all oven functions except Sabbath Mode. If the Start key is not touched within 5 seconds after touching another key, "START?" will appear on the oven display as a reminder. If the Start key is not touched within 5 minutes after touching another key, the oven display will return to inactive mode and the programmed function will be canceled. Lower Cancel, Upper Cancel and Cancel The LOWER CANCEL, UPPER CANCEL and CANCEL keys stop their respective oven functions except for the Clock, Kitchen Timer, and Control Lock. The oven cooling fan(s) may continue to operate even after an oven function has been canceled or completed, depending on the oven temperature. Clock This is a 12-hour clock. Before setting, make sure the oven(s), Kitchen Timer and Timed Cooking are off. To Set: 1. Touch CLOCK SET. 2. Touch the number keys to set the time of day. 3. Touch CLOCK SET again, or touch START. 5
-
 1
1 -
 2
2 -
 3
3 -
 4
4 -
 5
5 -
 6
6 -
 7
7 -
 8
8 -
 9
9 -
 10
10 -
 11
11 -
12
-
13
-
14
-
15
-
16
-
17
-
18
-
19
-
20
-
21
-
22
-
23
-
24
-
25
-
26
-
27
-
28
-
29
-
30
-
31
-
32
-
33
-
34
-
35
-
36
-
37
-
38
-
39
-
40
-
41
-
42
-
43
-
44
-
45
-
46
-
47
-
48
 |
 |