KitchenAid KESS907SBL User Guide
KitchenAid KESS907SBL - 30 Inch Slide-In Electric Range Manual
 |
UPC - 883049027067
View all KitchenAid KESS907SBL manuals
Add to My Manuals
Save this manual to your list of manuals |
KitchenAid KESS907SBL manual content summary:
- KitchenAid KESS907SBL | User Guide - Page 1
ELECTRIC RANGE ARCHITECT® SERIES II Use & Care Guide For questions about features, operation/performance, parts, accessories or service, call: 1-800-422-1230 or visit our website at www.kitchenaid.com In Canada, call for assistance, installation and service, call: 1-800-807-6777 or visit our website - KitchenAid KESS907SBL | User Guide - Page 2
24 Timed Cooking 24 Warming Drawer (on some models 25 RANGE CARE 26 Self-Cleaning Cycle (on some models 26 General Cleaning 27 Oven Light(s 28 Oven Door 29 Storage Drawer 29 Warming Drawer (on some models 29 TROUBLESHOOTING 30 ASSISTANCE OR SERVICE 31 In the U.S.A 31 In Canada 31 - KitchenAid KESS907SBL | User Guide - Page 3
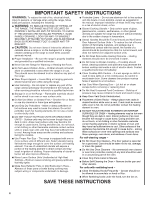
to follow these instructions can result in death or serious burns to children and adults. Anti-Tip Bracket Range Foot Making sure the anti-tip bracket is installed: • Slide range forward. • Look for the anti-tip bracket securely attached to floor. • Slide range back so rear range foot is under - KitchenAid KESS907SBL | User Guide - Page 4
except as suggested in the manual. Improper installation of these liners may result in a risk of electric shock, or fire. s Glazed Cooking Utensils - Only certain types of glass, glass/ceramic, ceramic, earthenware, or other glazed utensils are suitable for range-top service without breaking due to - KitchenAid KESS907SBL | User Guide - Page 5
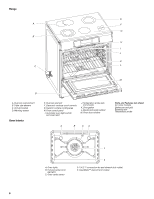
PARTS AND FEATURES This manual covers several different models. The range you have purchased may have some or all of the items listed. The locations and appearances of the features shown here may not match those of your model. Glass Touch-Activated Electronic Oven Control Panel (Models KESS908 and - KitchenAid KESS907SBL | User Guide - Page 6
Range E A F G B H I J K C L M D A. Dual-size oval element B. Triple-size element C. Anti Parts and Features not shown (on some models) Broiler pan and grid Roasting rack Temperature probe A. Oven lights B. Full and center broil elements C. Oven cavity sensor D E D. T.H.E.™ convection fan - KitchenAid KESS907SBL | User Guide - Page 7
element control (dual-size element) D. Left front cooktop element control (dual-size element) E. Oven control panel Standard Control Knob (Model KESK901) A B F G F. Right front cooktop element control (single element) G. Right rear cooktop element control (dual-size element) MED LOW HI - KitchenAid KESS907SBL | User Guide - Page 8
and serial number L. Oven door window Parts and Features not shown (on some models) Broiler pan and grid Roasting rack Temperature probe Simmer feature switch A B CA A. Oven lights B. Full and center broil elements C. Oven cavity sensor D E D. T.H.E.™ convection fan and element (on 807 and 907 - KitchenAid KESS907SBL | User Guide - Page 9
models such as plastic or aluminum foil, to touch any part of the entire cooktop. s Do not use the cooktop Use the following chart as a guide for cookware material characteristics. COOKWARE onsteel or cast iron Stainless steel s Follow manufacturer's instructions. s Use on low heat settings. s See - KitchenAid KESS907SBL | User Guide - Page 10
on the grate or largest surface cooking area or element. On electric cooktops, canners should not extend more than ½" (1.3 cm) Use the following chart as a guide when setting heat levels. SETTING cooking performance. REMEMBER: When range is in use or (on some models) during the Self-Cleaning - KitchenAid KESS907SBL | User Guide - Page 11
to select the desired simmer setting. When finished cooking, touch ON/OFF to turn surface cooking area off. Use the following chart as a guide when setting heat levels. SETTING RECOMMENDED USE LO s Water-based foods such as chicken noodle soup. s Bringing water to boil. s Cooking with a lid - KitchenAid KESS907SBL | User Guide - Page 12
Temperature Management System WARNING Use the following chart as a guide when setting heat levels. SETTING RECOMMENDED USE DUAL-SIZE ELEMENT operation without affecting cooking performance. i REMEMBER: When range is in use or (on some models) during the Self-Cleaning cycle, the entire cooktop - KitchenAid KESS907SBL | User Guide - Page 13
used. To Use: 1. Push in and turn knob to the desired SIMMER setting. 2. Turn knob to OFF when finished. Use the following chart as a guide when setting heat levels. SETTING RECOMMENDED USE LO s Water-based foods such as chicken noodle soup. s Bringing water to boil. s Cooking with a lid - KitchenAid KESS907SBL | User Guide - Page 14
in and turn to the desired heat setting.Use the following chart as a guide when setting heat levels. SETTING RECOMMENDED USE HI s Bring liquid to a boil . SIMMER Switch (on some models) s Precise simmer control. REMEMBER: When range is in use or (on some models) during the Self-Cleaning cycle - KitchenAid KESS907SBL | User Guide - Page 15
POWER ON Lights Each control knob has a POWER ON light. The light will glow when its control knob is on. A OFF Hi Lo Hot Surface Indicator Light The hot surface indicator light will glow as long as any surface cooking area is too hot to touch, even after the surface cooking area(s) is turned off - KitchenAid KESS907SBL | User Guide - Page 16
Lock feature shuts down the control panel pads to avoid unintended use of the oven. The Control Lock feature may be used either when the range is in use or turned off (for example, during cleaning). The Control Lock is preset unlocked, but can be locked. Clock/Timer Display This is - KitchenAid KESS907SBL | User Guide - Page 17
4. Dehydrate - Option 5 (on convection models, closed door) Dehydration is a method used other than 140°F (60°C). The dehydrating range can be set between 100°F and 200°F guide. ADJUSTMENT °F (AUTOMATIC °C CHANGE) COOKS FOOD 10°F (5°C) ...a little more 20°F (10°C) ...moderately more 30 - KitchenAid KESS907SBL | User Guide - Page 18
the oven on for only part of the Sabbath. When the temperature other than 325°F (163°C). The bake range can be set between 170°F and 500°F 0 represent temperatures. Use the following chart as a guide. NUMBER PAD OVEN TEMPERATURE 1 170°F (77°C) Untimed" section for instructions on placing the - KitchenAid KESS907SBL | User Guide - Page 19
guide. Meat Thermometer On models without a temperature probe, use a meat thermometer to determine doneness of meat, poultry and fish. The internal temperature, not appearance, should be used to determine doneness. A meat thermometer is not supplied with this appliance these instructions can - KitchenAid KESS907SBL | User Guide - Page 20
circulate. Allow 2" (5 cm) of space around bakeware and oven walls. Use the following chart as a guide. NUMBER POSITION ON RACK OF PAN(S) 1 Center of rack. 2 Side by side or slightly staggered. element will turn off in 30 seconds to 2 minutes. They will come back on once the door is closed. - KitchenAid KESS907SBL | User Guide - Page 21
to the "Positioning Racks and Bakeware" section. For baking, allow the range to preheat before placing food in the oven. When roasting, it is of a smaller area. s Use only the broiler pan and grid provided with the range. It is designed to drain juices and help avoid spatter and smoke. s For proper - KitchenAid KESS907SBL | User Guide - Page 22
models) In a convection oven, the fan time can be shortened by as much as 30 percent, especially for large turkeys and roasts cook time. Use the following chart as a guide. SETTING FOODS MEATS Baked potatoes, Chicken: whole the sides of the oven. Allow the range to preheat before placing food in the - KitchenAid KESS907SBL | User Guide - Page 23
32-35 20-25 25-30 30-35 20-25 300°F (149°C) 300°F (149°C) 300°F (149°C) 325°F (163°C) B C A. Roasting rack B. Broiler grid C. Broil pan 1. Press CONVECT ROAST. Press the number pads to enter a temperature other than 325°F (162°C). The convection roast range can be set between 170°F and 500°F (77 - KitchenAid KESS907SBL | User Guide - Page 24
, the broil elements and fan will turn off after 30 seconds. They will come temperature other than 500°F (260°C). The convection broil range can be set between 300°F and 500°F (149°C models) Proofing bread prepares the dough for baking by activating the yeast. Follow the recipe directions as a guide - KitchenAid KESS907SBL | User Guide - Page 25
appear on the oven display. On some models, the set temperature and minute time countdown will containing eggs, do not hold longer than 30 minutes. Food must be at serving temperature before additional times. Use the following chart as a guide when selecting a different temperature other than "Low - KitchenAid KESS907SBL | User Guide - Page 26
can be changed. There are 5 levels of clean. Suggested clean times are 2 hours 30 minutes for light soil and between 3 hours 30 minutes and 4 hours 30 minutes for average to heavy soil. Use the following chart as a guide to determine the desired cleaning level. CLEANING LEVEL TOTAL CLEANING TIME - KitchenAid KESS907SBL | User Guide - Page 27
between 2 hours 30 minutes and 4 hours 30 minutes. 2. follow label instructions on cleaning models) Food spills containing acids, such as vinegar and tomato, should be cleaned as soon as the entire appliance KitchenAid® Stainless Steel Cleaner and Polish (sample included): See "Assistance or Service - KitchenAid KESS907SBL | User Guide - Page 28
detergent WARMING DRAWER (on some models) Make sure drawer is cool. Cleaning Method: s KitchenAid® Stainless Steel Cleaner and Polish (sample included): See "Assistance or Service" section to order. s All-Purpose Appliance Cleaner (not included): See "Assistance or Service" section to order. s Mild - KitchenAid KESS907SBL | User Guide - Page 29
range use, it is not suggested to remove the oven door. However, if removal is necessary, make sure the oven is off and cool. Then, follow these instructions the drawer rails into the guides in the cavity. 2. (on some models) Remove all repeat the removal and installation procedures. 4. Holding the - KitchenAid KESS907SBL | User Guide - Page 30
TROUBLESHOOTING Try the solutions suggested here first in order to avoid the cost of an unnecessary service model. s Is the appliance level? Level the appliance. See the Installation Instructions. On some models, does the cooling fan run during BAKE, BROIL or CLEAN? It is normal for the fan to - KitchenAid KESS907SBL | User Guide - Page 31
calling for assistance or service, please check "Troubleshooting." It may save you the cost of a service call. If you still need help, follow the instructions below. When calling, please know the purchase date and the complete model and serial number of your appliance. This information will help - KitchenAid KESS907SBL | User Guide - Page 32
KITCHENAID® ELECTRIC RANGE WARRANTY LIMITED WARRANTY For one year from the date of purchase, when this major appliance is operated and maintained according to instructions attached to or furnished with the product, KitchenAid brand of Whirlpool Corporation or Whirlpool Canada LP (hereafter "
-
 1
1 -
 2
2 -
 3
3 -
 4
4 -
 5
5 -
 6
6 -
 7
7 -
8
-
9
-
10
-
11
-
12
-
13
-
14
-
15
-
16
-
17
-
18
-
19
-
20
-
21
-
22
-
23
-
24
-
25
-
26
-
27
-
28
-
29
-
30
-
31
-
32
 |
 |
Models
KERS807
KESK901
KESS907
KESS908
YKERS807
YKESS907
YKESS908
W101
62196
A
ELECTRIC RANGE
ARCHITECT
®
SERIES II
Use & Care Guide
For questions about features, operation/performance, parts, accessories or service, call:
1-800-422-1230
or visit our website at
www.kitchenaid.com
In Canada, call for assistance, installation and service, call:
1-800-807-6777
or visit our website at
www.KitchenAid.ca
Table of Contents
............................................................................................................
2