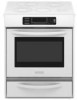
KitchenAid KESS908SPW Installation Guide
KitchenAid KESS908SPW - 30 Inch Slide-In Electric Range Manual
 |
View all KitchenAid KESS908SPW manuals
Add to My Manuals
Save this manual to your list of manuals |
KitchenAid KESS908SPW manual content summary:
- KitchenAid KESS908SPW | Installation Guide - Page 1
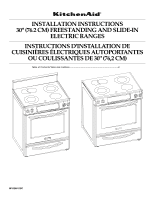
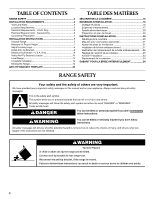
INSTALLATION INSTRUCTIONS 30" (76.2 CM) FREESTANDING AND SLIDE-IN ELECTRIC RANGES INSTRUCTIONS D'INSTALLATION DE CUISINIÈRES ÉLECTRIQUES AUTOPORTANTES OU COULISSANTES DE 30" (76,2 CM) Table of Contents/Table des matières 2 W10246119C - KitchenAid KESS908SPW | Installation Guide - Page 2
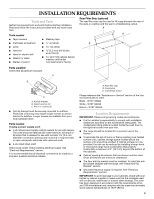
SAFETY 2 INSTALLATION REQUIREMENTS 3 Tools and Parts 3 Location Requirements 3 Electrical Requirements - U.S.A. Only 5 Electrical Requirements - Canada Only 6 Countertop Preparation 7 INSTALLATION INSTRUCTIONS 7 Unpack Range 7 Measure for Proper Height 7 Adjust Leveling Legs 8 Install - KitchenAid KESS908SPW | Installation Guide - Page 3
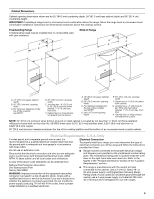
to comply with installation clearances specified on the model/serial rating plate. The model/serial rating plate is located inside the oven door on the right-hand side oven door trim. ■ The range should be located for convenient use in the kitchen. ■ To eliminate the risk of burns or fire - KitchenAid KESS908SPW | Installation Guide - Page 4
all the way in* E. 30" (76.2 cm) F. 27¹⁄₄" (69.2 cm) max. from handle to standoff at back of range** G. Model/serial number plate (located on the right-hand side oven door trim) *Range can be raised approximately 1" (2.5 cm) by adjusting the leveling legs. **When installed in a 24" (61.0 cm) base - KitchenAid KESS908SPW | Installation Guide - Page 5
electrician. ■ Range must be connected to the proper electrical voltage and frequency as specified on the model/serial number rating plate. The model/serial rating plate is located inside the oven door on the right-hand side oven door trim. Refer to the figures in the "Product Dimensions" section - KitchenAid KESS908SPW | Installation Guide - Page 6
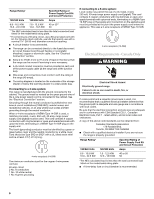
"Electrical Connection" section. ■ Allow 2 to 3 ft (61.0 cm to 91.4 cm) of slack in the line so that the range can be moved if servicing is Be sure that the electrical connection and wire size are adequate and in conformance with CSA Standard C22.1, Canadian Electrical Code, Part 1 - latest edition - KitchenAid KESS908SPW | Installation Guide - Page 7
(1.0 cm) dimension. Countertop must be level. Place level on countertop, first side to side, then front to back. If countertop is not level, range will not be level. Range must be level for satisfactory baking conditions. INSTALLATION INSTRUCTIONS Unpack Range WARNING Excessive Weight Hazard Use - KitchenAid KESS908SPW | Installation Guide - Page 8
mounting holes through your type of floor covering. Before moving range, slide range onto shipping base, cardboard or hardboard. 1. Remove template from the anti-tip bracket kit (found inside the oven cavity) or from the back page of this manual. 2. Place template on the floor in cabinet opening so - KitchenAid KESS908SPW | Installation Guide - Page 9
grounded outlet. Failure to follow these instructions can result in death, fire, or electrical shock. Electrical Shock Hazard Disconnect power before servicing. Use 8 gauge copper or 6 gauge aluminum wire. Electrically ground range. Failure to follow these instructions can result in death, fire, or - KitchenAid KESS908SPW | Installation Guide - Page 10
following instructions for your type of electrical connection: 4-wire (recommended) 3-wire (if 4-wire is not available) Electrical Connection or circuit breaker box A UL listed, 250-volt minimum, 40-amp, range power supply cord 4-wire connection: Direct wire 3-wire connection: Power supply cord - KitchenAid KESS908SPW | Installation Guide - Page 11
codes prohibit grounding through the neutral. 1. Cut out and remove part of the metal ground strap (B). 5. Use ³⁄₈" nut driver to power supply cord through the strain relief on the cord/conduit plate on bottom of range. Allow enough slack to easily attach the wiring to the terminal block. A B - KitchenAid KESS908SPW | Installation Guide - Page 12
to the center terminal block post with one of the 10-32 hex nuts. 1. Cut out and remove part of the metal ground strap (B). A E A B C D B C A. 10-32 hex nut B. Wire This range may be connected directly to the fuse disconnect or circuit breaker box. Depending on your electrical supply, make - KitchenAid KESS908SPW | Installation Guide - Page 13
copper 6 gauge aluminum 25 lbs-in. (2.8 N-m) 35 lbs-in. (4.0 N-m) 5. Use a hex or Phillips screwdriver to connect the bare (green) ground wire to the range with the ground-link screw and ground-link section. The ground wire must be attached first and must not contact any other terminal. 6. Use - KitchenAid KESS908SPW | Installation Guide - Page 14
and oven. See the Use and Care Guide for specific instruction on range operation. If range does not operate, check the following: ■ Household fuse is intact and tight; or circuit breaker has not tripped. ■ Range is plugged into an outlet. ■ Electrical supply is connected. ■ See the "Troubleshooting - KitchenAid KESS908SPW | Installation Guide - Page 15
anti-tip bracket securely attached to floor. ■ Slide range back so rear range foot is under anti-tip bracket. 6. Check that range is level. For direct-wired ranges: WARNING Electrical Shock Hazard Disconnect power before servicing. Replace all parts and panels before operating. Failure to do so can - KitchenAid KESS908SPW | Installation Guide - Page 16
au pied arrière de la cuisinière. Joindre de nouveau la bride antibasculement si la cuisinière est déplacée. Le non-respect de ces instructions peut causer un décès ou des brûlures graves aux enfants et aux adultes. EXIGENCES D'INSTALLATION Outillage et pièces Rassembler les outils et pièces - KitchenAid KESS908SPW | Installation Guide - Page 17
voir la section "Assistance ou service" du Guide d'utilisation et d'entretien. Noir Respecter les dimensions indiquées pour les ouvertures à découper dans les placards; ces dimensions constituent les Part 3280 (anciennement Federal Standard for Mobile Home Construction and Safety, Title 24, HUD Part - KitchenAid KESS908SPW | Installation Guide - Page 18
Dimensions du produit Cuisinière autoportante B Cuisinière coulissante A A F B* D* C* G E** C D F** E A. (69,2 cm) (27 70.3 cm] sur les modèles KERS807XSP et KESS907XSP) : Longueur de la poignée au support à l'arrière de la cuisinière** F. 23" (58,4 cm) : Longueur de l'encoche du plan de - KitchenAid KESS908SPW | Installation Guide - Page 19
cas d'installation d'une hotte ou d'un ensemble hotte/micro-ondes au-dessus de la cuisinière, suivre les instructions fournies avec la hotte ou l'ensemble hotte/microondes concernant les dimensions de dégagement à respecter au-dessus de la surface de la table de cuisson. Cuisinière autoportante Une - KitchenAid KESS908SPW | Installation Guide - Page 20
de courant murale soit placée à portée de la position de service finale de la cuisinière. 30" (76,2 cm) 30 est de plus de 30" (76,2 cm), ajuster la dimension de ³⁄₈" (1 cm). Il faut que le plan de travail la cuisinière. Le non-respect de cette instruction peut causer une blessure au dos ou d'autre - KitchenAid KESS908SPW | Installation Guide - Page 21
é alors que la cuisinière repose sur sa partie postérieure ou est supportée par 2 pieds en position verticale. REMARQUE : Pour remettre la cuisinière antibasculement si la cuisinière est déplacée. Le non-respect de ces instructions peut causer un décès ou des brûlures graves aux enfants et aux - KitchenAid KESS908SPW | Installation Guide - Page 22
10. Poursuivre l'installation de la cuisinière en utilisant les instructions d'installation suivantes. Vérification de l'emplacement de la bride antibasculement sol. Enfoncer les chevilles en plastique dans les trous à l'aide d'un marteau. 6. Aligner les trous de la bride antibasculement avec - KitchenAid KESS908SPW | Installation Guide - Page 23
la cuisinière ou reconnecter la source de courant électrique. 8. Allumer les brûleurs de surface et le four. Consulter le Guide d'utilisation et d'entretien pour des instructions spécifiques sur le fonctionnement de la cuisinière. Si la cuisinière ne fonctionne pas, contrôler ce qui suit : ■ Fusible - KitchenAid KESS908SPW | Installation Guide - Page 24
alimentation : 1. À l'aide d'au moins deux ère est déplacée. Le non-respect de ces instructions peut causer un décès ou des brûlures graves KitchenAid, U.S.A., KitchenAid Canada licensee in Canada ® Marque déposée/TM Marque de commerce de KitchenAid, U.S.A., Emploi sous licence par KitchenAid
-
 1
1 -
 2
2 -
 3
3 -
 4
4 -
 5
5 -
 6
6 -
 7
7 -
8
-
9
-
10
-
11
-
12
-
13
-
14
-
15
-
16
-
17
-
18
-
19
-
20
-
21
-
22
-
23
-
24
 |
 |
INSTALLATION INSTRUCTIONS
30" (76.2 CM) FREESTANDING AND SLIDE-IN
ELECTRIC RANGES
INSTRUCTIONS D'INSTALLATION DE
CUISINIÈRES ÉLECTRIQUES AUTOPORTANTES
OU COULISSANTES DE 30" (76,2 CM)
Table of Contents/Table des matières
.............................................................................
2
W10246119C