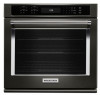
KitchenAid KOSE507EBS Owners Manual
KitchenAid KOSE507EBS Manual
 |
View all KitchenAid KOSE507EBS manuals
Add to My Manuals
Save this manual to your list of manuals |
KitchenAid KOSE507EBS manual content summary:
- KitchenAid KOSE507EBS | Owners Manual - Page 1
horno. Table of Contents BUILT-IN OVEN SAFETY 2 PARTS AND FEATURES 3 FEATURE GUIDE 4 Electronic Oven Controls 6 Display 6 Start 6 Lower Cancel, Upper Cancel and Lights 15 Oven Door 15 TROUBLESHOOTING 16 ASSISTANCE OR SERVICE 17 In the U.S.A 17 In Canada 17 ACCESSORIES 17 - KitchenAid KOSE507EBS | Owners Manual - Page 2
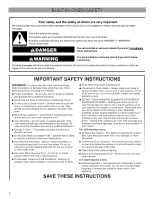
injury, and tell you what can happen if the instructions are not followed. IMPORTANT SAFETY INSTRUCTIONS WARNING: To reduce the risk of fire, electrical ■ User Servicing - Do not repair or replace any part of the oven unless specifically recommended in the manual. All other servicing should be - KitchenAid KOSE507EBS | Owners Manual - Page 3
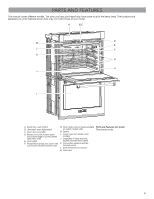
PARTS AND FEATURES This manual covers different models. The oven you have purchased may have some or all of the items listed. The locations and appearances of the features shown - KitchenAid KOSE507EBS | Owners Manual - Page 4
FEATURE GUIDE This manual covers several models. Your model may have some or all of the items listed. Refer to this manual or the Product Help section of our website at www.kitchenaid.com for more detailed instructions. In Canada, refer to the Product Help Section at www.kitchenaid.ca. WARNING - KitchenAid KOSE507EBS | Owners Manual - Page 5
/OFF) START CANCEL UPPER CANCEL LOWER BAKE (Upper and Lower Oven) BROIL EASY CONVECT BAKE EASY CONVECT ROAST FEATURE Oven timer Cooking start Range function INSTRUCTIONS The Timer can be set in hours or minutes up to 23 hours and 59 minutes. 1. Touch TIMER SET/OFF. Touch TIMER SET/OFF again - KitchenAid KOSE507EBS | Owners Manual - Page 6
KEY CONVECT MODE FEATURE Convect broil PROOF Proofing bread STOP TIME Delayed start COOK TIME Timed cooking Electronic Oven Controls INSTRUCTIONS Close the door. 1. Touch Upper or Lower CONVECT BROIL. Touch the number keys to enter a temperature other than 550°F (288°C). The convection - KitchenAid KOSE507EBS | Owners Manual - Page 7
and ending automatically at "9." You can also touch the Tools key repeatedly to manually scroll through the list of tools. TOOLS 1 2 3 4 5 6 oven will be warmer by the displayed amount. Use the following chart as a guide. NOTE: The oven display will continue to show the original set temperature and - KitchenAid KOSE507EBS | Owners Manual - Page 8
up to one-half hour for the oven to change temperature. Number keys "1" through "0" represent temperatures. Use the following chart as a guide. NUMBER KEY 1 2 3 4 5 6 7 8 9 0 OVEN TEMPERATURE 170°F (76°C) 200°F (93°C) 225°F (107°C) 250°F (121°C) 300°F (148°C) 325°F (162°C) 350°F (176°C) 375°F (190 - KitchenAid KOSE507EBS | Owners Manual - Page 9
evenly, hot air must be able to circulate. For best results, allow 2" (5 cm) of space around bakeware and oven walls. Use the following chart as a guide. NUMBER OF PAN(S) 1 2 3 or 4 POSITION ON RACK Center of rack. Side by side or slightly staggered. See the rack position graphics in this section - KitchenAid KOSE507EBS | Owners Manual - Page 10
■■ May need to increase baking time. ■■ Follow manufacturer's instructions. ■■ May need to reduce baking temperatures slightly. Meat Thermometer Not and the sliding shelf. Place the closed rack and the sliding shelf on the rack guide. 2. Using 2 hands, lift up on the front edge of the rack and the - KitchenAid KOSE507EBS | Owners Manual - Page 11
Oven Vent(s) A B C D E F G Single and Double Oven A. Control panel B. Oven vent C. Single oven or upper double oven G. Bottom vent Double Oven D. Upper oven E. Oven vent F. Lower oven G. Bottom vent The oven vent(s) should not be blocked or covered since they allow the inlet of fresh air into the - KitchenAid KOSE507EBS | Owners Manual - Page 12
first proofing, place dough in a lightly greased bowl and cover loosely with waxed paper or plastic wrap coated with shortening. Place on rack guide 2. See "Rack and Bakeware Positions" for diagram. Close door. 1. Touch Upper or Lower PROOF. Display will show 100°F (38°C). 2. Touch START. Let dough - KitchenAid KOSE507EBS | Owners Manual - Page 13
Burn Hazard Do not touch the oven during the Self-Cleaning cycle. Keep children away from oven during Self-Cleaning cycle. Failure to follow these instructions can result in burns. IMPORTANT: The health of some birds is extremely sensitive to the fumes given off during the High Temp Self-Cleaning - KitchenAid KOSE507EBS | Owners Manual - Page 14
to heavy soil. Use the following chart as a guide to determine the desired cleaning level. CLEANING LEVEL TOTAL the oven is cool. Always follow label instructions on cleaning products. Soap, water and a W10355010 (not included): See "Assistance or Service" section to order. OVEN DOOR INTERIOR - KitchenAid KOSE507EBS | Owners Manual - Page 15
If this happens, a light coating of vegetable oil applied to the rack guides will help them slide. ■■ Steel-wool pad Oven Lights The oven lights is necessary, make sure the oven is off and cool. Then, follow these instructions. The oven door is heavy. 2. Open the oven door. You should hear - KitchenAid KOSE507EBS | Owners Manual - Page 16
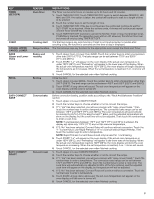
TROUBLESHOOTING Try the solutions suggested here first in order to avoid the cost of an unnecessary service call. Nothing will operate ■■ Has a household fuse blown, or has a circuit breaker tripped? Replace the fuse or reset the circuit breaker. If the problem See cycle instructions for preheat - KitchenAid KOSE507EBS | Owners Manual - Page 17
ASSISTANCE OR SERVICE If you need service Please refer to the warranty page in this manual. If you need replacement parts factory specified parts in your area, call us or your nearest KitchenAid designated service center. In the U.S.A. Call the KitchenAid Customer eXperience Center toll free: 1- - KitchenAid KOSE507EBS | Owners Manual - Page 18
service. Please take a few minutes to review the Troubleshooting or Problem Solver section of the Use and Care Guide, or visit http://kitchenaid.com/customer-service. 2. All warranty service is installed, operated and maintained according to instructions attached to or furnished with the product, - KitchenAid KOSE507EBS | Owners Manual - Page 19
Table des matières SÉCURITÉ DU FOUR ENCASTR 20 PIÈCES ET CARACTÉRISTIQUES 21 GUIDE DES CARACTÉRISTIQUES 22 Commandes électroniques du four 25 Affichage 25 Start (mise en marche 36 DÉPANNAGE 37 ASSISTANCE OU SERVICE 38 Aux États-Unis 38 Au Canada 38 ACCESSOIRES 38 GARANTIE 39 W10643471C - KitchenAid KOSE507EBS | Owners Manual - Page 20
qui peut se produire en cas de non-respect des instructions. IMPORTANTES INSTRUCTIONS DE SÉCURITÉ AVERTISSEMENT : Pour réduire le risque tre laissés seuls ou sans surveillance dans la pièce où le four est en service. Ne jamais laisser les enfants s'asseoir ou se tenir sur une partie quelconque du - KitchenAid KOSE507EBS | Owners Manual - Page 21
PIÈCES ET CARACTÉRISTIQUES Ce manuel couvre différents modèles. Le four que vous avez acheté peut comporter tous les articles énumérés ou seulement certains d'entre eux. L'emplacement et l'apparence des caractéristiques illustrées peuvent ne pas correspondre à ceux de votre modèle.. A B,C D M E - KitchenAid KOSE507EBS | Owners Manual - Page 22
GUIDE DES CARACTÉRISTIQUES Ce manuel concerne plusieurs modèles. Le modè Questions (FAQ) de notre site Web sur www.kitchenaid.com pour des instructions plus détaillées. Au Canada, consulter la section Service à la clientèle sur www.kitchenaid.ca. AVERTISSEMENT Risque d'empoisonnement alimentaire Ne - KitchenAid KOSE507EBS | Owners Manual - Page 23
inférieur) BROIL (cuisson au gril) FONCTION Lampe de la cavité du four Minuterie du four Démarrage de la cuisson Fonction de la cuisinière INSTRUCTIONS L'éclairage du four est commandé par une touche située sur le tableau de commande du four. Alors que la porte du four est fermée, appuyer - KitchenAid KOSE507EBS | Owners Manual - Page 24
FONCTION Cuisson au four par convection Rôtissage par convection Cuisson au gril par convection Levée du pain Mise en marche différée Cuisson minutée INSTRUCTIONS Avant la cuisson au four par convection, placer les grilles tel qu'indiqué à la section "Positionnement des grilles et des ustensiles de - KitchenAid KOSE507EBS | Owners Manual - Page 25
Commandes électroniques du four A B C D E F LK J A. Réglages du four B. Affichage du four C. Touches numériques D. Minuterie de cuisine E. Annulation du four supérieur et inférieur (modèles à double four) Annulation (modèles à four simple) F. Mise en marche/verrouillage des commandes G. - KitchenAid KOSE507EBS | Owners Manual - Page 26
degrés affiché. L'absence de signe moins signifie que le four sera plus chaud du nombre de degrés affiché. Utiliser le tableau suivant comme guide. REMARQUE : Cet affichage se poursuit pour indiquer la température du réglage d'origine, et n'indiquera pas le décalage de calibration. Par exemple, si - KitchenAid KOSE507EBS | Owners Manual - Page 27
aliments dans un four plus d'une heure avant ou après la cuisson. Le non-respect de cette instruction peut causer un empoisonnement alimentaire ou une maladie. Le mode Sabbat doit être activé avant de lancer de "1" à "0" représentent les températures. Utiliser le tableau suivant comme guide. 27 - KitchenAid KOSE507EBS | Owners Manual - Page 28
la butée d'arrêt, soulever le rebord avant et la tirer pour la sortir du four. Se servir de l'illustration et du tableau suivants comme guide. Positionnement des grilles et des ustensiles de cuisson au four Positions de grille - Four supérieur/inférieur 6 5 4 3 2 1 Cuisson au gril ALIMENT Pour la - KitchenAid KOSE507EBS | Owners Manual - Page 29
sur les rails pour grille. L'avant de la grille et du support coulissant doivent se trouver plus haut que l'arrière. Cuisson au four les ustensiles de cuisson et les parois du four. Utiliser le tableau suivant comme guide. NOMBRE D'USTENSILE(S) POSITION SUR LA GRILLE 1 2 3 ou 4 Centre de la - KitchenAid KOSE507EBS | Owners Manual - Page 30
mité du rail pour grille. Afin d'éviter d'endommager les supports coulissants, ne pas placer plus de 25 lb (11,4 Se servir du tableau suivant comme guide. USTENSILES DE CUISSON AU FOUR/ d'augmenter le temps de cuisson. ■■ Suivre les instructions du fabricant. ■■ Peut nécessiter de réduire légè - KitchenAid KOSE507EBS | Owners Manual - Page 31
Préchauffage et température du four Préchauffage Au début d'un programme de cuisson au four (Bake) ou de cuisson au four avec convection (Convect Bake), le four commence par un préchauffage une fois la touche Start (mise en marche) enfoncée. Le four atteint 350°F (177°C) en 12 à 17 minutes environ - KitchenAid KOSE507EBS | Owners Manual - Page 32
un saladier légèrement graissé et couvrir sans serrer avec du papier ciré ou de la pellicule plastique recouverts de graisse végétale. Placer sur le guide de grille n° 2. Voir "Positionnement des grilles et ustensiles de cuisson" pour le dessin. Fermer la porte. 1. Appuyer sur PROOF (levée du pain - KitchenAid KOSE507EBS | Owners Manual - Page 33
empoisonnement alimentaire Ne pas laisser des aliments dans un four plus d'une heure avant ou après la cuisson. Le non-respect de cette instruction peut causer un empoisonnement alimentaire ou une maladie. La cuisson minutée permet d'allumer le(s) four(s) à une certaine heure de la journée, de faire - KitchenAid KOSE507EBS | Owners Manual - Page 34
au cours du programme d'autonettoyage. Le non-respect de ces instructions peut causer des brûlures. IMPORTANT : Les émanations produites au pour des saletés moyennes à abondantes. Utiliser le tableau ci-dessous comme guide pour déterminer le niveau de nettoyage désiré. NIVEAU DE NETTOYAGE DURÉE - KitchenAid KOSE507EBS | Owners Manual - Page 35
commandes sont désactivées et que le four a refroidi. Toujours suivre les instructions sur les étiquettes des produits de nettoyage. Du savon, de l'eau et Pièce numéro W10355010 (non fournie) : Voir la section "Assistance ou service" pour placer une commande. INTÉRIEUR DE LA PORTE DU FOUR Méthode de - KitchenAid KOSE507EBS | Owners Manual - Page 36
la porte du four pour une utilisation normale. Toutefois, s'il est nécessaire de l'enlever, s'assurer que le four est éteint et froid. Puis suivre ces instructions. La porte du four est lourde. Réinstallation : 1. Insérer les deux bras de suspension dans la porte. 2. Ouvrir la porte du four. Vous - KitchenAid KOSE507EBS | Owners Manual - Page 37
une lettre suivie d'un chiffre réapparaît, faire un appel de service. Voir la section "Garantie". Le ventilateur fonctionne pendant la fonction ■■ Certains programmes ne nécessitent pas de préchauffage. Voir les instructions de programme pour connaître les recommandations en ce qui concerne le pr - KitchenAid KOSE507EBS | Owners Manual - Page 38
vous joindre dans la journée. ACCESSOIRES Accessoires É.-U. Pour commander des accessoires, contacter le service de l'eXpérience à la clientèle KitchenAid en composant le numéro sans frais 1-800-422-1230 et suivre les instructions du menu. Ou visiter notre site internet sur www.kitchenaid.com. Des - KitchenAid KOSE507EBS | Owners Manual - Page 39
èmes du guide d'utilisation et d'entretien, ou rendez-vous sur le site http://www.kitchenaid.ca. 2. Tout service sous garantie d'achat, lorsque ce gros appareil ménager est utilisé et entretenu conformément aux instructions jointes à ou fournies avec le produit, KitchenAid paiera les pièces spécifi - KitchenAid KOSE507EBS | Owners Manual - Page 40
CLAUSE D'EXONÉRATION DE RESPONSABILITÉ AU TITRE DES GARANTIES IMPLICITES LES GARANTIES IMPLICITES, Y COMPRIS LES GARANTIES APPLICABLES DE QUALITÉ MARCHANDE OU D'APTITUDE À UN USAGE PARTICULIER, SONT LIMITÉES À DIX ANS OU À LA PLUS COURTE PÉRIODE AUTORISÉE PAR LA LOI. Certains États et provinces ne
-
 1
1 -
 2
2 -
 3
3 -
 4
4 -
 5
5 -
 6
6 -
 7
7 -
8
-
9
-
10
-
11
-
12
-
13
-
14
-
15
-
16
-
17
-
18
-
19
-
20
-
21
-
22
-
23
-
24
-
25
-
26
-
27
-
28
-
29
-
30
-
31
-
32
-
33
-
34
-
35
-
36
-
37
-
38
-
39
-
40
 |
 |

THANK YOU for purchasing this high-quality product. Register your built-in oven at
www.kitchenaid.com
. In Canada, register your
built-in oven at
www.kitchenaid.ca
.
For future reference, please make a note of your product model and serial numbers. These can be found on the label located on the
bottom edge of the control panel, right hand side.
Model Number______________________________________________
Serial Number_______________________________________________
Para una versión de estas instrucciones en español, visite
www.kitchenaid.com
.
Deberá tener a mano el número de modelo y de serie, que están ubicados en el marco del horno, detrás del lado derecho superior de la
puerta del horno.
Table of Contents
W10643471C
BUILT-IN OVEN SAFETY
................................................................
2
PARTS AND FEATURES
................................................................
3
FEATURE GUIDE
............................................................................
4
Electronic Oven Controls
.............................................................
6
Display
..........................................................................................
6
Start
..............................................................................................
6
Lower Cancel, Upper Cancel and Cancel
...................................
6
Tones
............................................................................................
7
Fahrenheit and Celsius
.................................................................
7
Tools
.............................................................................................
7
Clock
............................................................................................
7
Kitchen Timer
...............................................................................
7
Control Lock
.................................................................................
7
Oven Temperature Control
...........................................................
7
Sabbath Mode
..............................................................................
8
OVEN USE
.......................................................................................
9
Aluminum Foil
...............................................................................
9
Oven Racks
..................................................................................
9
Rack and Bakeware Positions
.....................................................
9
SatinGlide™ Roll-Out Extension Rack
......................................
10
Bakeware
....................................................................................
10
Meat Thermometer
.....................................................................
10
Oven Vent(s)
...............................................................................
11
Preheating and Oven Temperature
............................................
11
Baking and Roasting
..................................................................
11
Broiling
........................................................................................
11
Convection
.................................................................................
11
Convection Bake
........................................................................
12
Convection Roast
.......................................................................
12
Convection Broil
.........................................................................
12
Proofing Bread
...........................................................................
12
Temperature Probe
.....................................................................
12
Timed Cooking
...........................................................................
13
High Temp Self-Cleaning Cycle
.................................................
13
OVEN CARE
..................................................................................
13
General Cleaning
........................................................................
14
Oven Lights
................................................................................
15
Oven Door
..................................................................................
15
TROUBLESHOOTING
..................................................................
16
ASSISTANCE OR SERVICE
.........................................................
17
In the U.S.A.
...............................................................................
17
In Canada
...................................................................................
17
ACCESSORIES
.............................................................................
17
WARRANTY
..................................................................................
18
User Guide
Built-In Electric Single and
Double Ovens