KitchenAid KPCG100OB Use & Care Guide
KitchenAid KPCG100OB Manual
 |
UPC - 883049061917
View all KitchenAid KPCG100OB manuals
Add to My Manuals
Save this manual to your list of manuals |
KitchenAid KPCG100OB manual content summary:
- KitchenAid KPCG100OB | Use & Care Guide - Page 1
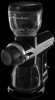
P R O L I N E™ S E R I E S GUIDE TO PROFESSIONAL RESULTS Model KPCG100 Burr Coffee Mill - KitchenAid KPCG100OB | Use & Care Guide - Page 2
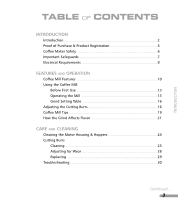
FEATURIENSTRAONDDUICNTSITORNUCTIONS P R O L I N E™ S E R I E S MODEL KPCG100 BURR COFFEE MILL Introduction Section Contents Table of Contents 3 Proof of Purchase & Registration.........5 Coffee Mill Safety 6 Important Safeguards 7 Electrical Requirements 8 1 - KitchenAid KPCG100OB | Use & Care Guide - Page 3
easily adjusted to compensate for wear or replaced if damaged. Like the famous KitchenAid® Stand Mixer, the PRO LINE™ Series Burr Coffee Mill features performance that can be enjoyed from generation to generation. The KitchenAid® PRO LINE™ Series: commercial quality for the discriminating home chef - KitchenAid KPCG100OB | Use & Care Guide - Page 4
Mill Before First Use 13 Operating the Mill 13 Grind Setting Table 16 Adjusting the Cutting Burrs 16 Coffee Mill Tips 19 How the Grind Affects Flavor 21 CARE AND CLEANING Cleaning the Motor Housing & Hoppers 24 Cutting Burrs Cleaning 25 Adjusting for Wear 28 Replacing 29 Troubleshooting - KitchenAid KPCG100OB | Use & Care Guide - Page 5
for the 50 United States & District of Columbia 32 Warranty for Puerto Rico 33 Arranging for Hassle-Free Replacement 34 Ordering Accessories and Replacement Parts 34 Arranging for Service After the Warranty Expires 35 Arranging for Service Outside the 50 United States & Puerto Rico 35 4 - KitchenAid KPCG100OB | Use & Care Guide - Page 6
receipt showing the date of purchase of your Coffee Mill. Proof of purchase will assure you of in-warranty service. Before you use your Coffee Mill, please fill out and mail your product the following for your personal records: Model Number: KPCG100 Serial Number Date Purchased Store Name 5 - KitchenAid KPCG100OB | Use & Care Guide - Page 7
COFFEE MILL SAFETY Your safety and the safety of others are very important. We have provided many important safety messages in this manual if you don't immediately follow instructions. WARNING You can be killed or seriously injured if you don't follow instructions. All safety messages will tell - KitchenAid KPCG100OB | Use & Care Guide - Page 8
all instructions. 2. To protect against the risk of electric shock, do not put the Coffee Mill in water or other liquids. 3. Close supervision is necessary when any appliance is used by or near children. 4. Unplug the Coffee Mill from the outlet when not in use, before putting on or taking off parts - KitchenAid KPCG100OB | Use & Care Guide - Page 9
: 120 V.A.C. only. Hertz: 60 Hz WARNING NOTE: This Coffee Mill has a 3 prong grounded plug. To reduce the risk of . Do not remove ground prong. Do not use an adapter. Failure to follow these instructions can result in death, fire, or electrical shock. entangled in or tripping over a longer - KitchenAid KPCG100OB | Use & Care Guide - Page 10
N E™ S E R I E S FEATURES AND OPERATION Features and Operation Section Contents Coffee Mill Features 10 Using the Coffee Mill Before First Use 13 Operating the Coffee Mill 13 Grind Setting Table 16 Adjusting the Cutting Burrs 16 Coffee Mill Tips 19 How the Grind Affects Flavor............21 9 - KitchenAid KPCG100OB | Use & Care Guide - Page 11
MODEL KPCG100 BURR COFFEE MILL FEATURES Model KPCG100 Burr Coffee Mill 10 - KitchenAid KPCG100OB | Use & Care Guide - Page 12
motor housing for simple cleaning. Press-fit hopper lid makes for quick and easy filling. Hopper and lid are dishwasher-safe (top rack only). Coffee Bin Coffee bin is glass to minimize the static "cling" of coffee grinds. Bin is dishwasher-safe (top rack only). Bin Platform Platform pad seats the - KitchenAid KPCG100OB | Use & Care Guide - Page 13
MODEL KPCG100 BURR COFFEE MILL FEATURES Faceplate Assembly & Screws Assembly includes the grind control dial and grind level ring. Two faceplate screws attach the faceplate assembly to the motor housing. Loosen the screws and remove the faceplate assembly to access the burrs. Precision Stainless - KitchenAid KPCG100OB | Use & Care Guide - Page 14
FEATURES AND OPERATION USING THE PRO LINE™ SERIES BURR COFFEE MILL Before First Use Before using the coffee mill, wipe the motor housing and cord with a clean damp cloth. Wash the bean hopper, hopper lid, and coffee bin in hot soapy water, then rinse and dry. The bean hopper, hopper lid, and - KitchenAid KPCG100OB | Use & Care Guide - Page 15
USING THE PRO LINE™ SERIES BURR COFFEE MILL WARNING Electrical Shock Hazard Plug into a grounded 3 prong outlet. Do not remove ground prong. Do not use an adapter. Failure to follow these instructions can result in death, fire, or electrical shock. 6. Select the grind by turning the grind control - KitchenAid KPCG100OB | Use & Care Guide - Page 16
FEATURES AND OPERATION 7. To grind coffee, flip the On/Off Switch to the "On" position. 8. When the desired amount of coffee has been ground, flip the On/Off Switch to the "Off" position, remove the coffee container, and scoop out the ground coffee. 15 - KitchenAid KPCG100OB | Use & Care Guide - Page 17
adjustment Espresso 325 microns Automatic Drip 750 microns French Press 1250 microns Adjusting the Cutting Burrs From the factory, the PRO LINE™ Series Burr Coffee Mill will provide grinds suitable for almost all types of brewing. If you're an espresso or French Press aficionado, however - KitchenAid KPCG100OB | Use & Care Guide - Page 18
The white grind control gear should be visible once the grind control dial is removed. 4. Turn on the mill by flipping the On/Off Switch to the "On" position. 6. When the burrs are touching, turn the grind control gear counterclockwise 1 "click" or detent. The grating or "rubbing" sound will stop - KitchenAid KPCG100OB | Use & Care Guide - Page 19
to grind level "8". NOTE: If the coffee mill produces a grating or "rubbing" sound during use, the burrs have been improperly adjusted. Damage to the burrs will result. Readjust the burrs immediately. Adjusting to Provide Coarser Grinds When the mill is adjusted to provide coarser grinds, grind - KitchenAid KPCG100OB | Use & Care Guide - Page 20
FEATURES AND OPERATION PRO LINE™ SERIES BURR COFFEE MILL TIPS 1 Select the correct grind for the brew process you are using. 15 grind levels are available in half-step increments from 1 to 8. Level 8 produces a - KitchenAid KPCG100OB | Use & Care Guide - Page 21
PRO LINE™ SERIES BURR COFFEE MILL TIPS 3 Ground coffee loses flavor and aroma very quickly. For the best results, grind only as much as you intend to immediately use. 4 To retain freshness, coffee beans should be stored in an airtight container and kept in a cool, dark place. It is not - KitchenAid KPCG100OB | Use & Care Guide - Page 22
consistency of the grind is also critical. oils and essences, resulting in a very thin and weak flavor. If the correct grind is used, adding more coffee simply makes a brew stronger without making it excessively bitter. The consistency of the grind is also an important factor in the flavor of - KitchenAid KPCG100OB | Use & Care Guide - Page 23
the type of grinder used. High speed grinders with small burr sets are usually not able to produce the fineness or consistency required for the best espresso. They also excessively heat the beans while grinding, resulting in lost flavor and aroma. The PRO LINE™ Series Burr Coffee Mill uses a pair of - KitchenAid KPCG100OB | Use & Care Guide - Page 24
CCAARREE AANNDD CCLLEEAANNIINNGG P R O L I N E™ S E R I E S CARE AND CLEANING Care and Cleaning Section Contents Cleaning the Housing & Hoppers......24 Cutting burrs Cleaning 25 Adjusting for Wear 28 Replacing 29 Troubleshooting 30 23 - KitchenAid KPCG100OB | Use & Care Guide - Page 25
CARE AND CLEANING Cleaning the Motor Housing and Hoppers • Make sure the coffee mill is switched off and unplugged before cleaning. • Do not immerse the motor housing in water. • Never immerse the cutting burrs, burr-shaft assembly, or face-plate assembly in water. Keep them dry at all times. • Do - KitchenAid KPCG100OB | Use & Care Guide - Page 26
their way into whole bean coffee. These objects may cause the mill to jam. If this happens, follow the burr-cleaning procedure to remove the foreign material. 1. Make sure the mill is switched off and unplugged. Remove the coffee bin and bean hopper from the mill. 2. Using a flat-head screwdriver - KitchenAid KPCG100OB | Use & Care Guide - Page 27
the face-plate assembly, grasp the center shaft of the burr-shaft assembly and remove it from the housing. Burr-Shaft Assembly Faceplate Assembly 4. Using the burr-cleaning brush, clean the burr mounted on the burr-shaft assembly and the burr mounted within the motor housing. NOTE: Never wash the - KitchenAid KPCG100OB | Use & Care Guide - Page 28
-shaped auger shaft facing into the motor housing, insert the burr-shaft assembly into the grinder. Keep the burr-shaft assembly level, so the tip of the auger shaft will line up with the small socket in the motor housing. 7. Once the burr-shaft assembly is in the motor housing, rotate the assembly - KitchenAid KPCG100OB | Use & Care Guide - Page 29
other. Adjusting The Cutting Burrs For Wear The cutting burrs are made of highquality After prolonged use, however, the burrs might require adjustment to compensate for Please see "Adjusting the Cutting Burrs" on page 16 for information on adjusting the burrs to provide maximum grind fineness. - KitchenAid KPCG100OB | Use & Care Guide - Page 30
. of coffee), they can be replaced easily. Contact KitchenAid at 1-800-541-6390 to order a set of replacement burrs. 3. Remove the burr from the CARE AND CLEANING To replace the burrs: 1. Remove the faceplate and burr-shaft assemblies. For instructions, see "Cleaning the Cutting Burrs" steps 1, 2, - KitchenAid KPCG100OB | Use & Care Guide - Page 31
: See "Adjusting the Cutting Burrs" on page 16 or "Replacing the Cutting Burrs" on page 29 for more information. If the problem cannot be fixed with the steps above, see the KitchenAid Warranty and Service section on the following page.* *Do not return the coffee mill to the retailer. Retailers do - KitchenAid KPCG100OB | Use & Care Guide - Page 32
Warranty Information Section Contents Warranty for the U.S 32 Warranty for Puerto Rico 33 Arranging for Hassle-Free Replacement 34 Ordering Accessories and Replacement Parts 34 Arranging for Service After the Warranty Expires 35 Arranging for Service Outside the U.S. & Puerto Rico 35 31 - KitchenAid KPCG100OB | Use & Care Guide - Page 33
toll-free at 1-800-541-6390. OR The replacement parts and repair labor costs to correct defects in materials and workmanship. Service must be provided by an Authorized KitchenAid Service Center. See the KitchenAid® PRO LINE™ Series Burr Coffee Mill Warranty for Puerto Rico for details on how to - KitchenAid KPCG100OB | Use & Care Guide - Page 34
warranty extends to the purchaser and any succeeding owner for PRO LINE™ Series Burr Coffee Mills operated in Puerto Rico. During the warranty period, all service must be handled by an Authorized KitchenAid Service Center. Please bring the Coffee Mill, or ship it prepaid and insured, to the nearest - KitchenAid KPCG100OB | Use & Care Guide - Page 35
ARRANGING FOR HASSLE-FREE REPLACEMENT IF YOU RESIDE IN THE 50 UNITED STATES and your KitchenAid® PRO LINE™ Series Burr Coffee Mill should fail within two years of ownership, simply call our toll-free Customer Satisfaction Center at 1-800-541-6390 Monday through Friday, 8 a.m. to 8 p.m. (Eastern Time - KitchenAid KPCG100OB | Use & Care Guide - Page 36
Shock Hazard Unplug before servicing. Failure to do so can result in death or electrical shock. ARRANGING FOR SERVICE OUTSIDE THE 50 UNITED STATES AND PUERTO RICO Consult your local KitchenAid dealer or the store where you purchased your PRO LINE™ Series Burr Coffee Mill for information on how - KitchenAid KPCG100OB | Use & Care Guide - Page 37
- KitchenAid KPCG100OB | Use & Care Guide - Page 38
® FOR THE WAY IT'S MADE.™ ® Registered Trademark/™ Trademark of KitchenAid, U.S.A © 2003. All rights reserved. Specifications subject to change without notice. dZw703
-
 1
1 -
 2
2 -
 3
3 -
 4
4 -
 5
5 -
 6
6 -
 7
7 -
8
-
9
-
10
-
11
-
12
-
13
-
14
-
15
-
16
-
17
-
18
-
19
-
20
-
21
-
22
-
23
-
24
-
25
-
26
-
27
-
28
-
29
-
30
-
31
-
32
-
33
-
34
-
35
-
36
-
37
-
38
 |
 |

GUIDE
TO
PROFESSIONAL
RESULTS
P
RO
L
INE
™
S
ERIES
Model KPCG100 Burr Coffee Mill