KitchenAid KSB1575CU Owners Manual
KitchenAid KSB1575CU Manual
 |
View all KitchenAid KSB1575CU manuals
Add to My Manuals
Save this manual to your list of manuals |
KitchenAid KSB1575CU manual content summary:
- KitchenAid KSB1575CU | Owners Manual - Page 1
Stand Blender KSB1575, 4KSB1575 W11382494A.indb 1 8/7/2019 4:26:46 PM - KitchenAid KSB1575CU | Owners Manual - Page 2
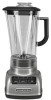
PARTS AND FEATURES 1 6 2 3 7 8 9 10 4 5 1 Lid with ingredient cup 2 BPA Free pitcher 3 Stainless steel blade 4 Clean touch control pad 5 Die-cast metal base 6 Speed selection buttons 1: Stir, 2: Chop, 3: Mix, 4: Puree, and 5: Liquify. 7 Crush Ice function 8 Pulse function 9 Power function 10 - KitchenAid KSB1575CU | Owners Manual - Page 3
experience and knowledge, unless they are closely supervised and instructed concerning the use of the appliance by a person responsible dropped or damaged in any manner. Contact the manufacturer at their customer service telephone number for information on examination, repair, or adjustment. 7. Do - KitchenAid KSB1575CU | Owners Manual - Page 4
use an adapter. Do not use an extension cord. Failure to follow these instructions can result in death, fire, or electrical shock. Voltage: 120 V Frequency: If the plug does not fit in the outlet, contact a qualified electrician or service technician. Do not modify the plug in any way. Do not use an - KitchenAid KSB1575CU | Owners Manual - Page 5
feature only works when a speed is selected and does not work with the Pulse mode or Crush Ice features. SPEED CONTROL GUIDE Item Speed Blended ice drink. . . Crush Ice, 5 Liquify Cheesecake 5 Liquify Chopped fruits Pulse, 2 Chop Chopped vegetables . . . . Pulse, 2 Chop Cream cheese-based - KitchenAid KSB1575CU | Owners Manual - Page 6
Plug into a grounded 3 prong outlet. Do not remove ground prong. Do not use an adapter. Do not use an extension cord. Failure to follow these instructions can result in death, fire, or electrical shock. 3 4 Put the ingredients in the pitcher and firmly place lid. Plug the Blender into a grounded - KitchenAid KSB1575CU | Owners Manual - Page 7
ENGLISH PRODUCT ASSEMBLY 5 6 Press desired speed (1 to 5) button for continuous operation at that speed. The white indicator light by the selected speed will stay lit. When finished, press POWER to turn off. Unplug the Blender before removing the pitcher. IMPORTANT: If blending hot foods or - KitchenAid KSB1575CU | Owners Manual - Page 8
PRODUCT USAGE USING THE CRUSH ICE FUNCTION Blender offers a CRUSH ICE feature. When selected, the Blender will automatically pulse for 30 seconds at staggered intervals at the optimal speed for crushing ice or other ingredients. 1 2 Put ice cubes into the pitcher and firmly place lid. Use up to - KitchenAid KSB1575CU | Owners Manual - Page 9
ENGLISH CARE AND CLEANING NOTE: Do not immerse the Blender base or cord in water. Do not use abrasive cleansers or scouring pads to avoid scratching. Unplug the Blender before cleaning. 1 2 Fill half of the pitcher with warm water and add 1 or 2 drops of dish-washing liquid. Place the pitcher - KitchenAid KSB1575CU | Owners Manual - Page 10
TROUBLESHOOTING GUIDE WARNING Electrical Shock Hazard Plug into a grounded 3 prong outlet. Do not remove ground prong. Do not use an adapter. Do not use an extension cord. Failure to follow these instructions the problem is not due to one of the above items, see the "Warranty and Service" sections - KitchenAid KSB1575CU | Owners Manual - Page 11
: One Year Full Warranty from date of purchase. Hassle-Free Replacement of your Blender. See the next page for details on how to arrange for service, or call the Customer eXperience Center toll-free at 1-800-541-6390. OR The replacement parts and repair labor costs to correct defects in materials - KitchenAid KSB1575CU | Owners Manual - Page 12
original Blender returned to us. Your replacement unit will also be covered by our one year limited warranty. Please follow these instructions to receive this quality service. If your Blender should fail within the first year of ownership, simply call our toll-free Customer eXperience Center at - KitchenAid KSB1575CU | Owners Manual - Page 13
FRANÇAIS PIÈCES ET CARACTÉRISTIQUES 1 6 2 3 7 8 9 10 4 5 1 Couvercle avec tasse à ingrédients 2 Récipient sans BPA 3 Lame en acier inoxydable 4 Clavier de commande tactile 5 Socle métallique coulé sous pression 6 Boutons de sélection de vitesse 1 : Stir (remuer), 2 : Chop (hacher), 3 : Mix - KitchenAid KSB1575CU | Owners Manual - Page 14
soient placées sous supervision ou qu'elles aient reçu des instructions concernant l'utilisation de l'appareil par une personne responsable de leur est endommagé d'une quelconque façon. Communiquer par téléphone avec le service à la clientèle du fabricant pour obtenir des renseignements sur la vé - KitchenAid KSB1575CU | Owners Manual - Page 15
un adaptateur. Ne pas utiliser un câble de rallonge. Le non-respect de ces instructions peut causer un décès, un incendie ou un choc électrique. Tension : 120 V appareil électroménager par un électricien ou un technicien de service qualifié. PUISSANCE DU MOTEUR La puissance du moteur du mélangeur - KitchenAid KSB1575CU | Owners Manual - Page 16
'une vitesse est sélectionnée et ne fonctionne pas avec le mode Pulse (impulsions) ou la fonction Crush Ice (concassage de la glace). GUIDE DE COMMANDE DE VITESSE Article Vitesse Boisson avec glaçons Crush Ice (concassage de la glace), 5 Liquify (liquifié) Gâteau au fromage. . . 5 Liquify - KitchenAid KSB1575CU | Owners Manual - Page 17
enlever la broche de liaison à la terre. Ne pas utiliser un adaptateur. Ne pas utiliser un câble de rallonge. Le non-respect de ces instructions peut causer un décès, un incendie ou un choc électrique. 3 4 Verser les ingrédients dans le récipient et bien fermer le couvercle. W11382494A.indb 17 - KitchenAid KSB1575CU | Owners Manual - Page 18
ASSEMBLAGE DU PRODUIT 5 6 Appuyer sur le bouton de vitesse souhaitée (1 à 5) pour une utilisation en continu à cette vitesse. L'indicateur blanc situé à côté de la vitesse sélectionnée reste allumé. Une fois terminé, appuyer sur POWER (mise sous tension) pour éteindre l'appareil. Débrancher le - KitchenAid KSB1575CU | Owners Manual - Page 19
UTILISATION DU PRODUIT UTILISATION DE LA FONCTION CRUSH ICE (CONCASSAGE DE LA GLACE) Le mélangeur comporte une caractéristique CRUSH ICE (concassage de la glace). Lorsque cette fonction est sélectionnée, le mélangeur fonctionne automatiquement par impulsions à intervalles réguliers et à vitesse - KitchenAid KSB1575CU | Owners Manual - Page 20
ENTRETIEN ET NETTOYAGE REMARQUE : Ne pas immerger la base ou le cordon du mélangeur dans l'eau. Ne pas utiliser de nettoyants abrasifs ou de tampons à récurer pour éviter de rayer la surface. Débrancher le mélangeur avant le nettoyage. 1 2 Remplir le récipient à moitié d'eau tiède et ajouter 1 à - KitchenAid KSB1575CU | Owners Manual - Page 21
FRANÇAIS GUIDE DE DÉPANNAGE AVERTISSEMENT Risque de choc électrique Brancher sur une prise à 3 alvéoles reliée à la terre. Ne pas enlever la broche de liaison à la terre. Ne pas utiliser un adaptateur. Ne pas utiliser un câble de rallonge. Le non-respect de ces instructions peut causer un décès, - KitchenAid KSB1575CU | Owners Manual - Page 22
GARANTIE ET DÉPANNAGE GARANTIE DU MÉLANGEUR KITCHENAID® POUR LES 50 ÉTATS DES ÉTATS-UNIS, LE DISTRICT FÉDÉRAL DE COLUMBIA, PORTO RICO ET LE CANADA La présente garantie couvre l'acheteur et le propriétaire suivant du mélangeur lorsqu'il est utilisé dans les 50 États des États-Unis, le district fédé - KitchenAid KSB1575CU | Owners Manual - Page 23
soit retourné. Les accessoires électriques de remplacement seront également couverts par notre garantie limitée d'un an. Veuillez suivre ces instructions pour bénéficier de ce service de qualité. Si votre mélangeur cesse de fonctionner durant la première année suivant son acquisition, il vous suffit - KitchenAid KSB1575CU | Owners Manual - Page 24
PIEZAS Y CARACTERÍSTICAS 1 6 2 3 7 8 9 10 4 5 1 Tapa con taza para ingredientes 2 Jarra sin BPA 3 Cuchilla de acero inoxidable 4 Botones de control Clean Touch 5 Base de metal fundido 6 Botones de selección de velocidad 1: Stir (Revolver), 2: Chop (Picar), 3: Mix (Mezclar), 4: Puree (Puré), - KitchenAid KSB1575CU | Owners Manual - Page 25
SEGURIDAD DEL PRODUCTO ESPAÑOL MEDIDAS DE PRECAUCIÓN IMPORTANTES Al utilizar electrodomésticos eléctricos, se deben seguir las precauciones básicas de seguridad, entre las que se incluyen las siguientes: 1. Lea todas las instrucciones. 2. Para protegerse contra el riesgo de choque eléctrico, no - KitchenAid KSB1575CU | Owners Manual - Page 26
SEGURIDAD DEL PRODUCTO 8. No deje que el cable cuelgue del borde de la mesa o del mostrador. 9. Mantenga las manos y los utensilios fuera del recipiente mientras mezcla, para así evitar el riesgo de lesiones graves a personas o daños a la licuadora. Puede usarse un raspador, pero se debe utilizar - KitchenAid KSB1575CU | Owners Manual - Page 27
ESPAÑOL SEGURIDAD DEL PRODUCTO REQUISITOS ELÉCTRICOS ADVERTENCIA Peligro de Choque Eléctrico Conecte a un contacto de pared de conexión a tierra de 3 terminales. No quite la terminal de conexión a tierra. No use un adaptador. No use un cable eléctrico de extensión. No seguir estas instrucciones - KitchenAid KSB1575CU | Owners Manual - Page 28
INTRODUCCIÓN Primero, limpie todas las piezas y accesorios (consulte la sección "Cuidado y limpieza"). Asegúrese de que el mostrador debajo del aparato y las áreas circundantes estén secos y limpios. La taza para ingredientes de la jarra de la licuadora se puede usar para medir y agregar - KitchenAid KSB1575CU | Owners Manual - Page 29
ESPAÑOL MONTAJE DEL PRODUCTO IMPORTANTE: cuando mueva la licuadora, levántela siempre de la base. La base se desconectará de la jarra si la licuadora solamente se agarra de la jarra o de la manija de la jarra de la licuadora. 1 2 Lengüeta Ranura Regule la longitud del cable eléctrico de la - KitchenAid KSB1575CU | Owners Manual - Page 30
MONTAJE DEL PRODUCTO 5 6 Presione el botón de la velocidad deseada (1 a 5) para que funcione de manera continua a esa velocidad. La luz indicadora blanca al lado de la velocidad seleccionada permanecerá encendida. Cuando haya terminado, presione el botón de POWER (Encendido) para apagarla. - KitchenAid KSB1575CU | Owners Manual - Page 31
ESPAÑOL USO DEL PRODUCTO CÓMO USAR LA FUNCIÓN CRUSH ICE (PICAR HIELO) Las licuadoras ofrecen la función CRUSH ICE (Picar hielo). Cuando esta se selecciona, la licuadora automáticamente se activará en pulsos alternadamente durante 30 segundos, a la velocidad óptima para picar hielo u otros - KitchenAid KSB1575CU | Owners Manual - Page 32
CUIDADO Y LIMPIEZA NOTA: no sumerja la base de la licuadora ni el cable en agua. No use limpiadores ni esponjas abrasivos para evitar rayaduras. Desenchufe la licuadora antes de limpiarla. 1 2 Llene la mitad de la jarra con agua tibia y agregue 1 o 2 gotas de líquido lavavajillas. Coloque la - KitchenAid KSB1575CU | Owners Manual - Page 33
ESPAÑOL GUÍA DE SOLUCIÓN DE PROBLEMAS ADVERTENCIA Peligro de Choque Eléctrico Conecte a un contacto de pared de conexión a tierra de 3 terminales. No quite la terminal de conexión a tierra. No use un adaptador. No use un cable eléctrico de extensión. No seguir estas instrucciones puede ocasionar - KitchenAid KSB1575CU | Owners Manual - Page 34
GARANTÍA Y SERVICIO TÉCNICO GARANTÍA DE KITCHENAID® PARA LA LICUADORA EN LOS CINCUENTA ESTADOS DE LOS ESTADOS UNIDOS, EL DISTRITO DE COLUMBIA, PUERTO RICO Y CANADÁ Esta garantía se extiende al comprador y a cualquier propietario subsiguiente para las licuadoras que se utilicen en los cincuenta - KitchenAid KSB1575CU | Owners Manual - Page 35
ESPAÑOL GARANTÍA Y SERVICIO TÉCNICO GARANTÍA DE REEMPLAZO SIN DIFICULTADES - EN LOS CINCUENTA ESTADOS DE ESTADOS UNIDOS, EL DISTRITO DE COLUMBIA Y PUERTO RICO Confiamos tanto en que la calidad de nuestros productos cumple con las exigentes normas de KitchenAid que, si la licuadora presentara - KitchenAid KSB1575CU | Owners Manual - Page 36
GARANTÍA Y SERVICIO CERTIFICADO DE GARANTÍA DE PEQUEÑOS ELECTRODOMÉSTICOS DE LA MARCA KITCHENAID GARANTÍA VÁLIDA SÓLO EN EL PAÍS DE ADQUISICIÓN DEL PRODUCTO GARANTIZADO IMPORTANTE: Este Certificado o Tarjeta de Garantía debería presentarse junto a la factura o boleta de compra o recepción original - KitchenAid KSB1575CU | Owners Manual - Page 37
en el presente Certificado de Garantía - incluyendo los contactos para la adquisición o compra de repuestos legítimos - se encuentran detalladas en este Manual de Uso. La solicitud de cumplimiento de ésta Garantía se podrá efectuar de forma personal y/o telefónica y/o por correo electrónico al - KitchenAid KSB1575CU | Owners Manual - Page 38
GARANTÍA Y SERVICIO La presente Garantía no constituye y en ningún caso podrá ser interpretada como una prórroga o plazo adicional en los términos y condiciones de la garantía legal del producto establecida por la ley local. La presente Garantía no extiende ni otorga al Beneficiario/Titular de ésta, - KitchenAid KSB1575CU | Owners Manual - Page 39
ESPAÑOL GARANTÍA Y SERVICIO México Lugar donde también podrá obtener las partes, componentes, consumibles y accesorios originales. Dirección: Antigua Carretera a Roma Km 9, Col. El Milagro, Apodaca, N.L. México 66634 Línea telefónica gratuita nacional: 01800-0022-767 Horarios de Atención: Lunes a - KitchenAid KSB1575CU | Owners Manual - Page 40
DISCOVER MORE. DÉCOUVREZ PLUS. DESCUBRA MÁS. KITCHENAID.COM/QUICKSTART PRODUCT QUESTIONS OR RETURNS QUESTIONS SUR LE PRODUIT OU LES RETOURS PREGUNTAS SOBRE EL PRODUCTO O DEVOLUCIÓNES USA: 1.800.541.6390 | KitchenAid.com CANADA: 1.800.807.6777 | KitchenAid.ca MEXICO: KitchenAid.com.mx LATIN AMERICA:
-
 1
1 -
 2
2 -
 3
3 -
 4
4 -
 5
5 -
 6
6 -
 7
7 -
8
-
9
-
10
-
11
-
12
-
13
-
14
-
15
-
16
-
17
-
18
-
19
-
20
-
21
-
22
-
23
-
24
-
25
-
26
-
27
-
28
-
29
-
30
-
31
-
32
-
33
-
34
-
35
-
36
-
37
-
38
-
39
-
40
 |
 |

Stand Blender
KSB1575, 4KSB1575
W11382494A.indb
1
8/7/2019
4:26:46 PM