KitchenAid KSGB900ESS Installation Instructions
KitchenAid KSGB900ESS Manual
 |
View all KitchenAid KSGB900ESS manuals
Add to My Manuals
Save this manual to your list of manuals |
KitchenAid KSGB900ESS manual content summary:
- KitchenAid KSGB900ESS | Installation Instructions - Page 1
INSTALLATION REQUIREMENTS 4 Tools and Parts 4 Location Requirements 4 Electrical Requirements 7 Gas Supply Requirements 7 INSTALLATION INSTRUCTIONS 9 Unpack Range 9 Install Anti-Tip Bracket 9 Adjust Leveling Legs 10 Level Range 11 Make Gas Connection 11 Install Griddle 12 Verify Anti-Tip - KitchenAid KSGB900ESS | Installation Instructions - Page 2
. • Do not touch any electrical switch. • Do not use any phone in your building. • Immediately call your gas supplier from a neighbor's phone. Follow the gas supplier's instructions. • If you cannot reach your gas supplier, call the fire department. - Installation and service must be performed by - KitchenAid KSGB900ESS | Installation Instructions - Page 3
foot is engaged in the slot of the anti-tip bracket. Re-engage anti-tip bracket if range is moved. Do not operate range without anti-tip bracket installed and engaged. Failure to follow these instructions can result in death or serious burns to children and adults. Anti-Tip Bracket To verify the - KitchenAid KSGB900ESS | Installation Instructions - Page 4
"Electrical Requirements" and "Gas Supply Requirements" sections. IMPORTANT: When the range is used under microwave models: JMC82808CB-0, JMV9196CB-0, or YJMV9196CB-0, the Door Baffle Plate Part Number W10737014 must be ordered and used. Please reference the "Accessories" section of the User Guide - KitchenAid KSGB900ESS | Installation Instructions - Page 5
range is adequate as long as it conforms to the standards listed above. Product Dimensions This manual range IMPORTANT: Range must be level after installation. Follow the instructions in the "Level Range" section. Using the cooktop as a reference for leveling the range is not recommended. *Range - KitchenAid KSGB900ESS | Installation Instructions - Page 6
hood or microwave hood combination above the cooking surface, follow the range hood or microwave hood combination installation instructions for dimensional clearances above the cooktop surface. Range may be installed next to combustible walls with zero clearance. NOTE: When installed in a slide - KitchenAid KSGB900ESS | Installation Instructions - Page 7
Failure to follow these instructions can result in death, fire, or electrical shock. IMPORTANT: The range must be electrically grounded in accordance with . Propane Gas Conversion: Conversion must be done by a qualified service technician. No attempt shall be made to convert the appliance from - KitchenAid KSGB900ESS | Installation Instructions - Page 8
pipe threads of the inlet to the appliance pressure regulator. ■ Do not kink or damage the flexible metal tubing when moving the range. ■ Must include a shut-off valve: Install a manual gas line shut-off valve in an easily accessible location. Do not block access to shut-off valve. The valve is for - KitchenAid KSGB900ESS | Installation Instructions - Page 9
racks and parts package from oven and shipping materials. 3. To remove cardboard bottom, first take 4 cardboard corners from the carton. Stack one cardboard corner on top of another. Repeat with the other 2 corners. Place them lengthwise on the floor behind the range to support the range when it - KitchenAid KSGB900ESS | Installation Instructions - Page 10
with the range on its back or with the range supported on 2 legs after the range has been placed back to a standing position. NOTE: To place range back tip bracket if range is moved. Do not operate range without anti-tip bracket installed and engaged. Failure to follow these instructions can result - KitchenAid KSGB900ESS | Installation Instructions - Page 11
service personnel. Failure to do so can result in death, explosion, or fire. This range is factory-set for use with Natural gas. To use this range shown in the "on" position 2. Open the manual shut-off valve in the gas supply line. The and bases from package containing parts. Place the burner bases - KitchenAid KSGB900ESS | Installation Instructions - Page 12
igniter electrode with the notch in the burner base. A B C Electrical Shock Hazard Plug into a grounded 3 prong outlet. Do not remove A. Front B. Feet 2. Clean the griddle before using. Refer to the Use and Care Guide for cleaning instructions. The griddle can be placed over the left, right, - KitchenAid KSGB900ESS | Installation Instructions - Page 13
■ Turn cooktop control knob to the "off" position. ■ Check that the range is plugged into a grounded 3 prong outlet. Check that the circuit breaker has your dealer or authorized service company for assistance. Please refer the "Warranty" to contact service. If the cooktop "low" burner flame needs to - KitchenAid KSGB900ESS | Installation Instructions - Page 14
service company for assistance. Please refer the "Warranty" to contact service. If the bake burner flame needs to be adjusted, see the "Adjust Flame Height" section. Refer to the User Guide pad. ■ Check that the range is plugged into a grounded cool. Then, follow these instructions. The oven door is - KitchenAid KSGB900ESS | Installation Instructions - Page 15
procedures. Complete Installation 1. Check that all parts are now installed. If there is an extra part, go back through the steps to see which Range Care" section of the User Guide. 7. Read the User Guide. 8. Turn on surface burners and oven. See the User Guide for specific instructions on range - KitchenAid KSGB900ESS | Installation Instructions - Page 16
and engaged. Failure to follow these instructions can result in death or serious burns to children and adults. 1. Turn the manual shut-off valve to the closed position. B A C A. Gas supply line B. Manual shut-off valve "closed" position C. To range 2. Unplug range or disconnect power. To Convert Gas - KitchenAid KSGB900ESS | Installation Instructions - Page 17
3. Remove plastic cover from gas pressure regulator cap. 4. Turn gas pressure regulator cap counterclockwise with a 5/8" (1.6 cm) combination wrench to remove. NOTE: Do not remove the spring beneath the cap. Side view before A 3. Apply masking tape to the end of a 9/32" (7 mm) nut driver to help - KitchenAid KSGB900ESS | Installation Instructions - Page 18
To Convert Oven Bake Burner (Natural Gas to Propane Gas) 1. Remove the oven racks and the oven door. See the "Oven Door" section. 2. Remove 2 screws and washers at the rear of the oven bottom. 3. Lift the rear of the oven bottom up and back until the front of the panel is away from the front frame. - KitchenAid KSGB900ESS | Installation Instructions - Page 19
. IMPORTANT: You may have to adjust the low setting for each cooktop burner. Checking for proper range is moved. Do not operate range without anti-tip bracket installed and engaged. Failure to follow these instructions can result in death or serious burns to children and adults. 1. Turn the manual - KitchenAid KSGB900ESS | Installation Instructions - Page 20
4. Turn gas pressure regulator cap counterclockwise with a 5/8" (1.6 cm) combination wrench to remove. NOTE: Do not remove the spring beneath the cap. Side view before A LP 3. Apply masking tape to the end of a 9/32" (7 mm) nut driver to help hold the gas orifice spud in the nut driver while - KitchenAid KSGB900ESS | Installation Instructions - Page 21
3. Lift the rear of the oven bottom up and back until the front of the panel is away from the front frame. Remove from oven and set it aside on a covered surface. A B 7. Replace the "56" spud with a "47" spud. Install the Natural gas bake burner orifice spud, turning it clockwise until snug. - KitchenAid KSGB900ESS | Installation Instructions - Page 22
proper connection of the range to the gas supply. low setting for each cooktop burner. Checking for proper cooktop, bake and broil burner flame is very important. Natural gas flames do not have yellow tips. 4. Refer to "Complete Installation" in the "Installation Instructions" section of this manual - KitchenAid KSGB900ESS | Installation Instructions - Page 23
Check Operation of Oven Bake Burner Refer to the User Guide for proper operation of the oven controls. Adjust Oven Bake Burner Flame (If Needed) 1. Remove the premium storage drawer, warming drawer or baking drawer (see - KitchenAid KSGB900ESS | Installation Instructions - Page 24
entretien doivent être effectués par un installateur qualifié, une agence de service ou le fournisseur de gaz. AVERTISSEMENT : L'odorat ne permet pas gaz local. En cas de détection d'une fuite de gaz, exécuter les instructions "Que faire dans le cas d'une odeur de gaz". IMPORTANT : Ne pas installer - KitchenAid KSGB900ESS | Installation Instructions - Page 25
Fixer la bride antibasculement au plancher ou au mur, conformément aux instructions d'installation. Faire glisser de nouveau la cuisinière de façon à antibasculement n'est pas installée et engagée. Le non-respect de ces instructions peut causer un décès ou des brûlures graves aux enfants et aux - KitchenAid KSGB900ESS | Installation Instructions - Page 26
ces nécessaires avant d'entreprendre l'installation. Lire et observer les instructions fournies avec chacun des outils de la liste ci-dessous. de porte référence W10737014. Se reporter à la section "Accessoires" du guide d'utilisation pour les informations de contact. ■ Pièces facultatives Pour - KitchenAid KSGB900ESS | Installation Instructions - Page 27
Title 24 CFR, Part 3280 (anciennement Federal Standard for Mobile Home Construction and Safety, Title 24, HUD Part 280). Lorsque cette IMPORTANT : La cuisinière doit être d'aplomb après l'installation. Suivre les instructions de la section "Réglage de l'aplomb de la cuisinière". Il n'est pas - KitchenAid KSGB900ESS | Installation Instructions - Page 28
hauteur. IMPORTANT : Si une hotte ou un ensemble hotte/four à micro-ondes est installé au-dessus de la surface de cuisson, suivre les instructions d'installation fournies avec la hotte ou l'ensemble hotte/four à micro-ondes concernant les dimensions de dégagement à respecter au-dessus de la surface - KitchenAid KSGB900ESS | Installation Instructions - Page 29
un câble de rallonge. Le non-respect de ces instructions peut causer un décès, un incendie ou un choc électrique du code national en vigueur : National Electrical Code, ANSI/ NFPA 70, ou Code de la plus récente édition du : National Fuel Gas Code ANSI Z223.1 (American National Standard), - KitchenAid KSGB900ESS | Installation Instructions - Page 30
Consulter le fournisseur de gaz avant toute conversion de l'appareil pour l'utilisation d'un type de gaz qui n'est pas mentionné sur la plaque signalétique. Voir la section "Conversions pour changement de gaz". Canalisation d'alimentation en gaz ■ Installer une canalisation d'alimentation en gaz - KitchenAid KSGB900ESS | Installation Instructions - Page 31
plancher dans le sens de la longueur derrière la cuisinière, à titre de support de la cuisinière lorsque celle-ci est placée sur sa partie postérieure. Fixer la bride antibasculement au plancher ou au mur, conformément aux instructions d'installation. Faire glisser de nouveau la cuisinière de façon - KitchenAid KSGB900ESS | Installation Instructions - Page 32
Fixer la bride antibasculement au plancher ou au mur, conformément aux instructions d'installation. Faire glisser de nouveau la cuisinière de façon bride antibasculement n'est pas installée et engagée. Le non-respect de ces instructions peut causer un décès ou des brûlures graves aux enfants et aux - KitchenAid KSGB900ESS | Installation Instructions - Page 33
le personnel autorisé de chauffage, le personnel autorisé d'une compagnie de gaz, et le personnel d'entretien autorisé. Le non-respect de ces instructions peut causer un décès, une explosion ou un incendie. Cette cuisinière a été configurée à l'usine pour l'alimentation au gaz naturel. Pour utiliser - KitchenAid KSGB900ESS | Installation Instructions - Page 34
-rapide) E. Grand (Ultra rapide) Pour le modèle KSGB900E: 5. Aligner l'ouverture du tube d'arrivée de gaz de la base du brûleur avec le support de l'injecteur à orifice sur la table de cuisson et l'électrode d'allumage avec l'encoche ménagée sur la base du brûleur. A B C D E A. Chapeau de brûleur - KitchenAid KSGB900ESS | Installation Instructions - Page 35
2. Nettoyer la plaque avant utilisation. Consulter le Guide d'utilisation et d'entretien pour obtenir les instructions de nettoyage. La grille peut être placée installée et engagée. Se reporter à "Garantie" pour contacter le service de maintenance. 8. Déplacer la cuisinière à son emplacement dé - KitchenAid KSGB900ESS | Installation Instructions - Page 36
consulter la section "Réglage de la taille des flammes". Consulter le Guide d'utilisation pour le bon fonctionnement des commandes du four. Brûleurs à "Garantie" pour contacter le service de maintenance. Si la flamme d'un brûleur de la table de cuisson en position "low" (bas) doit être régl - KitchenAid KSGB900ESS | Installation Instructions - Page 37
la porte du four pour une utilisation normale. Toutefois, si la dépose est nécessaire, s'assurer que le four est éteint et froid. Ensuite, suivre les instructions ci-dessous. La porte du four est lourde. Démontage : 1. Ouvrir la porte du four complètement. 2. Pincer le loquet de charnière entre les - KitchenAid KSGB900ESS | Installation Instructions - Page 38
Pour des instructions spécifiques concernant l'utilisation de la cuisinière, consulter le Guide d'utilisation et d'entretien ou les instructions d'utilisation. Si de l'assistance ou une visite de service : Se reporter à "Garantie" pour contacter le service de maintenance. REMARQUE : Au cours des - KitchenAid KSGB900ESS | Installation Instructions - Page 39
Fixer la bride antibasculement au plancher ou au mur, conformément aux instructions d'installation. Faire glisser de nouveau la cuisinière de façon bride antibasculement n'est pas installée et engagée. Le non-respect de ces instructions peut causer un décès ou des brûlures graves aux enfants et aux - KitchenAid KSGB900ESS | Installation Instructions - Page 40
; tourner dans le sens antihoraire et soulever pour enlever l'injecteur à orifice. Conserver à part l'injecteur à orifice du brûleur. AB D C A. Électrode d'allumage B. Injecteur à orifice C. Support d'injecteur à orifice D. Vis 4. Retirer les injecteurs fournis dans le sachet de documentation - KitchenAid KSGB900ESS | Installation Instructions - Page 41
Injecteurs à orifice pour propane - brûleurs de surface Emplacement Capacité/ type de brûleur Avant gauche 14 200 BTU Avant gauche 15 000 BTU (ST) Arrière gauche 5 000 BTU Avant droit 14 200 BTU Arrière droit 8 000 BTU Central 8 000 BTU Taille (mm) 1,08 1,08 0,64 1,08 0,84 0,84 - KitchenAid KSGB900ESS | Installation Instructions - Page 42
. Les flammes d'un brûleur alimenté au propane comportent une pointe légèrement 4. Voir le paragraphe "Achever l'installation" de la section "Instructions d'installation" de ce manuel pour achever cette procédure. IMPORTANT : S'assurer de bien conserver les injecteurs à orifice qui ont été remplac - KitchenAid KSGB900ESS | Installation Instructions - Page 43
Fixer la bride antibasculement au plancher ou au mur, conformément aux instructions d'installation. Faire glisser de nouveau la cuisinière de façon bride antibasculement n'est pas installée et engagée. Le non-respect de ces instructions peut causer un décès ou des brûlures graves aux enfants et aux - KitchenAid KSGB900ESS | Installation Instructions - Page 44
; tourner dans le sens antihoraire et soulever pour enlever l'injecteur à orifice. Conserver à part l'injecteur à orifice du brûleur. AB D C A. Électrode d'allumage B. Injecteur à orifice C. Support d'injecteur à orifice D. Vis 4. Chaque injecteur est marqué d'un code d'identification gravé sur - KitchenAid KSGB900ESS | Installation Instructions - Page 45
5. Faire glisser l'avant du brûleur de cuisson au four sur le côté pour retirer l'onglet de l'avant du four. Soulever l'arrière du brûleur de cuisson au four de l'orifice du four, et mettre le brûleur de cuisson au four de côté. Ne pas déconnecter le fil. A B A. Brûleur de cuisson au four B. Vis 9. - KitchenAid KSGB900ESS | Installation Instructions - Page 46
. 4. Voir le paragraphe "Achever l'installation" de la section "Instructions d'installation" de ce manuel pour achever cette procédure. IMPORTANT la flamme en tournant le bouton de commande pour le faire passer de la position "Low" (basse) à la position "High" (élevée) et observer les flammes pour - KitchenAid KSGB900ESS | Installation Instructions - Page 47
Contrôle du fonctionnement du brûleur de cuisson au four Consulter le Guide d'utilisation pour le bon fonctionnement des commandes du four. Réglage de la taille des flammes sur le brûleur du four (le cas échéant) 1. - KitchenAid KSGB900ESS | Installation Instructions - Page 48
W11396478A ©2020 All rights reserved. Used under license in Canada. Tous droits réservés. Utilisé sous licence au Canada. 05/20
-
 1
1 -
 2
2 -
 3
3 -
 4
4 -
 5
5 -
 6
6 -
 7
7 -
8
-
9
-
10
-
11
-
12
-
13
-
14
-
15
-
16
-
17
-
18
-
19
-
20
-
21
-
22
-
23
-
24
-
25
-
26
-
27
-
28
-
29
-
30
-
31
-
32
-
33
-
34
-
35
-
36
-
37
-
38
-
39
-
40
-
41
-
42
-
43
-
44
-
45
-
46
-
47
-
48
 |
 |

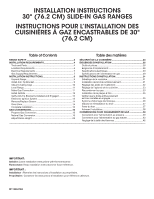
INSTALLATION INSTRUCTIONS
30" (76.2 CM) SLIDE-IN GAS RANGES
INSTRUCTIONS POUR L’INSTALLATION DES
CUISINIÈRES À GAZ ENCASTRABLES DE 30"
(76,2 CM)
IMPORTANT:
Installer:
Leave installation instructions with the homeowner.
Homeowner:
Keep installation instructions for future reference.
IMPORTANT :
Installateur :
Remettre les instructions d’installation au propriétaire.
Propriétaire :
Conserver les instructions d’installation pour référence ultérieure.
W11396478A
Table of Contents
Table des matières
RANGE SAFETY
.............................................................................
2
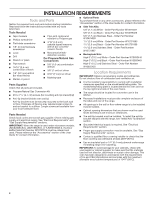
INSTALLATION REQUIREMENTS
.................................................
4
Tools and Parts
.............................................................................
4
Location Requirements
................................................................
4
Electrical Requirements
...............................................................
7
Gas Supply Requirements
...........................................................
7
INSTALLATION INSTRUCTIONS
...................................................
9
Unpack Range
..............................................................................
9
Install Anti-Tip Bracket
.................................................................
9
Adjust Leveling Legs
..................................................................
10
Level Range
................................................................................
11
Make Gas Connection
...............................................................
11
Install Griddle
.............................................................................
12
Verify Anti-Tip Bracket Is Installed and Engaged
......................
13
Electronic Ignition System
.........................................................
13
Remove/Replace Drawer
...........................................................
14
Oven Door
..................................................................................
14
Complete Installation
.................................................................
15
GAS CONVERSIONS
....................................................................
16
Propane Gas Conversion
...........................................................
16
Natural Gas Conversion
.............................................................
19
Adjust Flame Height
...................................................................
22
SÉCURITÉ DE LA CUISINIÈRE
...................................................
24
EXIGENCES D’INSTALLATION
...................................................
26
Outils et pièces
...........................................................................
26
Exigences d’emplacement
.........................................................
26
Spécifications électriques
..........................................................
29
Spécifications de l’alimentation en gaz
.....................................
29
INSTRUCTIONS D’INSTALLATION
.............................................
31
Déballage de la cuisinière
..........................................................
31
Installation de la bride antibasculement
....................................
31
Réglage des pieds de nivellement
.............................................
32
Réglage de l’aplomb de la cuisinière
.........................................
33
Raccordement au gaz
................................................................
33
Installation de la plaque à frire
...................................................
35
Vérifier que la bride antibasculement
est bien installée et engagée
.....................................................
35
Système d’allumage électronique
..............................................
36
Dépose et réinstallation du tiroir
................................................
37
Porte du four
..............................................................................
37
Achever l’installation
..................................................................
38
CONVERSIONS POUR CHANGEMENT DE GAZ
......................
39
Conversion pour l’alimentation au propane
..............................
39
Conversion pour l’alimentation au gaz naturel
..........................
43
Réglage de la taille des flammes
...............................................
46