KitchenAid KSGB900ESS Owners Manual 1
KitchenAid KSGB900ESS Manual
 |
View all KitchenAid KSGB900ESS manuals
Add to My Manuals
Save this manual to your list of manuals |
KitchenAid KSGB900ESS manual content summary:
- KitchenAid KSGB900ESS | Owners Manual 1 - Page 1
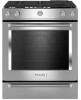
User Guide Gas Range THANK YOU for purchasing this high-quality product. Register your range at www.kitchenaid.com. In Canada, register your range at www.kitchenaid.ca. For 17 RANGE CARE 18 Clean Cycle 18 General Cleaning 19 Remove/Replace Drawer 20 TROUBLESHOOTING 21 ACCESSORIES 23 W11341324A - KitchenAid KSGB900ESS | Owners Manual 1 - Page 2
. • Do not touch any electrical switch. • Do not use any phone in your building. • Immediately call your gas supplier from a neighbor's phone. Follow the gas supplier's instructions. • If you cannot reach your gas supplier, call the fire department. - Installation and service must be performed by - KitchenAid KSGB900ESS | Owners Manual 1 - Page 3
the anti-tip bracket securely attached to floor or wall. • Slide range back so rear range foot is under anti-tip bracket. • See installation instructions for details. IMPORTANT SAFETY INSTRUCTIONS WARNING: To reduce the risk of fire, electrical shock, injury to persons, or damage when using the - KitchenAid KSGB900ESS | Owners Manual 1 - Page 4
. See the "Clean Cycle" section for more detailed instructions. For additional information, frequently asked questions, and videos Surface Burners The burner bases and caps must be properly positioned before cooking. Your range comes with 3 sizes of burners and caps. Each round burner base is marked - KitchenAid KSGB900ESS | Owners Manual 1 - Page 5
FEATURE GUIDE This manual covers several models. Your model may have some or all of the items listed. Refer to this manual or the Product Help section of our website at www.kitchenaid.com for more detailed instructions. In Canada, refer to the Product Help Section at www.kitchenaid.ca. WARNING Food - KitchenAid KSGB900ESS | Owners Manual 1 - Page 6
bread Hold warm Convection cooking Convection cooking Instructions 1. Insert the steam rack with water time for convection baking. Press "2" to manually convert the temperature and time. 3. Press be displayed. Enter a temperature in the allowable range. 4. Press START. 5. To change the temperature - KitchenAid KSGB900ESS | Owners Manual 1 - Page 7
cooking Delayed start Baking drawer Slow cook drawer Warming drawer Clean cycle Instructions 1. Press EASY CONVECT ROAST. 2. Press "1" to have the manually convert the temperature and time. 3. Press the number keypads to set the desired temperature. If the temperature entered is not in the range - KitchenAid KSGB900ESS | Owners Manual 1 - Page 8
time of day. 5. The clock will reappear in the display and the range can be operated as usual. Settings Many features of the oven control can time of day. Sound Volume Sets the volume of the tone to either high or low. 1. Press CLOCK/TOOLS until "SOUND VOLUME" is displayed. 2. The current setting - KitchenAid KSGB900ESS | Owners Manual 1 - Page 9
with Step 3. 3. Press the "3" keypad to increase the temperature in 5°F (3°C) increments or press the "6" keypad to decrease the temperature in 5°F (3°C) increments. The offset range is from -30°F to +30°F (-18°C to +18°C). 4. Press START or CANCEL UPPER to exit and display the time of day. 9 - KitchenAid KSGB900ESS | Owners Manual 1 - Page 10
these instructions can result in death or fire. E Electric igniters between H (high) and L (low). REMEMBER: When range is in use, the entire cooktop area may become hot. Power Failure In case of prolonged power failure, the surface burners can be lit manually - KitchenAid KSGB900ESS | Owners Manual 1 - Page 11
the burner still does not light, turn off the burner. Do not service the burner yourself. Contact a trained repair specialist. Surface Grates The grates Semi Rapid Ultra Rapid Stack (most powerful) Oval Recommended Use ■ Low-heat cooking ■ Melting chocolate or butter ■ Multipurpose burner ■ For - KitchenAid KSGB900ESS | Owners Manual 1 - Page 12
Low. To Clean the Griddle: 1. Let the griddle cool, and then empty the drip tray. 2. See the "General Cleaning" section for cleaning instructions. 3. Store griddle it and the cookware. Use the following chart as a guide for cookware material characteristics. Cookware Aluminum Cast iron Ceramic or - KitchenAid KSGB900ESS | Owners Manual 1 - Page 13
agricultural extension office, or refer to published home canning guides. Companies that manufacture home canning products can also offer assistance , raise the front edge, and then lift out. Use the following illustration and charts as guides. 7 6 5 4 3 2 1 The oven has 7 positions for a flat rack, - KitchenAid KSGB900ESS | Owners Manual 1 - Page 14
the "V" cutouts. Push the rack assembly into the oven until it stops at the ladder in the back of the oven. AB C D A. "V" cutout B. Rack guides C. Ladder hook D. Ladder 4. Reach through the rack to hold the sliding rack and the front crossbar. Lift the front of the rack assembly, and then - KitchenAid KSGB900ESS | Owners Manual 1 - Page 15
(When Sabbath Mode Is Running): 1. Press the number keypad as instructed by the scrolling text to select the new temperature. NOTE: The temperature baking, or press CANCEL for the desired oven to turn off the range. NOTE: No tones will sound while deactivating Sabbath mode. Baking and Roasting - KitchenAid KSGB900ESS | Owners Manual 1 - Page 16
dough for baking by activating the yeast. Follow the recipe directions as a guide. Proof should be used for fresh dough, thawed dough, and for the first allowed temperature will be displayed. Enter a temperature in the allowable range. 3. Press COOK TIME. The Cook Time oven indicator light will - KitchenAid KSGB900ESS | Owners Manual 1 - Page 17
or maximum allowed temperature will be displayed. Enter a temperature in the allowable range. 3. Press START. 4. To change the temperature, repeat steps 2 and and the control knobs are in the Off position. To Replace: 1. Unplug range or disconnect power. 2. Turn the glass bulb cover in the back of - KitchenAid KSGB900ESS | Owners Manual 1 - Page 18
1 hour. This new cleaning technology is a low-heat, odorfree alternative to traditional Clean options. Allow surface of the oven interior. NOTES: ■ The range should be level to ensure that the entire surface Cleaning Kits may be obtained by ordering Part Number W10423113RP. See the "Accessories" - KitchenAid KSGB900ESS | Owners Manual 1 - Page 19
are OFF and the oven and cooktop are cool. Always follow label instructions on cleaning products. For additional information, you can visit our website at www.kitchenaid.com. In Canada, visit our website at www.kitchenaid.ca. Soap, water, and a soft cloth or sponge are suggested first, unless - KitchenAid KSGB900ESS | Owners Manual 1 - Page 20
panel. ■ Affresh® Kitchen and Appliance Cleaner Part Number W10355010 (not included): See the " light coating of vegetable oil applied to the rack guides will help them slide. ■ Dishwasher (steam rack the baking drawer, and then allow the range to cool completely before attempting to remove the - KitchenAid KSGB900ESS | Owners Manual 1 - Page 21
. Do not remove ground prong. Do not use an adapter. Do not use an extension cord. Failure to follow these instructions can result in death, fire, or electrical shock. Problem Nothing will operate Surface burners will not operate Surface burner flames are uneven, yellow and/ or noisy Excessive heat - KitchenAid KSGB900ESS | Owners Manual 1 - Page 22
Problem Oven burner flames are yellow or noisy Oven temperature too high or too low . If it reappears, call for service. See the "Warranty" for contact keypad feature in the "Feature Guide" section. Range is in Sabbath Mode ( Range is not level - Level the range. See the Installation Instructions - KitchenAid KSGB900ESS | Owners Manual 1 - Page 23
or Broil burner is igniting - This is normal. Range converted improperly - If propane gas is being used, contact a service technician or see "Warranty" for contact information. ACCESSORIES For accessories in the U.S.A., you can visit our website at www.kitchenaid.com or call us at 1-800-422-1230 - KitchenAid KSGB900ESS | Owners Manual 1 - Page 24
Notes 24 - KitchenAid KSGB900ESS | Owners Manual 1 - Page 25
Guide d'utilisation Cuisinière à gaz MERCI d'avoir acheté ce produit de grande qualité. Enregistrez la cuisinière sur www.kitchenaid.com. Au Canada, enregistrer la table de cuisson sur www.kitchenaid.ca. Pour référence ultérieure, consignez par écrit les numéros de modèle et de série de votre - KitchenAid KSGB900ESS | Owners Manual 1 - Page 26
produire en cas de non-respect des instructions. AVERTISSEMENT : Si les renseignements dans ces instructions ne sont pas exactement observés, un entretien doivent être effectués par un installateur qualifié, une agence de service ou le fournisseur de gaz. AVERTISSEMENT : L'odorat ne permet pas - KitchenAid KSGB900ESS | Owners Manual 1 - Page 27
La bride antibasculement Dans des conditions de service normales, la cuisinière ne bascule pas. Elle rement une grille avec des matériaux tels que du papier d'aluminium. Le non-respect de cette instruction empêche la circulation de l'air dans le four et peut entraîner une intoxication au monoxyde de - KitchenAid KSGB900ESS | Owners Manual 1 - Page 28
que les méthodes d'autonettoyage traditionnelles, essuyer simplement l'eau restante et les salissures décollées. Voir la section "Programme de nettoyage" pour des instructions plus détaillées. Pour plus d'informations, des réponses aux questions fréquentes et des vidéos consacrées à la technologie - KitchenAid KSGB900ESS | Owners Manual 1 - Page 29
d'aide des produits de notre site Internet www.kitchenaid.ca. AVERTISSEMENT Risque d'empoisonnement alimentaire Ne pas laisser des aliments reposer plus d'une heure avant ou après la cuisson. Le non-respect de cette instruction peut causer un empoisonnement alimentaire ou une maladie. Touche - KitchenAid KSGB900ESS | Owners Manual 1 - Page 30
CONVECT BAKE (cuisson au four par convection facile) Caractéristique Instructions Cuisson au four et rôtissage 1. Appuyer sur BAKE (cuisson au informations. Maintien au chaud Les aliments doivent être à la température de service avant d'être placés dans le four chaud. 1. Appuyer sur KEEP WARM - KitchenAid KSGB900ESS | Owners Manual 1 - Page 31
différée Tiroir de cuisson Tiroir de cuisson lente Tiroir-réchaud Instructions 1. Appuyer sur EASY CONVECT BROIL (cuisson au gril par inférieur) après avoir terminé. Les aliments doivent être à la température de service avant d'être placés dans le four chaud. 1. Appuyer sur BAKING DRAWER KEEP WARM - KitchenAid KSGB900ESS | Owners Manual 1 - Page 32
Aqualift) START (Hold 3 sec) (mise en marche [appuyer pendant 3 secondes]) CLOCK/TOOLS (horloge/outils) Caractéristique Programme de nettoyage Instructions Voir la section "Programme de nettoyage". Verrouillage des commandes du four Économie d'énergie 1. Vérifier que le four est OFF (éteint - KitchenAid KSGB900ESS | Owners Manual 1 - Page 33
Fahrenheit et Celsius Le four est préréglé pour un affichage de la température en degrés Fahrenheit, mais on peut le permuter en degrés Celsius. 1. Appuyer sur CLOCK/TOOLS (réglages/outils) jusqu'à afficher "TEMP UNIT" (unité de température). 2. Le réglage en cours s'affiche. 3. Appuyer sur la - KitchenAid KSGB900ESS | Owners Manual 1 - Page 34
pas dépasser le bord du récipient de cuisson. Fermer tous les réglages lorsque la cuisson est terminée. Le non-respect de ces instructions peut causer un décès ou un incendie. Des allumeurs électriques allument automatiquement les brûleurs de surface lorsque les boutons de commande sont tourn - KitchenAid KSGB900ESS | Owners Manual 1 - Page 35
Ouverture du tube d'arrivée de gaz : Pour que la flamme s'allume convenablement, il faut que le gaz puisse passer librement à travers l'orifice. Garder cette zone propre et ne pas laisser les produits renversés, les aliments, les agents de nettoyage ou tout autre produit pénétrer dans l'ouverture du - KitchenAid KSGB900ESS | Owners Manual 1 - Page 36
de la plaque à frire : 1. Laisser la plaque à frire refroidir, puis vider le plateau ramassegouttes. 2. Voir la section "Nettoyage général" pour les instructions de nettoyage. 3. Conserver la plaque à frire dans un lieu sec et frais. Ustensiles de cuisson IMPORTANT : Ne pas laisser d'ustensile de - KitchenAid KSGB900ESS | Owners Manual 1 - Page 37
hors de la zone de cuisson. Utiliser le tableau suivant comme guide pour les caractéristiques du matériau d'ustensile de cuisson. de cuisson en cas de surchauffe du matériau. Terre cuite ■ Suivre les instructions du fabricant. ■ Utiliser des réglages de température basse. ■ Peut érafler - KitchenAid KSGB900ESS | Owners Manual 1 - Page 38
déplacer une grille, la tirer jusqu'à la butée, soulever l'avant puis la retirer. Se servir de l'illustration et du tableau suivants comme guide. 7 6 5 4 3 2 1 A B A. Bordures de grille en position 3 B. Aliments en position 2 IMPORTANT : Ces positions de grille concernent les grilles plates. En cas - KitchenAid KSGB900ESS | Owners Manual 1 - Page 39
Grille déployante Cette grille déployante offre un accès facile à l'utilisateur pour le positionnement et le retrait des aliments. Il n'est pas conseillé d'utiliser la grille déployante à la position supérieure (position 7) ou à la position inférieure (position 1). Position déployée 3. Abaisser l' - KitchenAid KSGB900ESS | Owners Manual 1 - Page 40
Évent du four Cuisson au four et rôtissage A A. Évent du four L'évent du four permet l'évacuation de l'air chaud et de l'humidité du four et ne doit pas être obstrué ou couvert. Le fait d'obstruer ou de couvrir l'évent nuit à la circulation adéquate de l'air et affecte les résultats de cuisson et - KitchenAid KSGB900ESS | Owners Manual 1 - Page 41
pas utiliser la conversion EasyConvect™, utiliser le tableau suivant comme guide. Mode de convection Cuisson au four par convection Rôtissage pare la pâte pour la cuisson en activant la levure. Suivre les instructions de la recette comme guide. La levée doit être utilisée pour les pâtes fraîches, - KitchenAid KSGB900ESS | Owners Manual 1 - Page 42
empoisonnement alimentaire Ne pas laisser des aliments dans un four plus d'une heure avant ou après la cuisson. Le non-respect de cette instruction peut causer un empoisonnement alimentaire ou une maladie. L'usage du tiroir de cuisson est hautement recommandé pour cuire les aliments surgelés au four - KitchenAid KSGB900ESS | Owners Manual 1 - Page 43
terminé. 8. Retirer les aliments du tiroir de cuisson. Maintien au chaud avec le tiroir de cuisson : Les aliments doivent être à la température de service avant d'être placés dans le tiroir chaud. 1. Placer les aliments dans le tiroir de cuisson. 2. Appuyer sur BAKING DRAWER KEEP WARM (maintien au - KitchenAid KSGB900ESS | Owners Manual 1 - Page 44
ENTRETIEN DE LA CUISINIÉRE Programme d'autonettoyage La technologie AquaLift® est une solution de nettoyage novatrice qui utilise la chaleur et l'eau pour débarrasser le four des produits renversés cuits en moins d'une heure. Cette nouvelle technologie de nettoyage est une alternative à basse tempé - KitchenAid KSGB900ESS | Owners Manual 1 - Page 45
table de cuisson sont froids. Toujours suivre les instructions figurant sur les étiquettes des produits de nettoyage. Pour plus d'informations, consulter la section service à la clientèle à l'adresse www.kitchenaid.com. Au Canada, consulter notre site Web www.kitchenaid.ca. Du savon, de l'eau et un - KitchenAid KSGB900ESS | Owners Manual 1 - Page 46
Méthode de nettoyage : ■ Savon et eau : Tirer les boutons en ligne droite hors du tableau de commande pour les enlever. PLAQUE À FRIRE Pour éviter d'endommager la surface antiadhésive, ne pas utiliser un tampon de laine d'acier ou des nettoyants abrasifs. Méthode de nettoyage : ■ Détergent doux ■ - KitchenAid KSGB900ESS | Owners Manual 1 - Page 47
visiter le site Internet http://www.kitchenaid.com/customer-service. Au Canada, visiter le site Internet http://www.kitchenaid.ca. Vous pouvez adresser tous Ne pas utiliser un câble de rallonge. Le non-respect de ces instructions peut causer un décès, un incendie ou un choc électrique. Problème - KitchenAid KSGB900ESS | Owners Manual 1 - Page 48
utilise du gaz propane, contacter un technicien de service ou consulter la "Garantie" pour des renseignements de de touche "Clock" (horloge) à la section "Guide des caractéristiques". Code d'erreur (l'afficheur indique de la cuisinière. Voir les Instructions d'installation. Utiliser un chiffon imbibé - KitchenAid KSGB900ESS | Owners Manual 1 - Page 49
La cuisinière n'est pas d'aplomb - Régler l'aplomb de la cuisinière. Voir les instructions d'installation. Le réglage de la température était incorrect - Revérifier la recette dans du gaz propane, contacter un technicien de service ou consulter la "Garantie" pour des renseignements de contact. 49 - KitchenAid KSGB900ESS | Owners Manual 1 - Page 50
-1230. Au Canada, visitez notre site Web à l'adresse www.kitchenaid.ca ou appelez-nous au 1-800-807-6777. Ensemble d'entretien de déployante Commander la pièce numéro W10554008 Grille d'étuvage du four Grille - Service intense, cuisson au four vapeur - Commander la pièce numéro W10554007 Ensemble - KitchenAid KSGB900ESS | Owners Manual 1 - Page 51
Remarques 51 - KitchenAid KSGB900ESS | Owners Manual 1 - Page 52
W11341324A ®/™ ©2020 All rights reserved. Used under license in Canada. Tous droits reserves. Utilise sous licence au Canada. 05/20
-
 1
1 -
 2
2 -
 3
3 -
 4
4 -
 5
5 -
 6
6 -
 7
7 -
8
-
9
-
10
-
11
-
12
-
13
-
14
-
15
-
16
-
17
-
18
-
19
-
20
-
21
-
22
-
23
-
24
-
25
-
26
-
27
-
28
-
29
-
30
-
31
-
32
-
33
-
34
-
35
-
36
-
37
-
38
-
39
-
40
-
41
-
42
-
43
-
44
-
45
-
46
-
47
-
48
-
49
-
50
-
51
-
52
 |
 |

THANK YOU for purchasing this high-quality product. Register your range at
www.kitchenaid.com
. In Canada, register your range
at
www.kitchenaid.ca
.
For future reference, please make a note of your product model and serial numbers. These can be found on the label located on the oven
frame behind the top-right side of the oven door.
Model Number______________________________________________
Serial Number_______________________________________________
Table of Contents
W11341324A
RANGE SAFETY
.............................................................................
2
The Anti-Tip Bracket
....................................................................
3
KEY USAGE TIPS
...........................................................................
4
AquaLift
®
Self-Cleaning Technology
............................................
4
Surface Temperatures
..................................................................
4
Preheating
....................................................................................
4
Surface Burners
...........................................................................
4
FEATURE GUIDE
............................................................................
5
Electronic Oven Controls
.............................................................
8
COOKTOP
.....................................................................................
10
Surface Burners
.........................................................................
10
Surface Grates
...........................................................................
11
Burner Size
.................................................................................
11
Griddle
........................................................................................
12
Cookware
...................................................................................
12
Home Canning
...........................................................................
13
OVEN
.............................................................................................
13
Aluminum Foil
.............................................................................
13
Positioning Racks and Bakeware
..............................................
13
Roll-Out Rack
.............................................................................
14
Oven Vent
...................................................................................
14
Sabbath Mode
............................................................................
15
Baking and Roasting
..................................................................
15
Broiling
........................................................................................
15
Convection Cooking
..................................................................
16
Proofing Bread
...........................................................................
16
Cook Time
..................................................................................
16
Baking Drawer
............................................................................
17
Oven Light
..................................................................................
17
RANGE CARE
...............................................................................
18
Clean Cycle
................................................................................
18
General Cleaning
........................................................................
19
Remove/Replace Drawer
...........................................................
20
TROUBLESHOOTING
..................................................................
21
ACCESSORIES
.............................................................................
23
User Guide
Gas Range