KitchenAid KSGG700ESS Owners Manual
KitchenAid KSGG700ESS Manual
 |
View all KitchenAid KSGG700ESS manuals
Add to My Manuals
Save this manual to your list of manuals |
KitchenAid KSGG700ESS manual content summary:
- KitchenAid KSGG700ESS | Owners Manual - Page 1
User Guide Gas Range THANK YOU for purchasing this high-quality product. Register your range at www.kitchenaid.com. In Canada, register your range at www.kitchenaid.ca. 17 RANGE CARE 18 Clean Cycle 18 General Cleaning 19 Remove/Replace Drawer 20 TROUBLESHOOTING 21 ACCESSORIES 23 WARRANTY - KitchenAid KSGG700ESS | Owners Manual - Page 2
RANGE SAFETY Your safety and the safety of others are very important. We have provided many important safety messages in this manual and instructions. • If you cannot reach your gas supplier, call the fire department. - Installation and service must be performed by a qualified installer, service - KitchenAid KSGG700ESS | Owners Manual - Page 3
range back so rear range foot is under anti-tip bracket. • See installation instructions for details. IMPORTANT SAFETY INSTRUCTIONS servicing. I Injuries may result from the misuse of appliance doors or drawers such as stepping, leaning, or sitting on the doors or drawers. I Maintenance - Keep range - KitchenAid KSGG700ESS | Owners Manual - Page 4
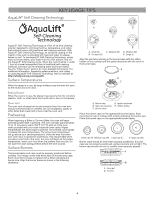
. See the "Clean Cycle" section for more detailed instructions. For additional information, frequently asked questions, and videos on Burners The burner bases and caps must be properly positioned before cooking. Your range comes with three sizes of burners and caps. Each round burner base is marked - KitchenAid KSGG700ESS | Owners Manual - Page 5
FEATURE GUIDE This manual covers several models. Your model may have some or all of the items listed. Refer to this manual or the Product Help section of our website at www.kitchenaid.com for more detailed instructions. In Canada, refer to the Product Help Section at www.kitchenaid.ca. WARNING Food - KitchenAid KSGG700ESS | Owners Manual - Page 6
bread Hold warm Convection cooking Convection cooking Instructions 1. Insert the steam rack with Press CANCEL UPPER when finished. NOTE: Let oven cool before removing and emptying water reservoir. 1. Press time for convection baking. Press "2" to manually convert the temperature and time. 3. Press - KitchenAid KSGG700ESS | Owners Manual - Page 7
Slow cook drawer Warming drawer Clean cycle Instructions 1. Press EASY CONVECT ROAST. 2. and time for convection baking. Press "2" to manually convert the temperature and time. 3. Press the the time of day. If Energy Save is ON, the range will go into Sleep mode after 5 minutes of inactivity. Any - KitchenAid KSGG700ESS | Owners Manual - Page 8
When the oven is not in use, the time of day is displayed. If the range is in Energy Save mode, the display will be blank when not in use. display the time of day. 5. The clock will reappear in the display and the range can be operated as usual. Settings Many features of the oven control can be - KitchenAid KSGG700ESS | Owners Manual - Page 9
off as needed to provide consistent temperature but may run slightly hot or cool at any point in time due to this cycling. Most thermometers are or press the "6" keypad to decrease the temperature in 5°F (3°C) increments. The offset range is from -30°F to +30°F (-18°C to +18°C). 4. Press START or - KitchenAid KSGG700ESS | Owners Manual - Page 10
not cooking. Failure to follow these instructions can result in death or fire. (high) and L (low). REMEMBER: When range is in use, the entire cooktop area may , the surface burners can be lit manually. Hold a lit match near a controls are off and the cooktop is cool. Do not use oven cleaners, bleach, - KitchenAid KSGG700ESS | Owners Manual - Page 11
If the burner still does not light, turn off the burner. Do not service the burner yourself. Contact a trained repair specialist. Surface Grates The grates must the proper position, the grates should be flush and level. Improper installation of the grates may result in chipping or scratching of the - KitchenAid KSGG700ESS | Owners Manual - Page 12
Griddle: 1. Let the griddle cool, and then empty the drip tray. 2. See the "General Cleaning" section for cleaning instructions. 3. Store griddle in a cool and the cookware. Use the following chart as a guide for cookware material characteristics. Cookware Characteristics Aluminum ■■ Heats - KitchenAid KSGG700ESS | Owners Manual - Page 13
burners between batches. This allows time for the most recently used areas to cool. ■■ Center the canner on the grate above the burner. ■■ Do , raise the front edge, and then lift out. Use the following illustration and charts as guides. 7 6 5 4 3 2 1 The oven has 7 positions for a flat rack, - KitchenAid KSGG700ESS | Owners Manual - Page 14
the "V" cutouts. Push the rack assembly into the oven until it stops at the ladder in the back of the oven. AB C D A. "V" cutout B. Rack guides C. Ladder hook D. Ladder 4. Reach through the rack to hold the sliding rack and the front crossbar. Lift the front of the rack assembly, and then - KitchenAid KSGG700ESS | Owners Manual - Page 15
Mode Is Running): 1. Press the number keypad as instructed by the scrolling text to select the new temperature. and off in intervals. On convection range models, the fan will run while preheating and may reservoir. This is normal. Wait for the oven to cool and discard the water. A B A. Steam rack - KitchenAid KSGG700ESS | Owners Manual - Page 16
the cycle. If the oven door is opened during convection cooking, the fan will turn off immediately. It will come back on when the oven shortening. Place on rack guide 2 and close the oven door. NOTE: If the temperature of the oven is greater than 120°F (49°C), "Oven Cooling" will be displayed until - KitchenAid KSGG700ESS | Owners Manual - Page 17
The oven light is a standard 40-watt appliance bulb. Before replacing, make sure the oven and cooktop are cool and the control knobs are in the Off position. To Replace: 1. Unplug range or disconnect power. 2. Turn the glass bulb cover in the back of the oven counterclockwise to remove. 3. Turn - KitchenAid KSGG700ESS | Owners Manual - Page 18
Oven Cooling" will appear in the display and the Clean cycle will not be activated until the oven cavity cools down surface of the oven interior. NOTES: ■■ The range should be level to ensure that the entire Cleaning Kits may be obtained by ordering Part Number W10423113RP. See the "Accessories" - KitchenAid KSGG700ESS | Owners Manual - Page 19
sure all controls are OFF and the oven and cooktop are cool. Always follow label instructions on cleaning products. For additional information, you can visit our website at www.kitchenaid.com. In Canada, visit our website at www.kitchenaid.ca. Soap, water, and a soft cloth or sponge are suggested - KitchenAid KSGG700ESS | Owners Manual - Page 20
. ■■ affresh® Kitchen and Appliance Cleaner Part Number W10355010 (not included): See the light coating of vegetable oil applied to the rack guides will help them slide. ■■ Dishwasher (steam rack the baking drawer, and then allow the range to cool completely before attempting to remove the drawer. - KitchenAid KSGG700ESS | Owners Manual - Page 21
is tripped - Replace the fuse or reset the circuit breaker. If the problem continues, call an electrician. Main or regulator gas shut-off valve is in the OFF position - See the Installation Instructions. The range is improperly connected to the gas supply - Contact a trained repair specialist or - KitchenAid KSGG700ESS | Owners Manual - Page 22
a cloth soaked with vinegar. Then use a cloth dampened with water to thoroughly remove any vinegar residue. Range is not level - Level the range. See the Installation Instructions. The set temperature was incorrect - Double-check the recipe in a reliable cookbook. Oven temperature needs adjustment - KitchenAid KSGG700ESS | Owners Manual - Page 23
or Broil burner is igniting - This is normal. Range converted improperly - If propane gas is being used, contact a service technician or see "Warranty" for contact information. ACCESSORIES For accessories in the U.S.A., you can visit our website at www.kitchenaid.com or call us at 1-800-422-1230 - KitchenAid KSGG700ESS | Owners Manual - Page 24
a few minutes to review the Troubleshooting or Problem Solver section of the Use and Care Guide, scan the QR code on the right to access additional resources, or visit http://kitchenaid.custhelp.com. 2. All warranty service is provided exclusively by our authorized KitchenAid Service Providers. In - KitchenAid KSGG700ESS | Owners Manual - Page 25
Guide d'utilisation Cuisinière à gaz MERCI d'avoir acheté ce produit de grande qualité. Enregistrez la cuisinière sur www.kitchenaid.com. Au Canada, enregistrer la table de cuisson sur www.kitchenaid. général 45 Dépose et réinstallation du tiroir 46 DÉPANNAGE 47 ACCESSOIRES 50 GARANTIE 51 25 - KitchenAid KSGG700ESS | Owners Manual - Page 26
de gaz à partir du téléphone d'un voisin. Suivre ses instructions. • À défaut de joindre votre fournisseur de gaz, appeler les pompiers. - L'installation et l'entretien doivent être effectués par un installateur qualifié, une agence de service ou le fournisseur de gaz. AVERTISSEMENT : L'odorat ne - KitchenAid KSGG700ESS | Owners Manual - Page 27
La bride antibasculement Dans les conditions de service normales, la cuisinière ne bascule la cuisinière se trouve sous la bride antibasculement. • Voir les instructions d'installation pour plus de détails. IMPORTANTES INSTRUCTIONS DE SÉCURITÉ AVERTISSEMENT : Pour réduire le risque d'incendie, de - KitchenAid KSGG700ESS | Owners Manual - Page 28
décollées. Voir la section "Programme de nettoyage" pour des instructions plus détaillées. Pour plus d'informations, des réponses aux placé doit être horizontal. Si les chapeaux de brûleurs ne sont pas correctement installés, les brûleurs de surface ne s'allumeront pas. Le chapeau de brûleur ne - KitchenAid KSGG700ESS | Owners Manual - Page 29
d'aide des produits de notre site Internet www.kitchenaid.ca. AVERTISSEMENT Risque d'empoisonnement alimentaire Ne pas laisser des aliments reposer plus d'une heure avant ou après la cuisson. Le non-respect de cette instruction peut causer un empoisonnement alimentaire ou une maladie. Touche - KitchenAid KSGG700ESS | Owners Manual - Page 30
EASY CONVECT BAKE (cuisson au four par convection facile) Caractéristique Instructions Cuisson au four et rôtissage 1. Appuyer sur BAKE (cuisson au four . Maintien au chaud Les aliments doivent être à la température de service avant d'être placés dans le four chaud. 1. Appuyer sur KEEP WARM - KitchenAid KSGG700ESS | Owners Manual - Page 31
différée Tiroir de cuisson Tiroir de cuisson lente Tiroir-réchaud Instructions 1. Appuyer sur EASY CONVECT BROIL (cuisson au gril par inférieur) après avoir terminé. Les aliments doivent être à la température de service avant d'être placés dans le four chaud. 1. Appuyer sur BAKING DRAWER KEEP WARM - KitchenAid KSGG700ESS | Owners Manual - Page 32
Aqualift) START (Hold 3 Sec) (mise en marche [appuyer pendant 3 secondes]) CLOCK/TOOLS (horloge/outils) Caractéristique Programme de nettoyage Instructions Voir la section "Programme de nettoyage". Verrouillage des commandes du four Économie d'énergie 1. Vérifier que le four est OFF (éteint - KitchenAid KSGG700ESS | Owners Manual - Page 33
Fahrenheit et Celsius Le four est préréglé pour un affichage de la température en degrés Fahrenheit, mais on peut le permuter en degrés Celsius. 1. Appuyer sur CLOCK/TOOLS (réglages/outils) jusqu'à afficher "TEMP UNIT" (unité de température). 2. Le réglage en cours s'affiche. 3. Appuyer sur la - KitchenAid KSGG700ESS | Owners Manual - Page 34
ne devrait pas dépasser le bord du récipient de cuisson. Fermer tous les réglages lorsque la cuisson est terminée. Le non-respect de ces instructions peut causer un décès ou un incendie. Brûleurs de surface IMPORTANT : Ne pas entraver l'évacuation de l'air de combustion et de ventilation autour des - KitchenAid KSGG700ESS | Owners Manual - Page 35
brûleur a besoin d'être ajusté, contacter un technicien de réparation qualifié. 5. Réinstaller le chapeau du brûleur et s'assurer qu'il est bien aligné avec la base de la grille avec les indentations sur la table de cuisson. 4. Réinstaller la base du brûleur. Chaque base de brûleur rond est marqu - KitchenAid KSGG700ESS | Owners Manual - Page 36
de cuisson de grande taille ■■ Le brûleur le plus puissant Plaque à frire installée sur le côté droit de la table de cuisson Utilisation de la plaque à plateau ramassegouttes. 2. Voir la section "Nettoyage général" pour les instructions de nettoyage. 3. Conserver la plaque à frire dans un lieu sec - KitchenAid KSGG700ESS | Owners Manual - Page 37
hors de la zone de cuisson. Utiliser le tableau suivant comme guide pour les caractéristiques du matériau d'ustensile de cuisson. Ustensile de cuisson en cas de surchauffe du matériau. Terre cuite ■■ Suivre les instructions du fabricant. ■■ Utiliser des réglages de température basse. ■■ Peut é - KitchenAid KSGG700ESS | Owners Manual - Page 38
déplacer une grille, la tirer jusqu'à la butée, soulever l'avant puis la retirer. Se servir de l'illustration et du tableau suivants comme guide. 7 6 5 4 3 2 1 A B A. Bordures de grille en position 3 B. Aliments en position 2 IMPORTANT : Ces positions de grille concernent les grilles plates. En cas - KitchenAid KSGG700ESS | Owners Manual - Page 39
Grille déployante Cette grille déployante offre un accès facile à l'utilisateur pour le positionnement et le retrait des aliments. Il n'est pas conseillé d'utiliser la grille déployante à la position supérieure (position 7) ou à la position inférieure (position 1). Position déployée 3. Abaisser l' - KitchenAid KSGG700ESS | Owners Manual - Page 40
Évent du four Cuisson au four et rôtissage A A. Évent du four L'évent du four permet l'évacuation de l'air chaud et de l'humidité du four et ne doit pas être obstrué ou couvert. Le fait d'obstruer ou de couvrir l'évent nuit à la circulation adéquate de l'air et affecte les résultats de cuisson et - KitchenAid KSGG700ESS | Owners Manual - Page 41
te pour la cuisson en activant la levure. Suivre les instructions de la recette comme guide. La levée doit être utilisée pour les pâtes : Si la température du four est supérieure à 120°F (49°C), "Oven Cooling" (refroidissement four) s'affiche jusqu'à ce que la température soit inférieure à 120 - KitchenAid KSGG700ESS | Owners Manual - Page 42
viande et de la volaille. Cette sonde de cuisson fonctionne de manière indépendante et n'est pas raccordée aux commandes du four. Suivre les instructions de la sonde de cuisson pour l'emploi d'une sonde de cuisson. Afin d'éviter d'endommager la sonde de cuisson, ne pas la laisser dans les fours - KitchenAid KSGG700ESS | Owners Manual - Page 43
terminé. 8. Retirer les aliments du tiroir de cuisson. Maintien au chaud avec le tiroir de cuisson : Les aliments doivent être à la température de service avant d'être placés dans le tiroir chaud. 1. Placer les aliments dans le tiroir de cuisson. 2. Appuyer sur BAKING DRAWER KEEP WARM (maintien au - KitchenAid KSGG700ESS | Owners Manual - Page 44
ambiante avant d'utiliser le programme d'autonettoyage. Si la température de la cavité du four est supérieure à 200°F (93°C), "Oven Cooling" (refroidissement du four) apparaît sur l'afficheur et le programme d'autonettoyage ne s'activera pas avant que la cavité ait refroidi. Nettoyage : 1. Retirer - KitchenAid KSGG700ESS | Owners Manual - Page 45
instructions figurant sur les étiquettes des produits de nettoyage. Pour plus d'informations, consulter la section service à la clientèle à l'adresse www.kitchenaid.com. Au Canada, consulter notre site Web www.kitchenaid les ustensiles en fonte. Ne pas réinstaller les chapeaux sur les brûleurs lorsqu - KitchenAid KSGG700ESS | Owners Manual - Page 46
2 pour l'autre côté. Le tiroir n'est plus fixé aux glissières de tiroir. Avec les deux mains, saisir le tiroir pour le retirer complètement. Réinstallation : 1. Aligner les encoches de l'avant du tiroir avec les encoches des glissières latérales à l'intérieur du tiroir (de chaque côté). Placer les - KitchenAid KSGG700ESS | Owners Manual - Page 47
Internet http://kitchenaid.custhelp.com. Au Canada, visiter le site Internet http://www.kitchenaid.ca. gaz est à la position fermée - Voir les Instructions d'installation. La cuisinière n'est pas adéquatement branch gaz propane, contacter un technicien de service ou consulter la section "Garantie" - KitchenAid KSGG700ESS | Owners Manual - Page 48
du gaz propane, contacter un technicien de service ou consulter la section "Garantie" pour des de touche "Clock" (horloge) à la section "Guide des caractéristiques". Code d'erreur (l'afficheur indique une de la cuisinière. Voir les Instructions d'installation. Utiliser un chiffon imbibé de - KitchenAid KSGG700ESS | Owners Manual - Page 49
cuisinière n'est pas d'aplomb - Régler l'aplomb de la cuisinière. Voir les instructions d'installation. Le réglage de la température était incorrect - Revérifier la recette dans un propane, contacter un technicien de service ou consulter la section "Garantie" pour des renseignements de contact. 49 - KitchenAid KSGG700ESS | Owners Manual - Page 50
-1230. Au Canada, visitez notre site Web à l'adresse www.kitchenaid.ca ou appelez-nous au 1-800-807-6777. Ensemble d'entretien de déployante Commander la pièce numéro W10554008 Grille d'étuvage du four Grille - Service intense, cuisson au four vapeur - Commander la pièce numéro W10554007 Ensemble - KitchenAid KSGG700ESS | Owners Manual - Page 51
CE QUI N'EST PAS COUVERT Pendant un an à compter de la date d'achat, lorsque ce gros appareil ménager est installé, utilisé et entretenu conformément aux instructions jointes à ou fournies avec le produit, la marque KitchenAid de Whirlpool Corporation ou Whirlpool Canada, LP (ci-après désignées - KitchenAid KSGG700ESS | Owners Manual - Page 52
W10896670A ®/™ © 2016. Used under license in Canada. All rights reserved. SP PN W10898305 Utilisé sous licence au Canada. Tous droits réservés. 6/16
-
 1
1 -
 2
2 -
 3
3 -
 4
4 -
 5
5 -
 6
6 -
 7
7 -
8
-
9
-
10
-
11
-
12
-
13
-
14
-
15
-
16
-
17
-
18
-
19
-
20
-
21
-
22
-
23
-
24
-
25
-
26
-
27
-
28
-
29
-
30
-
31
-
32
-
33
-
34
-
35
-
36
-
37
-
38
-
39
-
40
-
41
-
42
-
43
-
44
-
45
-
46
-
47
-
48
-
49
-
50
-
51
-
52
 |
 |
THANK YOU for purchasing this high-quality product. Register your range at
www.kitchenaid.com
. In Canada, register your range
at
www.kitchenaid.ca
.
For future reference, please make a note of your product model and serial numbers. These can be found on the label located on the oven
frame behind the top-right side of the oven door.
Model Number______________________________________________
Serial Number_______________________________________________
Para una versión de estas instrucciones en español, visite
www.kitchenaid.com
.
Deberá tener a mano el número de modelo y de serie, que están ubicados en el marco del horno, detrás del lado derecho superior
de la puerta del horno.
Table of Contents
W10896670A
RANGE SAFETY
.............................................................................
2
The Anti-Tip Bracket
....................................................................
3
KEY USAGE TIPS
...........................................................................
4
AquaLift
®
Self-Cleaning Technology
............................................
4
Surface Temperatures
..................................................................
4
Preheating
....................................................................................
4
Surface Burners
...........................................................................
4
FEATURE GUIDE
............................................................................
5
Electronic Oven Controls
.............................................................
8
COOKTOP
.....................................................................................
10
Surface Burners
.........................................................................
10
Surface Grates
...........................................................................
11
Burner Size
.................................................................................
11
Griddle
........................................................................................
12
Cookware
...................................................................................
12
Home Canning
...........................................................................
13
OVEN
.............................................................................................
13
Aluminum Foil
.............................................................................
13
Positioning Racks and Bakeware
..............................................
13
Roll-Out Rack
.............................................................................
14
Oven Vent
...................................................................................
14
Sabbath Mode
............................................................................
15
Baking and Roasting
..................................................................
15
Broiling
........................................................................................
15
Convection Cooking
..................................................................
16
Proofing Bread
...........................................................................
16
Cook Time
..................................................................................
16
Meat Probe
.................................................................................
17
Baking Drawer
............................................................................
17
Oven Light
..................................................................................
17
RANGE CARE
...............................................................................
18
Clean Cycle
................................................................................
18
General Cleaning
........................................................................
19
Remove/Replace Drawer
...........................................................
20
TROUBLESHOOTING
..................................................................
21
ACCESSORIES
.............................................................................
23
WARRANTY
..................................................................................
24
User Guide
Gas Range