KitchenAid KUDE60FXSS Use & Care Guide
KitchenAid KUDE60FXSS Manual
 |
UPC - 883049195957
View all KitchenAid KUDE60FXSS manuals
Add to My Manuals
Save this manual to your list of manuals |
KitchenAid KUDE60FXSS manual content summary:
- KitchenAid KUDE60FXSS | Use & Care Guide - Page 1
. These instructions include a "Troubleshooting" section to help you through any problems you may encounter. For additional information, you can visit the Frequently Asked Questions (FAQs) section of our website at www.kitchenaid.com. If you need further assistance using your KitchenAid dishwasher - KitchenAid KUDE60FXSS | Use & Care Guide - Page 2
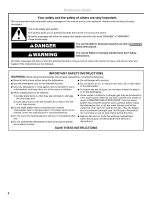
. ■ Do not touch the heating element during or immediately after use. ■ Do not operate the dishwasher unless all enclosure panels are properly in place. ■ Remove the door or lid to the washing compartment when removing an old dishwasher from service or discarding it. SAVE THESE INSTRUCTIONS 2 - KitchenAid KUDE60FXSS | Use & Care Guide - Page 3
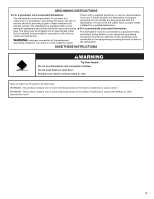
be run with the circuit conductors and connected to the equipment-grounding terminal or lead on the dishwasher. SAVE THESE INSTRUCTIONS WARNING Tip Over Hazard Do not use dishwasher until completely installed. Do not push down on open door. Doing so can result in serious injury or cuts. State - KitchenAid KUDE60FXSS | Use & Care Guide - Page 4
level wash Parts and Features ProScrub® (on some models) powerful jets target water toward pots, pans, or casserole dishes loaded in the back of the dishwasher to clean stubborn messes. Water feed tube Model and serial number label Water inlet opening Heating element Rinse aid dispenser reduces - KitchenAid KUDE60FXSS | Use & Care Guide - Page 5
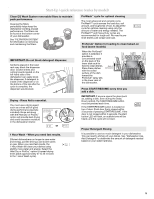
to clean baked-on food (some models) When the ProScrub® option is selected, it provides a concentrated wash on the back of the lower dish rack for hard-to-clean dishes. Place these dishes with the soiled surface of the dish toward the ProScrub® spray jets in the lower rack of the dishwasher. Back - KitchenAid KUDE60FXSS | Use & Care Guide - Page 6
Add detergent for cleaning and rinse aid for drying. 4 Start dishwasher. NOTE: If the START/RESUME button is located on the top of door, push door firmly closed within 3 seconds of pressing START/ RESUME. Dishwasher Use STEP 1 Prepare and Load the Dishwasher IMPORTANT: Remove leftover food, bones - KitchenAid KUDE60FXSS | Use & Care Guide - Page 7
Hard Water Soft Water instructions on the package when using other dishwasher Main Wash Pre-Wash detergent types. Premeasured forms are suitable for all hardness and soil levels. Always place premeasured detergents in the main compartment and close the lid. Add Rinse Aid ■ Your dishwasher - KitchenAid KUDE60FXSS | Use & Care Guide - Page 8
different models. Your dishwasher may and energy needed. Heavy 125 190 Use for hard-to-clean, heavily soiled pots, pans, Light to Medium 130 dishwasher. Increase in time results from low temperature of the incoming water. OPTION SELECTIONS OPTIONS Cleans pans, casseroles, etc., with tough food - KitchenAid KUDE60FXSS | Use & Care Guide - Page 9
184 for Residential Dishwashers. Certified residential dishwashers are not intended for licensed food establishments. The Sani the top rack to help keep the kitchen continuously clean. Dries dishes with heat and a fan. This option with the use of rinse aid will provide the best drying performance. - KitchenAid KUDE60FXSS | Use & Care Guide - Page 10
dishwasher cycle. Located on the front of the dishwasher for front control models, and located on the top of the door for hidden control models. Clean Light is blinking, see dishwasher cycle by color "Troubleshooting" section. (for hidden control models only). The Cycle Status Display - KitchenAid KUDE60FXSS | Use & Care Guide - Page 11
Dish After Dishwasher Is Started 1. Check if Add a Dish indicator is lit. (Available on some models. Otherwise, dish. 5. Press START/RESUME. Dishwasher Features Your KitchenAid dishwasher may have some or all of up, and alternate spoons, for best cleaning results. CULINARY CADDY® Utensil Basket - KitchenAid KUDE60FXSS | Use & Care Guide - Page 12
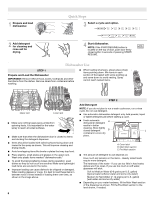
of flexible tines located in the back of the rack. Follow the same instructions to adjust. SURE-HOLD® Light Item Clips The light item clips hold lightweight rack. IMPORTANT: Remove dishes prior to removing the top rack from the dishwasher. To remove the rack: To gain access to the removable tabs on - KitchenAid KUDE60FXSS | Use & Care Guide - Page 13
position Install dishwasher, the filter will require maintenance to sustain peak cleaning performance. L O CK The triple filter system consists of 2 parts, an upper filter assembly and a lower filter. ■ The upper filter assembly keeps oversized items and foreign objects, along with very fine food - KitchenAid KUDE60FXSS | Use & Care Guide - Page 14
and effort. Very Hard Water If you have hard water (above 15 grains), clean your filter at least once per month. Building up of white residue on your dishwasher indicates hard water. For tips on removing spots and stains, see "Troubleshooting" section. Filter Removal Instructions 1. Turn the - KitchenAid KUDE60FXSS | Use & Care Guide - Page 15
"Spotting and filming on dishes" in "Troubleshooting" section. NOTE: Run a normal cycle with dishwasher detergent after cleaning the interior. Some state or local plumbing codes require the addition of a drain air gap between a built-in dishwasher and the home drain system. Check the drain air gap - KitchenAid KUDE60FXSS | Use & Care Guide - Page 16
Troubleshooting First try the solutions suggested here or visit our website and reference FAQs (Frequently Asked Questions) to possibly avoid the cost of a service call. In the U.S.A., www.kitchenaid.com In Canada, www.kitchenaid.ca PROBLEM SOLUTION DISHWASHER DOES NOT RUN NOTE: It is normal - KitchenAid KUDE60FXSS | Use & Care Guide - Page 17
(or refilling) the rinse aid. ■ Using an excessive amount of dishwasher detergent. Call for service. If no water was present in the machine at any time during a heated wash cycle, the cycle will end and the Clean LED will not come on. See "Will Not Fill" in "Troubleshooting." If the sanitized light - KitchenAid KUDE60FXSS | Use & Care Guide - Page 18
" section of the Use & Care Guide. If you are unable to resolve the problem after checking "Troubleshooting," additional help can be found by checking the "Assistance or Service" section or by calling KitchenAid. In the U.S.A., call 1-800-422-1230. In Canada, call 1-800-807-6777. 2/10 - KitchenAid KUDE60FXSS | Use & Care Guide - Page 19
Benton Harbor, MI 49022-2692 In Canada: KitchenAid Brand Home Appliances Customer eXperience Centre 200 - 6750 Century Avenue Mississauga ON L5N 0B7 Please include a daytime phone number in your correspondence. Please keep this User Instructions and model number information for future reference - KitchenAid KUDE60FXSS | Use & Care Guide - Page 20
KitchenAid®constitue pour vous une expérience positive. Pour votre commodité, nous vous fournissons un manuel d'instructions facile à utiliser. Ces instructions LAVE-VAISSELLE 2 PIÈCES ET CARACTÉRISTIQUES 4 DÉMARRAGE / GUIDE RAPIDE 5 ÉTAPES RAPIDES 6 UTILISATION DU LAVE-VAISSELLE 6 DESCRIPTION - KitchenAid KUDE60FXSS | Use & Care Guide - Page 21
et vous disent comment réduire le risque de blessure et ce qui peut se produire en cas de non-respect des instructions. IMPORTANTES INSTRUCTIONS DE SÉCURITÉ AVERTISSEMENT : Lors de l'utilisation du lave-vaisselle, suivre les précautions élémentaires dont les suivantes : ■ Lire la totalité des - KitchenAid KUDE60FXSS | Use & Care Guide - Page 22
choc électrique. Vérifier avec un électricien compétent ou un représentant de service si vous avez des doutes si le lave-vaisselle est correctement relié à la qu'il soit complètement installé. Ne pas appuyer sur la porte ouverte. Le non-respect de ces instructions peut causer des blessures graves - KitchenAid KUDE60FXSS | Use & Care Guide - Page 23
Lavage au niveau supérieur Pièces et caractéristiques Les jets puissants ProScrub® (sur certains modèles) dirigent l'eau vers les plats, poêles ou casseroles placés à l'arrière du lave-vaisselle pour décoller la saleté tenace. Tube d'arrivée d'eau Plaque signalétique des numéros de modèle et de sé - KitchenAid KUDE60FXSS | Use & Care Guide - Page 24
/ guide rapide d'un excès d'humidité à l'intérieur du lave-vaisselle. USE RINSE AID FOR Full BETTER DRYING Lock Add Refill ou L O CK Programme ProWash™ pour d'eau et d'énergie nécessaire. Les programmes ProWash™ et Heavy Duty (service intense) sont recommandés pour la saleté tenace. Il n'est pas - KitchenAid KUDE60FXSS | Use & Care Guide - Page 25
Pour l'obtention de A meilleurs résultats de lavage, il est recommandé d'utiliser un détergent à lave- B vaisselle automatique frais. Conserver le Hard Water Soft Water Hard Water Soft Water C PRE- MAIN WASH WASH récipient du détergent bien fermé dans un lieu sec et frais. A. Loquet du - KitchenAid KUDE60FXSS | Use & Care Guide - Page 26
service d'eau de la ville] Eau moyenne à dure (7 à 12 grains par gallon U.S.) [eau de puits et du service Hard Water Soft Water Hard Water Soft Water poudre standard. Lors de l'utilisation d'un autre type Lavage principal Prélavage de détergent, procéder conformément aux instructions age aide à - KitchenAid KUDE60FXSS | Use & Care Guide - Page 27
Description des programmes et options Ces renseignements couvrent plusieurs modèles différents. Votre lave-vaisselle peut ne pas comporter tous les programmes et options indiqués. SÉLECTION DE PROGRAMMES PROGRAMMES Programme le plus avancé et le plus polyvalent. ProWash™ détecte la taille de la - KitchenAid KUDE60FXSS | Use & Care Guide - Page 28
la placés à l'arrière du cuisson. panier inférieur. Augmente la température Heavy Duty Fait passer la 22 principale de lavage pour (service intense) température du améliorer le nettoyage des Normal Wash lavage principal de charges comportant des charges difficiles, (lavage normal) 105 - KitchenAid KUDE60FXSS | Use & Care Guide - Page 29
SÉLECTION D'OPTIONS OPTIONS PEUT ÊTRE SÉLECTIONNÉ AVEC DESCRIPTION DURÉE SUPPLÉMENTAIRE DU PROGRAMME NORMAL MAX CONSOMMATION SUPPLÉMENTAIRE D'EAU EN GALLONS (LITRES) Séche la vaisselle à l'air Disponible pour Active l'élément de 52 52 0 chaud. Cette option, tous les chauffage à la fin - KitchenAid KUDE60FXSS | Use & Care Guide - Page 30
. Ils sont situés à l'avant du lavevaisselle sur les modèles disposant des commandes à l'avant, et sur le dessus de la porte pour pas pu être suffisamment chauffée pour atteindre la température requise. Le voyant Clean and Sanitized (propre et assaini) s'éteint lorsque l'on ouvre et ferme la - KitchenAid KUDE60FXSS | Use & Care Guide - Page 31
fermé), on peut ajouter un plat. 5. Appuyer sur START/RESUME (mise en marche/reprise). Caractéristiques du lave-vaisselle Votre lave-vaisselle KitchenAid peut comporter toutes les caractéristiques ou seulement certaines d'entre elles. Zone de lavage ProScrub® La zone de lavage de l'option ProScrub - KitchenAid KUDE60FXSS | Use & Care Guide - Page 32
mêmes instructions. Attaches SURE-HOLD® pour articles légers Les agrafes maintiennent en place les articles légers en plastique tels que les tasses, couvercles ou bols pendant le lavage. Pour déplacer une attache : 1. Tirer l'attache vers le haut pour la séparer de la tige. 2. Réinstaller l'attache - KitchenAid KUDE60FXSS | Use & Care Guide - Page 33
en le soulevant légèrement vers le haut puis vers le l'avant. Pour réinstaller le panier : Tirer les glissières vers l'avant pour les extraire à mi dans la fente de la glissière et faire rouler le panier pour le réinstaller dans les glissières. 4. Insérer les roulettes avant du panier de chaque - KitchenAid KUDE60FXSS | Use & Care Guide - Page 34
permet d'économiser l'eau et l'énergie utilisées pour la préparation des plats. Cela vous épargne également du temps et des efforts. Eau très dure Instructions de nettoyage Si l'eau du domicile est très dure (au-delà de 15 grains), nettoyer le filtre au moins une fois par mois. L'accumulation de - KitchenAid KUDE60FXSS | Use & Care Guide - Page 35
Instructions de réinstallation du filtre 1. En s'aidant des illustrations précédentes, d'éviter d'endommager le lave-vaisselle, ne pas le faire fonctionner sans que les filtres ne soient correctement installés. S'assurer que le filtre inférieur est bien en place et que le filtre supérieur est bien - KitchenAid KUDE60FXSS | Use & Care Guide - Page 36
installation service agréé. Dépannage Essayer d'abord les solutions suggérées ici ou visiter notre site Web et consulter la FAQ (Foire aux questions) pour tenter d'éviter le coût d'une intervention de dépannage. Aux États-Unis., www.kitchenaid.com Au Canada, www.kitchenaid le témoin Clean est allum - KitchenAid KUDE60FXSS | Use & Care Guide - Page 37
séchage. (Voir les instructions spécifiques de chargement dans ce guide.) Les verres et les "). Vérifier que le programme est terminé (le témoin Clean (propre) est allumé). Si le programme n'est pas termin qu'il est bien installé. Nettoyer au besoin. (Voir les Instructions de nettoyage dans la - KitchenAid KUDE60FXSS | Use & Care Guide - Page 38
. ■ Le fait de ne pas avoir réinstallé le couvercle du distributeur d'agent de rin . (Voir les instructions spécifiques de chargement dans ce guide.) Si le programme Dans ce cas, la DEL Clean/Complete (propre/terminé) clignote autre programme. Faire un appel de service. REMARQUES : ■ Un agent de - KitchenAid KUDE60FXSS | Use & Care Guide - Page 39
éloignée où un service d'entretien autorisé KitchenAid n'est pas disponible. 10. La dépose et la réinstallation de votre gros appareil ménager si celui-ci est installé dans un endroit inaccessible ou n'est pas installé conformément aux instructions d'installation fournies par KitchenAid. 11. Les pi - KitchenAid KUDE60FXSS | Use & Care Guide - Page 40
en soumettant toute question ou problème à l'adresse cidessous : Aux É.-U. : KitchenAid Brand Home Appliances Customer eXperience Center 553 Benson Road Benton Harbor, MI 49022-2692 Au Canada : KitchenAid Brand Home Appliances Centre pour l'eXpérience de la clientèle 200 - 6750 Century Avenue
-
 1
1 -
 2
2 -
 3
3 -
 4
4 -
 5
5 -
 6
6 -
 7
7 -
8
-
9
-
10
-
11
-
12
-
13
-
14
-
15
-
16
-
17
-
18
-
19
-
20
-
21
-
22
-
23
-
24
-
25
-
26
-
27
-
28
-
29
-
30
-
31
-
32
-
33
-
34
-
35
-
36
-
37
-
38
-
39
-
40
 |
 |

Thank you for Choosing KitchenAid
®
Appliances.
We hold our company to the highest quality standards and it is important to us that you have a positive experience owning a
KitchenAid
®
product.
For your convenience, we have provided an easy to follow User Instruction Book. These instructions include a “Troubleshooting”
section to help you through any problems you may encounter.
For additional information, you can visit the Frequently Asked Questions (FAQs) section of our website at
www.kitchenaid.com
. If
you need further assistance using your KitchenAid dishwasher, please contact us at 1-800-422-1230. In Canada: visit
www.kitchenaid.ca
or call 1-800-807-6777.
Have your complete model and serial number ready. You can find your model and serial number on the label located near the door
on the right-hand or left-hand side of the dishwasher interior.
Para obtener acceso a “Instrucciones para el usuario de la lavavajillas” en español, o para obtener información adicional acerca de
su producto, visite:
www.kitchenaid.com
Tenga listo su número completo de modelo y de serie. Puede encontrar su número de modelo y de serie en la etiqueta ubicada
cerca de la puerta, al lado derecho o izquierdo del interior de la lavavajillas.
Table of Contents
DISHWASHER SAFETY
.............................................................
2
PARTS AND FEATURES
............................................................
4
START-UP / QUICK REFERENCE
............................................
5
QUICK STEPS
.............................................................................
6
DISHWASHER USE
....................................................................
6
CYCLE AND OPTION DESCRIPTIONS
....................................
8
DISHWASHER FEEDBACK SECTION
....................................
10
DISHWASHER FEATURES
......................................................
11
FILTRATION SYSTEM
..............................................................
13
DISHWASHER CARE
...............................................................
15
TROUBLESHOOTING
..............................................................
16
WARRANTY
..............................................................................
18
DISHWASHER USER INSTRUCTIONS
W10300929A