KitchenAid KUDH03DTBL Installation Instructions
KitchenAid KUDH03DTBL - ARCHITECT II 24" Dishwasher Manual
 |
UPC - 883049140728
View all KitchenAid KUDH03DTBL manuals
Add to My Manuals
Save this manual to your list of manuals |
KitchenAid KUDH03DTBL manual content summary:
- KitchenAid KUDH03DTBL | Installation Instructions - Page 1
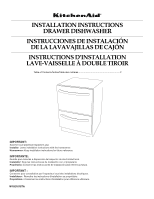
INSTRUCTIONS DRAWER DISHWASHER INSTRUCCIONES DE INSTALACIÓN DE LA LAVAVAJILLAS DE CAJÓN INSTRUCTIONS D'INSTALLATION LAVE-VAISSELLE À DOUBLE TIROIR Table of Contents/Índice/Table des matières 2 IMPORTANT: Save for local electrical inspector's use. Installer: Leave installation instructions - KitchenAid KUDH03DTBL | Installation Instructions - Page 2
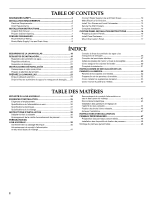
Supply Line and Drain Hoses 10 Make Electrical Connection 12 Install Trim Pieces and Level Dishwasher 13 Secure the Dish Drawers 14 Complete Installation 15 CUSTOM PANEL INSTALLATION INSTRUCTIONS 16 Preparing Custom Panels 16 Install Panel Fasteners 17 Mount the Custom Panel 17 ÍNDICE - KitchenAid KUDH03DTBL | Installation Instructions - Page 3
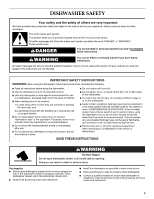
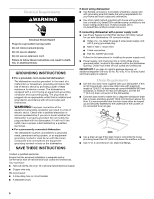
DISHWASHER SAFETY Your safety and the safety of others are very important. We have provided many important safety messages in this manual and on your appliance an old dishwasher from service or discarding it. SAVE THESE INSTRUCTIONS WARNING Tip Over Hazard Do not open dishwasher drawer until - KitchenAid KUDH03DTBL | Installation Instructions - Page 4
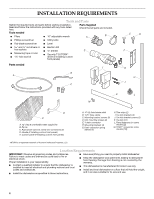
T-20 TORX®† ■ 1½" hole saw bit driver (if installing custom front panels) Parts needed I B A C C D F G H J K L M D dishwasher as specified in these instructions. ■ Have everything you need to properly install dishwasher. ■ Keep the dishwasher and water lines leading to dishwasher - KitchenAid KUDH03DTBL | Installation Instructions - Page 5
be drilled at 1½" (3.8 cm) diameter. Water Supply Requirements ■ A hot water line with 20-120 psi (138-862 kPa) water pressure. ■ 120°F (49°C) water temperature at dishwasher. ■ Flexible stainless steel braided fill line (½" minimum plastic tubing is not recommended). 5 - KitchenAid KUDH03DTBL | Installation Instructions - Page 6
Neer C-500 ⁷⁄₈" strain relief. ■ 3 wire connectors. ■ Part No. 302797 grommet. Follow the kit instructions for installing the power supply cord. ■ Power supply cord must plug into a mating three prong, grounded outlet, located in the cabinet next to the dishwasher opening. Outlet must meet all local - KitchenAid KUDH03DTBL | Installation Instructions - Page 7
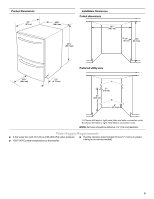
. 2. Remove shipping materials, tape and film from the dishwasher. Remove parts package from inside the dishwasher. Prepare Cabinet Opening 1. To ensure minimum clearance dimensions exist (59.7 cm) minimum width. 17" (43.2 cm) 4. Decide which dishwasher-to-counter attachment method will be used. 7 - KitchenAid KUDH03DTBL | Installation Instructions - Page 8
inside cabinet opening. Doing so can result in death or serious injury. WARNING Excessive Weight Hazard Use two or more people to move and install dishwasher. Failure to do so can result in back or other injury. 1. Measure cabinet opening height from floor to bottom of countertop. H 2. Place corner - KitchenAid KUDH03DTBL | Installation Instructions - Page 9
Water Supply Line and Drain Hose 1. Connect water supply line to water valve on dishwasher. Route wire through 1½" (3.81 cm) hole located 8" (20.32 cm) above the floor. After routing the electrical wire through the right-hand hole, attach the wire to back left-hand side of cabinet wall 8" (20.32 cm - KitchenAid KUDH03DTBL | Installation Instructions - Page 10
■ For right-hand routing, drain hoses are shipped in the correct position. Place the water supply line in the clip as shown. ■ Slide dishwasher partway into the cabinet opening. Allow for access to the electrical terminal box. Connect Water Supply Line and Drain Hoses 1. Connect water supply line - KitchenAid KUDH03DTBL | Installation Instructions - Page 11
Waste A. Drain hose connector B. Drain air gap C. Waste Option 4: No waste disposer, no drain air gap A C B A. Drain hose connector B. Cut drain connector C. Waste NOTE: Attach the drain hose connector to the water waste line using the supplied hose clamp. 6. Turn on water and check for leaks. 11 - KitchenAid KUDH03DTBL | Installation Instructions - Page 12
these instructions can result in death, fire, or electrical shock. 3. Connect wires as follows using twist-on connectors sized to connect direct wire to 16 gauge dishwasher wire. Power supply wire: Terminal box wire: white white black black ground wire ground connector 4. Attach ground - KitchenAid KUDH03DTBL | Installation Instructions - Page 13
the level on the top of the drawer. Check front to back level by placing level on the slide rails. Install Trim Pieces and Level Dishwasher 1. Open bottom drawer. 2. Push in clips and slide rails back 5" (12.7 cm). 6. Adjust legs with a socket wrench to level the - KitchenAid KUDH03DTBL | Installation Instructions - Page 14
. 11. Place flexible side trim strips on both sides as shown. 9. Place trim strip into toe kick bracket. 10. Attach toe kick bracket on the opposite side. 12. Slide the dishwasher back into position in the cabinet opening. Check to ensure that the drain hose and electrical wiring are not kinked - KitchenAid KUDH03DTBL | Installation Instructions - Page 15
and press START/RESUME. Allow the dishwasher to fill, rinse and drain. Check for leaks. If leaks are found, secure the connection and repeat this step. If you need Assistance or Service: Please reference the "Assistance or Service" section of the User Instructions or contact the dealer from whom - KitchenAid KUDH03DTBL | Installation Instructions - Page 16
CUSTOM PANEL INSTALLATION INSTRUCTIONS Custom Drawer Panels If you plan to install a custom height dimension for the custom panel(s). Panel(s) that exceed the height dimension may damage the drawer dishwasher, cabinets or countertop. ■ The width of the custom panel(s) may vary according to the - KitchenAid KUDH03DTBL | Installation Instructions - Page 17
Install Panel Fasteners 1. Remove the two panel fasteners from the face of the inner door of the upper drawer. 3. Using the screws provided, secure the custom panel to the inner door by screwing through the inner door and into the ¹⁄₈" (3.175 mm) pilot holes. 2. Screw the two panel fasteners into - KitchenAid KUDH03DTBL | Installation Instructions - Page 18
muy importante. Hemos incluido muchos mensajes importantes de seguridad en este manual y en su electrodoméstico. Lea y obedezca siempre todos los despacio el cajón de la lavavajillas mientras otra persona agarra la parte posterior de la lavavajillas. Quite el material de transporte. Cierre el - KitchenAid KUDH03DTBL | Installation Instructions - Page 19
REQUISITOS DE INSTALACIÓN Piezas y herramientas Reúna las herramientas y piezas necesarias antes de comenzar la instalación. Lea y siga las instrucciones provistas con cualquiera de las herramientas enlistadas aquí. Herramientas necesarias ■ Pinzas ■ Destornillador Phillips ■ Destornillador de - KitchenAid KUDH03DTBL | Installation Instructions - Page 20
Medidas del producto 24" (61 cm) Área de servicio preferida 23³⁄₈" (59,5 cm) 33³⁄₄" (85,7 cm) A ¹⁄₂" (1,3 cm) 25" (63,5 cm) B 8" (20,3 cm) 19¹⁄₄" (48,9 cm) 1¹⁄₂" (3,75 cm) Espacios libres para la instalación Dimensiones de corte 23¹⁄₂" (59,7 cm) 24" 33³⁄₄" (61 cm) (85,7 cm) A. Elija una - KitchenAid KUDH03DTBL | Installation Instructions - Page 21
Requisitos eléctricos ADVERTENCIA Peligro de Choque Eléctrico Conecte a un contacto de pared de conexión a tierra de 3 terminales. No quite la terminal de conexión a tierra. No use un adaptador. No use un cable eléctrico de extensión. No seguir estas instrucciones puede ocasionar la muerte, incendio - KitchenAid KUDH03DTBL | Installation Instructions - Page 22
tubería de la casa, y a un mínimo de 20" (50,8 cm) del piso. Se recomienda que la manguera de desagüe se enlace y quede asegurada firmemente a la parte inferior del mostrador, o que se conecte a una purga de aire. ■ Use una purga de aire del desagüe si la manguera de desagüe está conectada a la - KitchenAid KUDH03DTBL | Installation Instructions - Page 23
ocasionar la muerte o heridas serias. Opción 2: Instalación para un mostrador de madera ■ Prepare la lavavajillas doblando las lengüetas ubicadas en la parte frontal superior, como se muestra. 8 4 EHLOAYURS START 33¹⁄₂" (85 cm) PREPARE LA LAVAVAJILLAS ADVERTENCIA Peligro de Peso Excesivo Use dos - KitchenAid KUDH03DTBL | Installation Instructions - Page 24
Dirija el cableado eléctrico ADVERTENCIA H 2. Coloque los esquineros en el piso y apoye la lavavajillas sobre su lado posterior. 3. Ajuste las patas niveladoras según la medida de la abertura del armario y la tabla a continuación. Peligro de Choque Eléctrico Desconecte el suministro de energía en - KitchenAid KUDH03DTBL | Installation Instructions - Page 25
Opción 2: Ruta de servicio del lado izquierdo Opción 1: Acceso de servicio por el lado derecho ■ Para dirigir por el lado derecho, las mangueras de desagüe vienen enviadas en la posición correcta. Coloque la línea del suministro de agua en el sujetador, como se muestra. Dirija el cable a través - KitchenAid KUDH03DTBL | Installation Instructions - Page 26
■ Dirija la línea del suministro de agua y las mangueras de desagüe hacia el interior del armario. 4. Deslice las abrazaderas a su posición (figuras C y D). A B C D ■ Delize la lavavajillas dentro de la abertura del armario parcialmente. Deje espacio para tener acceso a la caja de terminales - KitchenAid KUDH03DTBL | Installation Instructions - Page 27
Opción 2: Sin recipiente de desechos pero con purga de aire de desagüe B Conexión del suministro eléctrico ADVERTENCIA C A A. Conector de la manguera de desagüe B. Purga de aire del desagüe C. Tubo de desechos Opción 3: Recipiente de desechos y purga de aire de desagüe A Peligro de Choque Elé - KitchenAid KUDH03DTBL | Installation Instructions - Page 28
ADVERTENCIA 5. Vuelva a colocar la tapa de la caja eléctrica con todos los alambres dentro de la caja de terminales. Peligro de Choque Eléctrico Conecte a tierra la lavavajillas. Conecte el alambre de conexión a tierra al conector verde de conexión a tierra en la caja de conexiones. No use - KitchenAid KUDH03DTBL | Installation Instructions - Page 29
ás hacia adelante colocando el nivel sobre los rieles deslizables. 7. Coloque la tira de adorno en el piso y haga una marca en el mismo, en la parte superior del largo del reborde del marco. Elija la ranura más cercana a la marca. Si la marca se encuentra entre dos ranuras, elija la ranura que - KitchenAid KUDH03DTBL | Installation Instructions - Page 30
10. Sujete el soporte de la cubierta protectora al lado contrario. 2. Sujete la lavavajillas al soporte de montaje inferior de la carcasa (el cual se instaló anteriormente). A 11. Coloque las tiras de adorno flexibles en ambos lados, como se muestra. A. Sujete la lavavajillas al soporte de - KitchenAid KUDH03DTBL | Installation Instructions - Page 31
Opción 2: Mostrador de madera ■ Sujete la lavavajillas al mostrador usando las lengüetas de montaje dobladas, ubicadas en la parte superior de la lavavajillas. A 3. Empuje el cajón superior hacia adentro y repita los pasos anteriores con el cajón inferior. 4. En la carcasa que se encuentra debajo - KitchenAid KUDH03DTBL | Installation Instructions - Page 32
(de izquierda a derecha) sobre el panel a la medida. Asegúrese al instalar los herrajes que los tornillos de montaje estén al ras con la parte trasera del panel o los paneles a la medidas. Preparación de los paneles a la medida 1. Coloque los paneles a la medida (superior e inferior) boca abajo en - KitchenAid KUDH03DTBL | Installation Instructions - Page 33
la izquierda y 2 en la derecha), para el cajón inferior. 2. Para asegurar el panel a la medida al cajón, ponga presión sobre el panel hasta que la parte superior del panel a la medida esté alineada con la - KitchenAid KUDH03DTBL | Installation Instructions - Page 34
Ne pas ouvrir le tiroir du lave-vaisselle jusqu'à ce qu'il soit placé à l'intérieur de l'ouverture du placard. Le non-respect de ces instructions peut causer un décès ou des blessures graves. Opérations à exécuter : ■ Ouvrir lentement le tiroir du lave-vaisselle tandis qu'une autre personne saisit - KitchenAid KUDH03DTBL | Installation Instructions - Page 35
èces nécessaires avant de commencer l'installation. Lire et suivre les instructions fournies avec les outils indiqués ici. Pièces fournies Vérifier D E A. Tuyau d'arrivée d'eau flexible 72" (182.9 cm) B. Attache en plastique C. Connecteurs de fils de taille appropriée - homologation UL (2) D. Pi - KitchenAid KUDH03DTBL | Installation Instructions - Page 36
en vigueur régissant les installations d'électricité et de plomberie. ■ Réaliser l'installation du lave-vaisselle tel que spécifié dans ces instructions. ■ Veiller à disposer de tous les outils et composants nécessaires pour l'installation du lave-vaisselle. ■ Gardez les lignes de lave-vaisselle - KitchenAid KUDH03DTBL | Installation Instructions - Page 37
étent ou un représentant de service si vous avez des doutes si de l'appareil à l'aide d'un cordon d'alimentation du cordon d'alimentation, exécuter les instructions fournies avec l'ensemble. ■ La fiche avec le tuyau d'évacuation (arrimage avec une attache de plastique sous le plan de travail), ou - KitchenAid KUDH03DTBL | Installation Instructions - Page 38
déplacer et installer le lave-vaisselle. Le non-respect de cette instruction peut causer une blessure au dos ou d'autre blessure. 1. Lire la droite. 3. Fixer les brides de montage à 17" (43,2 cm) du sol à l'aide des vis fournies. Si nécessaire, percer des avant-trous de ¹⁄₈" dans le placard. 17" ( - KitchenAid KUDH03DTBL | Installation Instructions - Page 39
inside cabinet opening. Doing so can result in death or serious injury. WARNING Excessive Weight Hazard Use two or more people to move and install dishwasher. Failure to do so can result in back or other injury. 2. Placer l'emballage des coins du lave-vaisselle sur le sol et coucher le lave - KitchenAid KUDH03DTBL | Installation Instructions - Page 40
électrique avant d'installer le lave-vaisselle (au niveau du tableau de distribution fusible ou disjoncteur) Le non-respect de cette instruction peut causer un décès ou on choc électrique. Installer l'alimentation électrique du placard en respectant tous les codes et règlements nationaux - KitchenAid KUDH03DTBL | Installation Instructions - Page 41
sur le lave-vaisselle. Option 2 : Accès au système électrique par la gauche ■ Pour un acheminement par la gauche, retirer les tuyaux de vidange des attaches situées dans la bride arrière, tel qu'illustré. 2. Acheminer le conduit d'alimentation en eau et les tuyaux de vidange en fonction des sp - KitchenAid KUDH03DTBL | Installation Instructions - Page 42
Raccordement du conduit d'alimentation en eau et des tuyaux de vidange 1. Raccorder le conduit d'alimentation en eau au robinet d'arrivée d'eau sous l'évier. Option 1 : Broyeur de déchets sans dispositif antirefoulement C A A B A. Robinet d'arrivée d'eau chaude 2. Enfiler les brides de serrage - KitchenAid KUDH03DTBL | Installation Instructions - Page 43
Interrompre l'alimentation électrique avant d'installer le lave-vaisselle (au niveau du tableau de distribution fusible ou disjoncteur) Le non-respect de cette instruction peut causer un décès ou on choc électrique. 1. Ôter la vis fixant le couvercle du boîtier de raccordement. Ôter le couvercle - KitchenAid KUDH03DTBL | Installation Instructions - Page 44
borne. Ne pas utiliser un câble de rallonge. Le non-respect de ces instructions peut causer un décès, un incendie ou un choc électrique. 3. Raccorder le de l'aplomb du lave-vaisselle 1. Ouvrir le tiroir inférieur. 2. Enfoncer les attaches et réinsérer les glissières de 5" (12,7 cm). A 3. Retirer - KitchenAid KUDH03DTBL | Installation Instructions - Page 45
5. Contrôler l'aplomb gauche-droite de l'appareil en plaçant le niveau sur le dessus du tiroir. Contrôler l'aplomb avant-arrière de l'appareil en plaçant le niveau sur les glissières. 7. Placer les bandes de garniture sur le sol et marquer l'emplacement de la garniture au-dessus du rebord du châ - KitchenAid KUDH03DTBL | Installation Instructions - Page 46
le lave-vaisselle aux brides de montage du placard latéral. Option 2 : Plan de travail en bois ■ Fixer le lave-vaisselle au plan de travail à l'aide des pattes de montage repliées situées sur le dessus du lave-vaisselle. A 2 1 2 1 2 A. Fixer le lave-vaisselle au plan de travail - KitchenAid KUDH03DTBL | Installation Instructions - Page 47
une boucle avec l'excès de longueur du tuyau d'évacuation. Utiliser l'attache pour former et immobiliser la boucle. Brancher le lave-vaisselle ou reconnecter avez besoin d'assistance ou de service : Consulter la section "Assistance ou service" des Instructions d'utilisation ou contacter le marchand - KitchenAid KUDH03DTBL | Installation Instructions - Page 48
és. Préparation des panneaux personnalisés 1. Placer les panneaux personnalisés (haut et bas) face vers le bas sur une surface propre et souple. 2. À l'aide d'un crayon, noter les points centraux pour les 2 avant-trous du dispositif de fixation des panneaux et les 6 avant-trous nécessaires pour le - KitchenAid KUDH03DTBL | Installation Instructions - Page 49
3. À l'aide des vis fournies, fixer le panneau personnalisé sur la porte interne en vissant à travers la porte interne et dans les avant-trous de ¹⁄₈" (3,175 mm). 4. Répé - KitchenAid KUDH03DTBL | Installation Instructions - Page 50
reservados. ® Marca registrada/TM Marca de comercio de KitchenAid, U.S.A., usada en Canadá bajo licencia de KitchenAid Canada Tous droits réservés. ® Marque déposée/TM Marque de commerce de KitchenAid, U.S.A., Emploi sous licence par KitchenAid Canada au Canada 10/08 Printed in U.S.A. Impreso en
-
 1
1 -
 2
2 -
 3
3 -
 4
4 -
 5
5 -
 6
6 -
 7
7 -
8
-
9
-
10
-
11
-
12
-
13
-
14
-
15
-
16
-
17
-
18
-
19
-
20
-
21
-
22
-
23
-
24
-
25
-
26
-
27
-
28
-
29
-
30
-
31
-
32
-
33
-
34
-
35
-
36
-
37
-
38
-
39
-
40
-
41
-
42
-
43
-
44
-
45
-
46
-
47
-
48
-
49
-
50
 |
 |
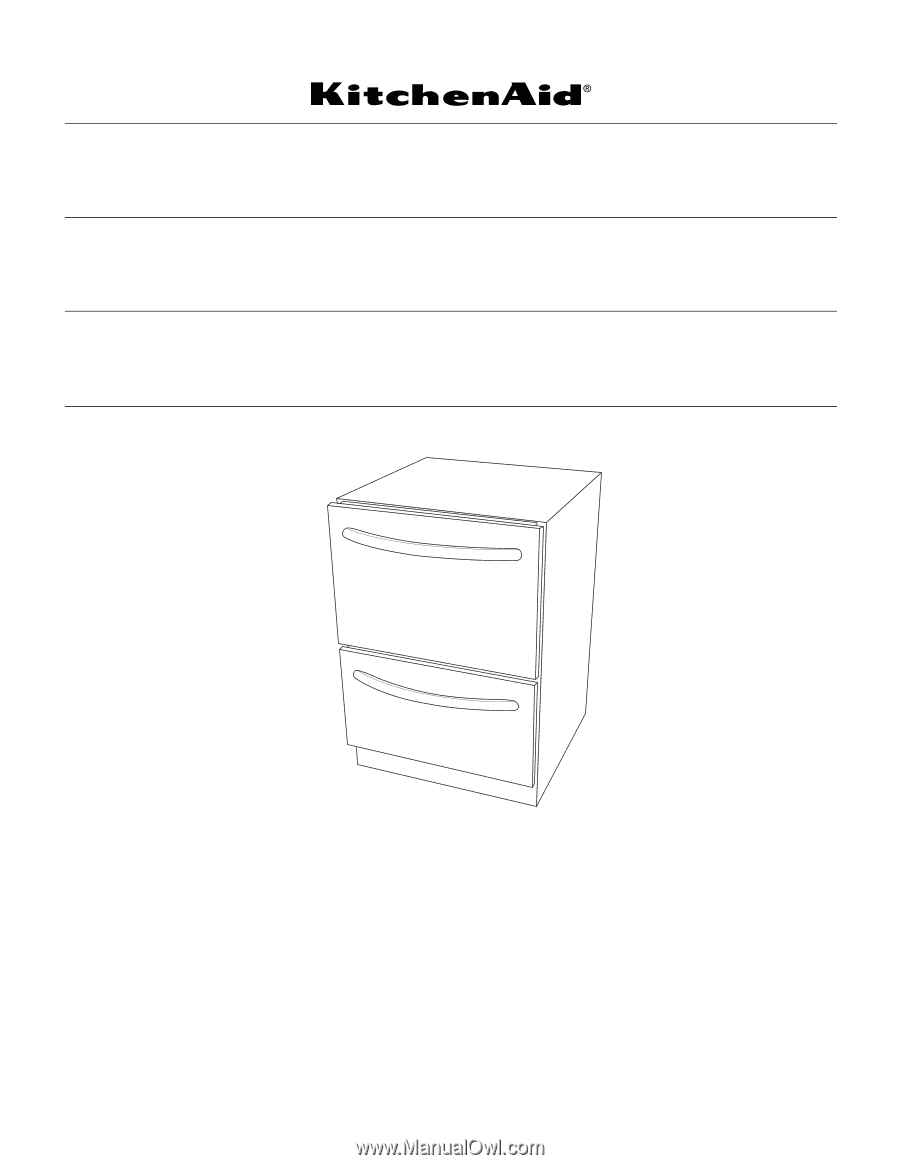
INSTALLATION INSTRUCTIONS
DRAWER DISHWASHER
INSTRUCCIONES DE INSTALACIÓN
DE LA LAVAVAJILLAS DE CAJÓN
INSTRUCTIONS D’INSTALLATION
LAVE-VAISSELLE À DOUBLE TIROIR
Table of Contents/Índice/Table des matières
..................................................................
2
IMPORTANT:
Save for local electrical inspector's use.
Installer:
Leave installation instructions with the homeowner.
Homeowner:
Keep installation instructions for future reference.
IMPORTANTE:
Guarde para tenerlas a disposición del inspector de electricidad local.
Instalador:
Deje las instrucciones de instalación con el propietario.
Propietario:
Conserve las instrucciones de instalación para referencia futura.
IMPORTANT :
Conserver pour consultation par l'inspecteur local des installations électriques.
Installateur :
Remettre les instructions d'installation au propriétaire.
Propriétaire :
Conserver les instructions d'installation pour référence ultérieure.
W10216167A