KitchenAid KUDS40FVSS Installation Instructions
KitchenAid KUDS40FVSS - 24" Dishwasher Manual
 |
UPC - 883049157696
View all KitchenAid KUDS40FVSS manuals
Add to My Manuals
Save this manual to your list of manuals |
KitchenAid KUDS40FVSS manual content summary:
- KitchenAid KUDS40FVSS | Installation Instructions - Page 1
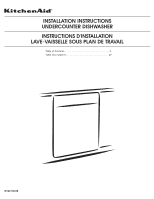
INSTALLATION INSTRUCTIONS UNDERCOUNTER DISHWASHER INSTRUCTIONS D'INSTALLATION LAVE-VAISSELLE SOUS PLAN DE TRAVAIL Table of Contents 2 Table des matières 27 W10275503B - KitchenAid KUDS40FVSS | Installation Instructions - Page 2
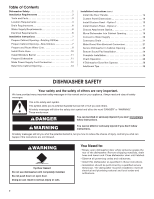
door until latched. • Observe all governing codes and ordinances. • Install this dishwasher as specified in these instructions. • Installation should be performed by a qualified service technician. The dishwasher must be installed to meet all electrical and plumbing national and local codes and - KitchenAid KUDS40FVSS | Installation Instructions - Page 3
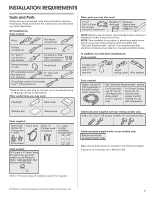
panels, Torx®† T15 screwdriver *Must be the proper size to connect your household wiring to 16-gauge wiring in dishwasher Other useful items you may need: Flashlight Bath towel Other parts you may also need: (3.81-5.0 cm) Screw-type clamps (3 maximum) Masking or Moisture duct tape barrier tape - KitchenAid KUDS40FVSS | Installation Instructions - Page 4
from your dealer for installing your dishwasher at the end of your cabinetry. A moisture barrier accessory (Part Number 4396277) is available from your dishwasher will be left unused for a period of time or in a location where it may be subject to freezing, have it winterized by authorized service - KitchenAid KUDS40FVSS | Installation Instructions - Page 5
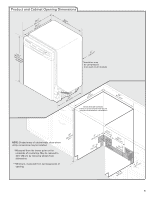
cm) w(8ri6ethmcmwovh)eemdeil.ns (1.9 cm)* *Insulation may be compressed. (not used on all models) (532.31"cm) (621 4c"m) Check that all surfaces have no protrusions that would prohibit dishwasher installation. (612c4m" )** NOTE: Shaded areas of cabinet walls show where utility connections may - KitchenAid KUDS40FVSS | Installation Instructions - Page 6
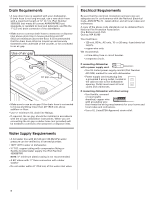
air gap, should be installed in accordance with the air gap installation instructions. When you are connecting the air gap a rubber hose (not provided °F (49°C) water at dishwasher O.D. copper tubing with compression fitting or flexible braided water supply line (Part Number 4396897RP) NOTE: ¹⁄₂" - KitchenAid KUDS40FVSS | Installation Instructions - Page 7
power at the fuse box or circuit breaker box before installing dishwasher. 2 3 Do you already have utility hookups? Yes -Follow instructions in the "Prepare Cabinet Opening-Existing Utilities" section. No -Follow instructions in the "Prepare Cabinet Opening-New Utilities" section. Existing utility - KitchenAid KUDS40FVSS | Installation Instructions - Page 8
Metal cabinet Wood cabinet: Sand the hole until smooth. Metal cabinet: Cover hole with grommet (Part Number 302797 - not provided). 8 Hot water line Measure overall length of copper tubing or flexible local codes and ordinances. The water line to the dishwasher should have a manual shutoff valve. - KitchenAid KUDS40FVSS | Installation Instructions - Page 9
ferrule, about 1" (2.5 cm) onto copper tubing. NOTE: To avoid vibration during operation, route the water supply line so that it does not touch the dishwasher base, frame or motor. 6 Add 90° elbow fitting to the water supply line Slowly turn water shutoff valve to "ON" position. Flush water into - KitchenAid KUDS40FVSS | Installation Instructions - Page 10
the floor in area shown. This will prohibit it from moving when dishwasher is moved into cabinet opening. 3 Connect drain hose Connect drain hose drain trap and at least 20" (50.8 cm) above the floor where the dishwasher will be installed. Helpful Tip: To reduce vibration of the hose, keep the hose - KitchenAid KUDS40FVSS | Installation Instructions - Page 11
Remove the backing of the moisture barrier and apply to underside of the countertop along the front edge of the counter. Prepare Dishwasher Tip Over Hazard Do not use dishwasher until completely installed. Do not push down on open door. Doing so can result in serious injury or cuts. Excessive Weight - KitchenAid KUDS40FVSS | Installation Instructions - Page 12
lower part of dishwasher tub. Pull cord through strain relief in terminal bow. Take notice when installing or removing the dishwasher in order to reduce the chance of damaging the power supply cord. Select UL Listed/CSA Approved twist-on wire connectors (included with power supply cord kit) rated to - KitchenAid KUDS40FVSS | Installation Instructions - Page 13
dishwasher. Connect ground wire to green ground connector in terminal box. Do not use an extension cord. Failure to follow these instructions If needed, see website for animated representation of this step. Visit www.kitchenaid.com under FAQ tab. Place wires inside terminal box. Insert tabs on - KitchenAid KUDS40FVSS | Installation Instructions - Page 14
Instructions. Custom Panel Dimensions IMPORTANT: You need to know which control panel is on your dishwasher before you order your custom door panel. Custom panel dimensions-Dishwashers with control panel on the top (59.7 cm) 4" (10.1 cm) (52c"m) (7 cm) Built-up floors: If the kitchen - KitchenAid KUDS40FVSS | Installation Instructions - Page 15
Option 1 (Models KUDS40FVPA, KUDS50FVPA KitchenAid custom handle selection, refer to the KitchenAid Catalog, visit www.kitchenaid.com, or call 1-800-422-1230. NOTE: A customer-supplied full-front panel must weigh no more than 16 lbs (7.3 kg) and must be made to specific dimensions- Dishwashers with - KitchenAid KUDS40FVSS | Installation Instructions - Page 16
3 Mark line Back " (25.2 cm) Top edge Measure 9 25.2 cm) from top edge and mark a line on the back of customer-supplied custom panel. Position the outer panel on the back of the customer-supplied custom panel as shown, so that the top holes in the outer panel are on the line, and both panels are - KitchenAid KUDS40FVSS | Installation Instructions - Page 17
) All models require an accessory option to attach custom panels. Kit Number 8171555 (black), 8171556 (white) or 8171557 (biscuit) are available. To order, call customer service at 1-800-444-1230. NOTE: A custom full-front panel must weigh no more than 14 lbs (6.3 kg) and must be made to specific - KitchenAid KUDS40FVSS | Installation Instructions - Page 18
, bend the tab down to secure the bracket in place. Repeat this step for the other side. NOTE: Do not attach the dishwasher. This will be done later. Option 2, Dishwasher side attachment: NOTE: Remove the brackets from the parts package. 1 Break end of bracket Push bracket into slot on the side of - KitchenAid KUDS40FVSS | Installation Instructions - Page 19
the console. Panel or console may dent. Helpful Tip: Temporarily tape utilities to the floor in the locations shown to prohibit them from moving when dishwasher is moved into the cabinet opening. 3 Check water and drain hose position Check that water line is on the left side of opening and drain - KitchenAid KUDS40FVSS | Installation Instructions - Page 20
the hex head socket or adjustable wrench. Preferred method Optional method IMPORTANT: If wheels were removed, cover the floor when moving the dishwasher. Slowly move dishwasher completely into cabinet opening. Do not kink or pinch water line, drain hose, power supply cord or direct wire between - KitchenAid KUDS40FVSS | Installation Instructions - Page 21
www.kitchenaid. part of dishwasher tub. Pull cable through UL Listed or CSA Approved strain relief in terminal box. Strain relief is not supplied with the dishwasher. Owner must purchase a ⁷⁄₈" screw-in type strain relief. Select UL Listed or CSA Approved twist-on wire connectors (not included) rated - KitchenAid KUDS40FVSS | Installation Instructions - Page 22
WARNING Electrical Shock Hazard Electrically ground dishwasher. Connect ground wire to green ground connector in terminal box. Do not use an extension cord. Failure to follow these instructions can result in death, fire, or electrical shock. 2 Direct Wire-Connect ground wire Wiring configuration - KitchenAid KUDS40FVSS | Installation Instructions - Page 23
does not contact screws, brackets, or countertop. If it does, adjust leveling legs. 5 Check inner spacing Open door and check that space between dishwasher cabinet opening and tub is equal on both sides. If spacing is not equal, loosen bracket screws secured and shift tub. Tighten bracket screws - KitchenAid KUDS40FVSS | Installation Instructions - Page 24
shown. Remove towel from dishwasher. Reinstall the lower dish rack. If needed, see website for animated representation of this step. Visit www.kitchenaid.com/anchoring under FAQ tab. Complete Installation 1 Reinstall access panels Insulation (on some models) Access panel Lower panel Insulation - KitchenAid KUDS40FVSS | Installation Instructions - Page 25
behind the access panel. On some models there is insulation on the access . Do not use an extension cord. Failure to follow these instructions can result in death, fire, or electrical shock. 1 Power supply cord does not touch dishwasher motor or lower part of dishwasher tub. Reconnect Power 1 - KitchenAid KUDS40FVSS | Installation Instructions - Page 26
call 1-800-422-1230, or in Canada, call 1-800-807-6777. Additional Tips Expect longer wash times. Your new dishwasher will average 2-3 hours per load, but use nearly 40% less energy than older models. Designed with a low wattage, low energy consumption motor, your dishwasher washes longer to ensure - KitchenAid KUDS40FVSS | Installation Instructions - Page 27
pas utiliser le lave-vaisselle jusqu'à ce qu'il soit complètement installé. Ne pas appuyer sur la porte ouverte. Le non-respect de ces instructions peut causer des blessures graves ou des coupures. Il faut : • Ouvrir lentement la porte du lave-vaisselle tandis qu'une autre personne saisit l'arrière - KitchenAid KUDS40FVSS | Installation Instructions - Page 28
cessaires avant d'entreprendre l'installation. Lire et observer les instructions fournies avec chacun des outils de la liste ci- tous les raccordements électriques par un électricien qualifié agréé. D'autre part, pour les premières installations Outillage nécessaire : Perceuse électrique avec - KitchenAid KUDS40FVSS | Installation Instructions - Page 29
Exigences d'emplacement Une source d'électricité avec liaison à la terre est nécessaire. Ne pas placer de canalisation d'évacuation, canalisation d'eau ou câblage électrique à un endroit où cela susciterait interférence ou contact avec les pieds ou le moteur du lavevaisselle. À l'emplacement d' - KitchenAid KUDS40FVSS | Installation Instructions - Page 30
Dimensions - Produit et cavité d'encastrement (64,1 (62,2 cm) cm) (60,6 cm) a(dv8ee6cscdrmoéu)pemossi.en (532,31"cm) REMARQUE : La zone grisée des parois du placard indique l'endroit où les raccordements électriques peuvent être installés. *Mesure depuis le point le plus bas de la face infé - KitchenAid KUDS40FVSS | Installation Instructions - Page 31
intérieur minimal de ¹⁄₂" pour le conduit d'évacuation. • Si nécessaire, le dispositif de brise-siphon doit être installé conformément aux instructions d'installation de ce dernier. Lors du raccordement du dispositif de brisesiphon à la canalisation d'égout en T ou au raccord de broyeur à déchets - KitchenAid KUDS40FVSS | Installation Instructions - Page 32
dépassent des emplacements indiqués, passer à la section "Installation du tuyau d'évacuation". S'ils ne sont pas assez longs, suivre les instructions dans la section "Préparation de l'ouverture d'encastrement du placard - Nouveaux moyens de raccordement". Préparation de l'ouverture d'encastrement - KitchenAid KUDS40FVSS | Installation Instructions - Page 33
totale de la canalisation de cuivre ou de la canalisation d'arrivée d'eau flexible à tresse d'acier. Fixer la canalisation d'eau chaude à l'aide d'une configuration de raccordement qui soit conforme à tous les codes et règlements locaux. La canalisation d'eau raccordée au lave-vaisselle doit - KitchenAid KUDS40FVSS | Installation Instructions - Page 34
et la virole vers l'avant et engager l'écrou sur le filetage du raccord coudé. Raccord flexible à tresse d'acier : Fixer l'écrou sur le coude à l'aide d'une clé plate ou d'une clé à molette de ⁵⁄₈". REMARQUE : Ne pas utiliser de ruban adhésif Teflon®† avec les raccords de compression. †® Teflon - KitchenAid KUDS40FVSS | Installation Instructions - Page 35
(Ne pas couper la section ondulée). 2 2. Fixer l'extrémité noire du tuyau d'évacuation à la canalisation d'égout en T à l'aide d'une grosse bride pour tuyau d'évacuation argentée (fournie). À l'aide d'une pince, serrer la bride pour l'ouvrir et la mettre en position. Si le tuyau d'évacuation - KitchenAid KUDS40FVSS | Installation Instructions - Page 36
si nécessaire. (Ne pas couper la section ondulée). 4. Fixer le tuyau d'évacuation sur le dispositif de brise-siphon à l'aide de la grosse bride de tuyau d'évacuation argentée (fournie). À l'aide d'une pince, serrer la bride pour l'ouvrir et la mettre en position. Si le tuyau d'évacuation a été coup - KitchenAid KUDS40FVSS | Installation Instructions - Page 37
deux personnes ou plus pour déplacer et installer le lave-vaisselle. Le non-respect de cette instruction peut causer une blessure au dos ou d'autre blessure. 1 Placer le lave-vaisselle sur le dos À l'aide d'une clé à douille, un tourne-écrou ou un tournevis Phillips de ter le couvercle du bo - KitchenAid KUDS40FVSS | Installation Instructions - Page 38
de la borne. Ne pas utiliser un câble de rallonge. Le non-respect de ces instructions peut causer un décès, un incendie ou un choc électrique. 2 Cordon d'alimentation - conducteur blanc avec le blanc à l'aide des connecteurs de fils (homologation UL ou CSA) (fournis avec l'ensemble de - KitchenAid KUDS40FVSS | Installation Instructions - Page 39
Web pour une représentation vidéo de cette étape. Visiter www.kitchenaid.com sous l'onglet FAQ. 4 Cordon d'alimentation électrique - Fixation couvercle à l'aide d'un tourne-écrou de ¹⁄₄" et de la vis précédemment retirée. REMARQUE : Ne pas brancher dans une prise avant que les instructions ne le sp - KitchenAid KUDS40FVSS | Installation Instructions - Page 40
clé Allen dans les vis de blocage. Serrer les vis d'un quart de tour au-delà de la butée. Conserver la clé Allen avec les instructions d'installation. 40 Dimensions du panneau personnalisé IMPORTANT : Il faut savoir de quel tableau de commande est doté le lave-vaisselle avant de commander le - KitchenAid KUDS40FVSS | Installation Instructions - Page 41
sur le choix de la poignée personnalisée KitchenAid, consulter le catalogue KitchenAid, visiter www.kitchenaid.com ou composer le 1-800-422-1230 recommandé pour les brides de calage supérieures à 6" (15,2 cm). À l'aide d'un tournevis TORX®, ôter trois vis de chaque côté, tel qu'illustré; maintenir le - KitchenAid KUDS40FVSS | Installation Instructions - Page 42
(blanc) ou 8171557 (biscuit) sont disponibles. Pour commander, appeler le service à la clientèle au 1-800-444-1230. REMARQUE : Le panneau (3,2 mm) les brides de calage supérieures à 6" (15,2 cm). À l'aide d'un tournevis TORX®, retirer les trois vis de chaque côté (voir l'illustration); tenir - KitchenAid KUDS40FVSS | Installation Instructions - Page 43
Utiliser deux personnes ou plus pour déplacer et installer le lave-vaisselle. Le non-respect de cette instruction peut causer une blessure au dos ou d'autre blessure. À l'aide d'au moins deux personnes, mettre le lavevaisselle en position verticale. Option 1, Fixation au plan de travail : 1 Sortir - KitchenAid KUDS40FVSS | Installation Instructions - Page 44
extraire du côté de la cuve. REMARQUE : Conserver les boutons à part pour recouvrir les trous une fois le lave-vaisselle installé. 3 Ré 44 À l'aide d'au moins deux personnes, mettre le lavevaisselle en position verticale. REMARQUE : Ne pas installer le garde-pieds avant que les instructions ne le - KitchenAid KUDS40FVSS | Installation Instructions - Page 45
tension du ressort ressort tendeur vis Pour régler la tension du ressort de la porte, détacher le ressort du pied arrière du lave-vaisselle. À l'aide d'un tourne-écrou ou d'une clé à douille de ter la vis du tendeur. La vis peut être placée dans l'un des trois trous , , dans le - KitchenAid KUDS40FVSS | Installation Instructions - Page 46
le haut jusqu'à la valve et serrer à la main afin d'éviter de fausser le filetage. Serrer à la main jusqu'à ce que le raccord soit serré. À l'aide d'une pince, vérifier l'étanchéité du raccord tour supplémentaire peut s'avérer nécessaire pour créer l'étanchéité du joint de caoutchouc. REMARQUE : Ne - KitchenAid KUDS40FVSS | Installation Instructions - Page 47
pour une représentation vidéo de cette étape. Visiter www.kitchenaid.com/watersupply sous l'onglet FAQ. Raccordement au circuit d'évacuation Tuyau d'évacuation Butée d'arrêt du tuyau d'évacuation Butée d'arrêt À l'aide d'une pince, ouvrir la petite bride de tuyau d'évacuation verte en la serrant - KitchenAid KUDS40FVSS | Installation Instructions - Page 48
ble de rallonge. Le non-respect de ces instructions peut causer un décès, un incendie ou un représentation vidéo de cette étape. Visiter www.kitchenaid.com/electrical sous l'onglet FAQ. 4 Raccordement direct ne pas coincer de fils. Fixer le couvercle à l'aide d'un tourne-écrou de ¹⁄₄" et de la vis - KitchenAid KUDS40FVSS | Installation Instructions - Page 49
tomber de vis au fond du lavevaisselle. Localiser les brides sur le dessus du lave-vaisselle et fixer celui-ci au plan de travail à l'aide de deux vis Phillips n°10 x ¹⁄₂" (fournies). Le lave-vaisselle doit être immobilisé pour l'empêcher de basculer lors de l'ouverture de la porte. 4 Vérification - KitchenAid KUDS40FVSS | Installation Instructions - Page 50
le panier à vaisselle inférieur. Au besoin, visiter le site Web pour une représentation vidéo de cette étape. Visiter www.kitchenaid.com/anchoring sous l'onglet FAQ. Achever l'installation 1 Réinstallation des panneaux d'accès Isolant (sur certains modèles) Panneau d'accès Panneau inférieur - KitchenAid KUDS40FVSS | Installation Instructions - Page 51
trous du panneau d'accès et les fentes du panneau inférieur à l'aide d'un tournevis Phillips ou tournevis de ¹⁄₄". 3 Inspection de la rive de adaptateur. Ne pas utiliser un câble de rallonge. Le non-respect de ces instructions peut causer un décès, un incendie ou un choc électrique. 1 Cordon d' - KitchenAid KUDS40FVSS | Installation Instructions - Page 52
Contrôle du fonctionnement ❏ Lire les instructions d'utilisation du lave-vaisselle fournies avec le lave-vaisselle Si aucune de ces vérifications ne résout le problème, composer le 1-800-422-1230. Au Canada, composer le 1-800-807-6777. Conseils supplémentaires Prévoir des durées de lavage plus - KitchenAid KUDS40FVSS | Installation Instructions - Page 53
53 - KitchenAid KUDS40FVSS | Installation Instructions - Page 54
54 - KitchenAid KUDS40FVSS | Installation Instructions - Page 55
55 - KitchenAid KUDS40FVSS | Installation Instructions - Page 56
. All rights reserved. Tous droits réservés. ® Registered Trademark/TM Trademark of KitchenAid, U.S.A., KitchenAid Canada licensee in Canada ® Marque déposée/TM Marque de commerce de KitchenAid, U.S.A., Emploi sous licence par KitchenAid Canada au Canada 4/10 Printed in U.S.A. Imprimé aux É.-U.
-
 1
1 -
 2
2 -
 3
3 -
 4
4 -
 5
5 -
 6
6 -
 7
7 -
8
-
9
-
10
-
11
-
12
-
13
-
14
-
15
-
16
-
17
-
18
-
19
-
20
-
21
-
22
-
23
-
24
-
25
-
26
-
27
-
28
-
29
-
30
-
31
-
32
-
33
-
34
-
35
-
36
-
37
-
38
-
39
-
40
-
41
-
42
-
43
-
44
-
45
-
46
-
47
-
48
-
49
-
50
-
51
-
52
-
53
-
54
-
55
-
56
 |
 |
INSTALLATION INSTRUCTIONS
UNDERCOUNTER DISHWASHER
INSTRUCTIONS D'INSTALLATION
LAVE-VAISSELLE SOUS PLAN DE TRAVAIL
Table of Contents
. . . . . . . . . . . . . . . . . . . . . . . . . . . . . . . . . . . 2
Table des matières. . . . . . . . . . . . . . . . . . . . . . . . . . . . . . . . . . 27
W10275503B