KitchenAid KUIS18NNTS Use and Care Guide
KitchenAid KUIS18NNTS - Automatic Ice Maker Manual
 |
UPC - 883049050058
View all KitchenAid KUIS18NNTS manuals
Add to My Manuals
Save this manual to your list of manuals |
KitchenAid KUIS18NNTS manual content summary:
- KitchenAid KUIS18NNTS | Use and Care Guide - Page 1
ICE MAKER Use & Care Guide For questions about features, operation/performance, parts, accessories or service, call: 1-800-422-1230 or visit out website at... www.kitchenaid.com In Canada, for assistance, installation and service, call: 1-800-807-6777 or visit our website at... www.KitchenAid.ca - KitchenAid KUIS18NNTS | Use and Care Guide - Page 2
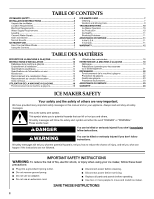
and Moving Care 9 TROUBLESHOOTING 10 Ice Maker Operation 10 Ice Production 10 Ice Quality 11 Plumbing Problems 11 ASSISTANCE OR SERVICE 11 In the U.S.A 11 In Canada 11 WARRANTY 12 TABLE DES MATIÈRES SÉCURITÉ DE LA MACHINE À GLAÇONS 13 INSTRUCTIONS D'INSTALLATION 13 Déballage de la - KitchenAid KUIS18NNTS | Use and Care Guide - Page 3
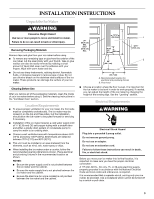
sides, but the installation should allow the ice maker to be pulled forward for servicing if necessary. ■ Installation of the ice maker requires a cold water supply inlet of ¹⁄₄" (6.35 mm) OD soft copper tubing with a shutoff valve and either a gravity-drain system or condensate pump to carry the - KitchenAid KUIS18NNTS | Use and Care Guide - Page 4
Supply IMPORTANT: ■ Reverse osmosis water filtration systems can be used only with ice maker installations that have a gravity drain. A reverse osmosis system is not recommended for ice makers that have a drain pump installed. ■ The pressure of the water supply coming out of a reverse osmosis system - KitchenAid KUIS18NNTS | Use and Care Guide - Page 5
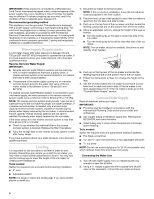
reducer installed directly below the outlet of the drain tube as shown. You must maintain a 1" (2.54 cm) air gap between the drain hose and the standpipe. ■ It may be desirable to insulate the drain line thoroughly up to the drain inlet. E A. Water supply tube clamp B. Vent hose (drain pump models - KitchenAid KUIS18NNTS | Use and Care Guide - Page 6
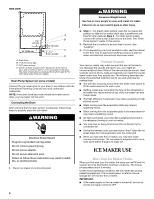
instructions can result in death, fire, or electrical shock. 1. Plug in ice maker or reconnect power. WARNING Excessive Weight Hazard Use two or more people to move and install ice maker. Failure to do so can result in back or other injury. 2. Style 1 - For gravity drain system, push the ice maker - KitchenAid KUIS18NNTS | Use and Care Guide - Page 7
Service The service light indicates when service is needed. If the service light turns on, turn the ice maker off and back on. If the service light turns on again, call for service 473 mL) bottle of approved ice maker cleaner. To order, call 1-800-442-9991 and ask for Part Number 4396808. In Canada, - KitchenAid KUIS18NNTS | Use and Care Guide - Page 8
the four screws. 6. Plug in ice maker or reconnect power. Interior Components 1. Unplug ice maker or disconnect power. 2. Open the storage bin door and remove any ice that is in the bin. 3. Remove the drain cap from the water pan and drain thoroughly. Replace the drain cap securely on the water pan - KitchenAid KUIS18NNTS | Use and Care Guide - Page 9
(0°C), water must be removed from the drain line. For ice makers with a drain pump installed: ■ Plug in ice maker or reconnect power. ■ Turn ice maker off and remove all remaining ice from ice bin. ■ Pour 1 qt (0.95 L) of water into the ice bin near the drain and let the unit stand for approximately - KitchenAid KUIS18NNTS | Use and Care Guide - Page 10
life of the machine. TROUBLESHOOTING Try the solutions suggested here first in order to avoid the cost of an unnecessary service call. Ice Maker Operation Your ice maker will not operate WARNING ■ Make sure that the drain cap is tight and the water drain pan pump is securely attached to the - KitchenAid KUIS18NNTS | Use and Care Guide - Page 11
. Plumbing Problems WARNING Excessive Weight Hazard Use two or more people to move and install ice maker. Failure to do so can result in back or other injury. ■ Is the drain hose aligned over the drain? Move the ice maker to align the drain. See "Connect Water Supply." NOTE: Service technicians - KitchenAid KUIS18NNTS | Use and Care Guide - Page 12
system. These parts are compressor, evaporator, condenser, dryer/ strainer, and connecting tubing. Service must be performed by a KitchenAid designated service company. ITEMS KITCHENAID WILL NOT PAY FOR 1. Service calls to correct the installation of your major appliance, to instruct you how to - KitchenAid KUIS18NNTS | Use and Care Guide - Page 13
la source de courant électrique avant l'entretien. ■ Replacer pièces et panneaux avant de faire la remise en marche. CONSERVEZ CES INSTRUCTIONS INSTRUCTIONS D'INSTALLATION Déballage de la machine à glaçons AVERTISSEMENT Risque du poids excessif Utiliser deux ou plus de personnes pour déplacer et - KitchenAid KUIS18NNTS | Use and Care Guide - Page 14
installer la machine à glaçons, il faut avoir un tuyau souple d'alimentation en eau froide de ¹⁄₄" (6,35 mm) de dia. ext. en cuivre avec un robinet d'arrêt et un système de vidange par gravité ou une pompe à condensat pour pousser l'eau vers un drain conformément aux instructions du Code national - KitchenAid KUIS18NNTS | Use and Care Guide - Page 15
est d'aplomb, passer à la section "Raccordement à la canalisation d'eau". Raccordement à la canalisation d'eau Lire toutes les instructions avant de commencer. IMPORTANT : ■ L'installation de la plomberie doit être conforme au Code International de plomberie et respecter les codes et règlements - KitchenAid KUIS18NNTS | Use and Care Guide - Page 16
de sortir la machine à glaçons du placard ou du mur en cas d'intervention de service. VUE ARRIÈRE A B C D E A. Bride pour tube d'arrivée d'eau glaçons est fournie avec un drain de vidange par gravité, il faut suivre les instructions cidessous lors de l'installation des tuyaux de vidange. Ceci - KitchenAid KUIS18NNTS | Use and Care Guide - Page 17
ou plus de personnes pour déplacer et installer la machine à glaçons. Le non-respect de cette instruction peut causer une blessure au dos ou système avec pompe de vidange, connecter le tuyau de sortie de la pompe au drain. Voir "Système avec pompe de vidange" précédemment dans cette section. 3. Vé - KitchenAid KUIS18NNTS | Use and Care Guide - Page 18
pour activer cette caractéristique. Appuyer à nouveau sans relâcher sur le bouton pour désactiver la caractéristique. Témoin Service Le témoin Service indique si une visite de service est nécessaire. Si le témoin Service est allumé, éteindre puis remettre en marche la machine à glaçons. Si le témoin - KitchenAid KUIS18NNTS | Use and Care Guide - Page 19
de glace. 5. Lire et suivre toutes les instructions apparaissant sur la bouteille avant de suivre les eau, recommencer le programme de nettoyage. Veiller à réinstaller le capuchon solidement sur le bac à eau. Si production de glaçons. Condenseur Un condenseur sale ou obstrué : ■ Entraîne l' - KitchenAid KUIS18NNTS | Use and Care Guide - Page 20
à glace avec les autres composants intérieurs conformément aux instructions suivantes. ■ Réinstaller le support de pelle à glace en alignant le crochet arrière avec l'ouverture (le support penche légèrement vers le bas). Glisser le support vers l'arrière jusqu'à ce que l'avant repose solidement sur - KitchenAid KUIS18NNTS | Use and Care Guide - Page 21
étanche de la porte et pelle à glace ainsi que son support avec de l'eau tiède et un savon ou un du détecteur de niveau de glaçons. 14. Réinstaller le couvercle de la grille de coupe. 15. Brancher la remise en marche. Le non-respect de ces instructions peut causer un décès ou un choc électrique. - KitchenAid KUIS18NNTS | Use and Care Guide - Page 22
la canalisation n'est pas déformée. ■ Le témoin de service clignote-t-il en permanence? Faire un appel de service. La machine à glaçons fonctionne mais produit très marche. Le non-respect de ces instructions peut causer un décès ou un choc électrique. ■ Le condenseur est-il sale? De la saleté ou de - KitchenAid KUIS18NNTS | Use and Care Guide - Page 23
ou plus de personnes pour déplacer et installer la machine à glaçons. Le non-respect de cette instruction peut causer une blessure au dos ou d' locaux. Les techniciens de service désignés par KitchenAid Canada sont formés pour remplir la garantie des produits et fournir un service après la garantie, - KitchenAid KUIS18NNTS | Use and Care Guide - Page 24
résidentiel, et entretenu conformément aux instructions fournies avec le produit, KitchenAid paiera pour les pièces de rechange service doit être exécuté par une compagnie de service désignée par KitchenAid. KITCHENAID NE PRENDRA PAS EN CHARGE 1. Les visites de service pour rectifier l'installation
-
 1
1 -
 2
2 -
 3
3 -
 4
4 -
 5
5 -
 6
6 -
 7
7 -
8
-
9
-
10
-
11
-
12
-
13
-
14
-
15
-
16
-
17
-
18
-
19
-
20
-
21
-
22
-
23
-
24
 |
 |

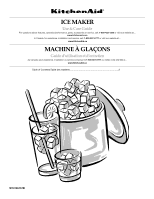
ICE MAKER
Use & Care Guide
For questions about features, operation/performance, parts, accessories or service, call:
1-800-422-1230
or visit out website at...
www.kitchenaid.com
In Canada, for assistance, installation and service, call:
1-800-807-6777
or visit our website at...
www.KitchenAid.ca
MACHINE À GLAÇONS
Guide d’utilisation et d’entretien
Au Canada, pour assistance, installation ou service composez le
1-800-807-6777
ou visitez notre site Web à...
www.KitchenAid.ca
Table of Contents/Table des matières
.............................................................................
2
W10136157B