KitchenAid KUIS18NNXB Use and Care Manual
KitchenAid KUIS18NNXB Manual
 |
View all KitchenAid KUIS18NNXB manuals
Add to My Manuals
Save this manual to your list of manuals |
KitchenAid KUIS18NNXB manual content summary:
- KitchenAid KUIS18NNXB | Use and Care Manual - Page 1
ICE MAKER Use & Care Guide For questions about features, operation/performance, parts, accessories or service, call: 1-800-422-1230 or visit our website at... www.kitchenaid.com In Canada, for assistance, installation and service, call: 1-800-807-6777 or visit our website at... www.KitchenAid.ca - KitchenAid KUIS18NNXB | Use and Care Manual - Page 2
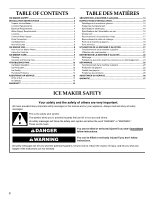
and Moving Care 11 TROUBLESHOOTING 12 Ice Maker Operation 12 Ice Production 12 Ice Quality 13 Plumbing Problems 13 ASSISTANCE OR SERVICE 13 In the U.S.A 13 In Canada 13 WARRANTY 14 TABLE DES MATIÈRES SÉCURITÉ DE LA MACHINE À GLAÇONS 15 INSTRUCTIONS D'INSTALLATION 15 Déballage de la - KitchenAid KUIS18NNXB | Use and Care Manual - Page 3
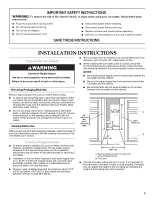
■ Disconnect power before cleaning. ■ Disconnect power before servicing. ■ Replace all parts and panels before operating. ■ Use two or more people to move and install ice maker. SAVE THESE INSTRUCTIONS INSTALLATION INSTRUCTIONS Unpack the Ice Maker WARNING Excessive Weight Hazard Use two or more - KitchenAid KUIS18NNXB | Use and Care Manual - Page 4
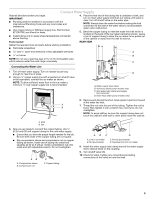
left to raise that side of the ice maker. NOTE: The ice maker should not wobble. Use shims to add stability when needed. 5. Push up on the top rear of the ice maker and locate the leveling legs that are on the bottom rear of the ice maker. 6. Follow the instructions in Step 4 to change the height of - KitchenAid KUIS18NNXB | Use and Care Manual - Page 5
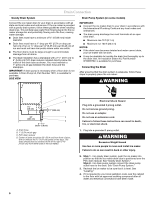
is located on the back of the ice maker cabinet as shown. Leave a coil of copper tubing to allow the ice maker to be pulled out of the cabinet or away from the wall for service. Tools needed REAR VIEW Gather the required tools and parts before starting installation: ■ Flat-blade screwdriver - KitchenAid KUIS18NNXB | Use and Care Manual - Page 6
Pump kit, Part Number 1901, is available for purchase. SIDE VIEW IMPORTANT: ■ Connect the ice maker drain to ice maker). Electrical Shock Hazard Plug into a grounded 3 prong outlet. Do not remove ground prong. Do not use an adapter. Do not use an extension cord. Failure to follow these instructions - KitchenAid KUIS18NNXB | Use and Care Manual - Page 7
ice maker and tighten the screws. 6. Remove the top hinge pin. Remove Door 1. Unplug ice maker or disconnect power. 2. Remove the handle screws and handle (on some models). Keep the parts for the front door of your ice maker may be in the package with the Use & Care Guide. Fasten the brand badge to - KitchenAid KUIS18NNXB | Use and Care Manual - Page 8
cycle ends, you may hear a gurgling sound due to the refrigerant flowing in your ice maker. ■ You may hear air being forced over the condenser by follow these instructions can result in death, fire, or electrical shock. 4. Plug into a grounded 3 prong outlet. Normal Sounds Your new ice maker may - KitchenAid KUIS18NNXB | Use and Care Manual - Page 9
water is. With hard water of 15 to 20 grains/gal. (4 to 5 grains/ liter), you may need to clean the system as often as every 6 months. NOTE: Use one 16 oz (473 mL) bottle of approved ice maker cleaner. To order, call 1-800-422-1230 and ask for Part Number 4396808. In Canada, call - KitchenAid KUIS18NNXB | Use and Care Manual - Page 10
cleaning. Replace all parts and panels before operating. Failure to do so can result in death or electrical shock. 1. Unplug ice maker or disconnect power. 2. Remove the two screws in the lower access panel and the two screws from the base grille area of the front panel support. 3. Pull the bottom - KitchenAid KUIS18NNXB | Use and Care Manual - Page 11
with the other interior components using the following instructions. ■ Replace the ice scoop holder by replacing the thumb screws. Vacation and Moving Care WARNING A Electrical Shock Hazard B Disconnect power before servicing. Replace all parts and panels before operating. Failure to do so - KitchenAid KUIS18NNXB | Use and Care Manual - Page 12
pan pump is securely attached to the water pan. ■ Is there ice between the evaporator plate and the cutting grid? Check that the ice maker is level. See "Leveling." If the ice maker is level, and the problem persists, run a cleaning cycle. See "Cleaning." Ice Production Ice maker runs but produces - KitchenAid KUIS18NNXB | Use and Care Manual - Page 13
cannot repair plumbing problems outside of the ice maker. Call a licensed, qualified plumber. ASSISTANCE OR SERVICE Before calling for assistance or service, please check "Troubleshooting." It may save you the cost of a service call. If you still need help, follow the instructions below - KitchenAid KUIS18NNXB | Use and Care Manual - Page 14
KITCHENAID® ICE MAKER WARRANTY THREE YEAR LIMITED WARRANTY (PARTS AND LABOR) For three years from the date of purchase, when this major appliance is installed, operated and maintained according to instructions attached to or furnished with the product, KitchenAid brand of Whirlpool Corporation or - KitchenAid KUIS18NNXB | Use and Care Manual - Page 15
réduire le risque de blessure et ce qui peut se produire en cas de non-respect des instructions. IMPORTANTES INSTRUCTIONS DE SÉCURITÉ AVERTISSEMENT : Pour réduire le risque d'incendie, de choc électrique ou de blessures liquide sur l'adhésif avec les doigts. Rincer à l'eau tiède et essuyer. 15 - KitchenAid KUIS18NNXB | Use and Care Manual - Page 16
, de 15 ou 20 ampères, mis à la terre conformément aux instructions du Code national de l'électricité et des codes et règlements locaux. Il est recommandé de réserver un circuit spécial à la machine à glaçons. Utiliser une prise où l'alimentation ne peut pas être coupée à l'aide - KitchenAid KUIS18NNXB | Use and Care Manual - Page 17
trouvent sur le fond arrière de la machine à glaçons. 6. Suivre les instructions de l'étape 4 pour modifier la hauteur des pieds. 7. Utiliser le niveau pour le plus proche assez longtemps pour vider l'eau du tuyau. 2. À l'aide d'un tuyau d'alimentation en cuivre de ¹⁄₂" avec une valve d'arrêt tourn - KitchenAid KUIS18NNXB | Use and Care Manual - Page 18
sur l'extrémité de la sortie à l'aide d'une clé à molette. Ne pas serrer ou du mur en cas d'intervention de service. VUE ARRIÈRE A B C de vidange par gravité, suivre les instructions ci-dessous lors de l'installation des tuyaux de vidange doivent avoir au moins 15,88 mm) de diamètre intérieur - KitchenAid KUIS18NNXB | Use and Care Manual - Page 19
utiliser un câble de rallonge. Le non-respect de ces instructions peut causer un décès, un incendie ou un choc électrique. l'exige, sceller la caisse sur le plancher à l'aide d'un produit de calfeutrage approuvé une fois que avec le guide d'utilisation et d'entretien. Fixer l'insigne de la marque à la - KitchenAid KUIS18NNXB | Use and Care Manual - Page 20
pas enlever la broche de liaison à la terre. Ne pas utiliser un adaptateur. Ne pas utiliser un câble de rallonge. Le non-respect de ces instructions peut causer un décès, un incendie ou un choc électrique. 4. Brancher sur une prise à 3 alvéoles reliée à la terre. Sons normaux Il est possible que - KitchenAid KUIS18NNXB | Use and Care Manual - Page 21
lumineux s'allumera. ■ Appuyer sur MAX ICE (glaçons max.) une fois de plus pour éteindre la caractéristique de glaçons rapides. Le témoin lumineux s'éteindra. Service Le témoin Service indique si une visite de service est nécessaire. Si le témoin Service s'allume, éteindre puis remettre en marche - KitchenAid KUIS18NNXB | Use and Care Manual - Page 22
aide le système de formation aide à enlever les dépôts accumulés de de l'eau. Lorsque l'eau est dure (15 à 20 grains/gal. [4 à 5 grains glace. 5. Lire et suivre toutes les instructions apparaissant sur la bouteille de produit de marche. Le non-respect de ces instructions peut causer un décès ou un - KitchenAid KUIS18NNXB | Use and Care Manual - Page 23
instructions suivantes. ■ Réinstaller le support de la pelle à glace en réinstallant les vis à ailette. A B A. Vis à ailette B. Support l'eau propre. Nettoyer ensuite ces mêmes composants à l'aide d'une solution comprenant 1 cuillerée à soupe (15 mL) d'agent de blanchiment ménager dans 1 gal (3,8 - KitchenAid KUIS18NNXB | Use and Care Manual - Page 24
de la grille de coupe et les deux vis. 15. Nettoyer doucement le tableau de commande avec un la remise en marche. Le non-respect de ces instructions peut causer un décès ou un choc électrique. et les deux vis de la grille de la base du support du panneau avant. Tirer vers l'avant pour enlever le - KitchenAid KUIS18NNXB | Use and Care Manual - Page 25
réservoir déborde-t-elle? Ceci est normal. Ce débordement aide à purger les minéraux éliminés de l'eau durant ■ Le témoin de service clignote-t-il en permanence? Faire un appel de service. La machine à glaç remise en marche. Le non-respect de ces instructions peut causer un décès ou un choc électrique - KitchenAid KUIS18NNXB | Use and Care Manual - Page 26
Avant de demander une assistance ou un service, veuillez vérifier la section "Dépannage". Cette vérification peut vous faire économiser le coût d'une visite de réparation. Si vous avez encore besoin d'aide, suivre les instructions ci-dessous. Lors d'un appel, veuillez connaître la date d'achat - KitchenAid KUIS18NNXB | Use and Care Manual - Page 27
section "Dépannage" du guide d'utilisation et d'entretien. Si vous êtes dans l'incapacité de résoudre le problème après avoir vérifié la section "Dépannage", vous pourrez trouver de l'aide supplémentaire en vérifiant la section "Assistance ou service" ou en appelant KitchenAid. Aux É.-U., composer - KitchenAid KUIS18NNXB | Use and Care Manual - Page 28
de votre gros appareil ménager pour mieux vous aider à obtenir assistance ou service en cas de besoin. Vous devrez connaître le numéro de modèle KitchenAid, U.S.A., KitchenAid Canada licensee in Canada ® Marque déposée/TM Marque de commerce de KitchenAid, U.S.A., Emploi sous licence par KitchenAid
-
 1
1 -
 2
2 -
 3
3 -
 4
4 -
 5
5 -
 6
6 -
 7
7 -
8
-
9
-
10
-
11
-
12
-
13
-
14
-
15
-
16
-
17
-
18
-
19
-
20
-
21
-
22
-
23
-
24
-
25
-
26
-
27
-
28
 |
 |

ICE MAKER
Use & Care Guide
For questions about features, operation/performance, parts, accessories or service, call:
1-800-422-1230
or visit our website at...
www.kitchenaid.com
In Canada, for assistance, installation and service, call:
1-800-807-6777
or visit our website at...
www.KitchenAid.ca
MACHINE À GLAÇONS
Guide d’utilisation et d’entretien
Au Canada, pour assistance, installation ou service composez le
1-800-807-6777
ou visitez notre site Web à...
www.KitchenAid.ca
Table of Contents/Table des matières
.............................................................................
2
W10340960B