Kodak DX7440 User Manual - Page 13
Taking pictures and videos, Taking a picture, Using the diopter dial - how to see videos
 |
UPC - 041771842734
View all Kodak DX7440 manuals
Add to My Manuals
Save this manual to your list of manuals |
Page 13 highlights
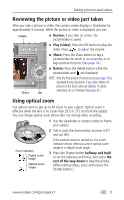
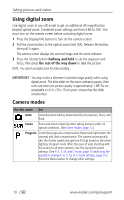
2 Taking pictures and videos Taking a picture 1 Turn the Mode dial to Auto . (See page 10 for other mode descriptions.) The camera screen displays the mode name and description. To interrupt the description, press any button. To redisplay the description, press the OK button. Display/Info button 2 Use the camera screen as a viewfinder, or press the Display/Info button to turn off the camera screen and use the viewfinder to frame your subject. 3 Press the Shutter button halfway to set the exposure and focus. 4 When the ready light turns green, continue pressing the Shutter button completely down to take the picture. If the ready light is steady or blinking red, release your finger, recompose the scene, and return to Step 3. When the ready light blinks green, the picture is being saved; you can still take pictures. NOTE: If you want the camera screen be off when you turn on the camera, see Liveview (Auto), page 23. Using the diopter dial You can adjust the viewfinder sharpness to your preference. 1 Look through the viewfinder. 2 Using your left thumb, turn the diopter dial until the viewfinder image is sharp. Diopter dial www.kodak.com/go/support 7
-
 1
1 -
2
-
3
-
4
-
5
-
6
-
7
-
 8
8 -
 9
9 -
 10
10 -
 11
11 -
 12
12 -
 13
13 -
 14
14 -
 15
15 -
 16
16 -
 17
17 -
 18
18 -
19
-
20
-
21
-
22
-
23
-
24
-
25
-
26
-
27
-
28
-
29
-
30
-
31
-
32
-
33
-
34
-
35
-
36
-
37
-
38
-
39
-
40
-
41
-
42
-
43
-
44
-
45
-
46
-
47
-
48
-
49
-
50
-
51
-
52
-
53
-
54
-
55
-
56
-
57
-
58
-
59
-
60
-
61
-
62
-
63
-
64
-
65
-
66
-
67
 |
 |