Kodak DX7440 User Manual - Page 26
Changing picture-taking settings
 |
UPC - 041771842734
View all Kodak DX7440 manuals
Add to My Manuals
Save this manual to your list of manuals |
Page 26 highlights
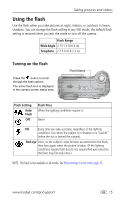
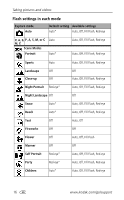
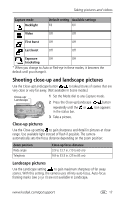
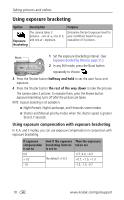
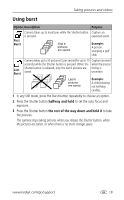
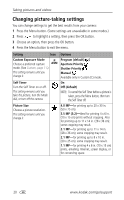
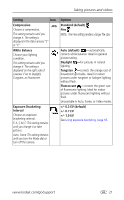
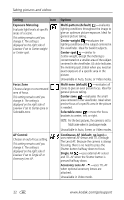
Taking pictures and videos Changing picture-taking settings You can change settings to get the best results from your camera: 1 Press the Menu button. (Some settings are unavailable in some modes.) 2 Press to highlight a setting, then press the OK button. 3 Choose an option, then press the OK button. 4 Press the Menu button to exit the menu. Setting Icon Options Custom Exposure Mode Choose a preferred capture mode. (See Custom, page 11.) This setting remains until you change it. P ASM Program (default) Aperture Priority Shutter Priority Manual Available only in Custom (C) mode. Self Timer Turn the Self Timer on or off. This setting remains until you take the picture, turn the Mode dial, or turn off the camera. On Off (default) NOTE: To cancel the Self Timer before a picture is taken, press the Menu button, then turn the Self Timer off. Picture Size Choose a picture resolution. This setting remains until you change it. 4.0 MP-for printing up to 20 x 30 in. (50 x 75 cm). 3.5 MP (3:2)-ideal for printing 4 x 6 in. (10 x 15 cm) prints without cropping. Also for printing up to 11 x 14 in. (28 x 36 cm); some cropping may result. 3.1 MP-for printing up to 11 x 14 in. (28 x 36 cm); some cropping may result. 2.1 MP-for printing up to 8 x 10 in. (20 x 25 cm); some cropping may result. 1.1 MP-for printing 4 x 6 in. (10 x 15 cm) prints, emailing, Internet, screen display, or for conserving space. 20 www.kodak.com/go/support
-
 1
1 -
2
-
3
-
4
-
5
-
6
-
7
-
8
-
9
-
10
-
11
-
12
-
13
-
14
-
15
-
16
-
17
-
18
-
19
-
20
-
 21
21 -
 22
22 -
 23
23 -
 24
24 -
 25
25 -
 26
26 -
 27
27 -
 28
28 -
 29
29 -
 30
30 -
 31
31 -
32
-
33
-
34
-
35
-
36
-
37
-
38
-
39
-
40
-
41
-
42
-
43
-
44
-
45
-
46
-
47
-
48
-
49
-
50
-
51
-
52
-
53
-
54
-
55
-
56
-
57
-
58
-
59
-
60
-
61
-
62
-
63
-
64
-
65
-
66
-
67
 |
 |
