Kodak ESP 3 User guide - Page 39
Scan from Control Panel (Windows) - aio
 |
UPC - 041771756932
View all Kodak ESP 3 manuals
Add to My Manuals
Save this manual to your list of manuals |
Page 39 highlights
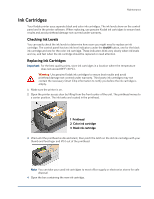
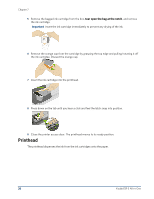
Maintenance Scan Scanning is the process of converting text and pictures into an electronic format for your computer. The Scan mode becomes active when you press Scan. The Scan status light is always on when your All-in-One printer is in Scan mode. To use the scan features, your All-in-One printer must be connected to a computer. Important Use the Kodak AiO Home Center software to configure scan settings for the control panel. Scan from Control Panel (Windows) To scan to a file 1 Set the Default scan destination to File with the Kodak Home Center software (see Home Center Help). 2 Place your original face down in the right front corner of the scanner glass. 3 Press Scan. The original is scanned and saved to a file on your computer according to the scan settings in the Kodak Home Center software. To scan to an application 1 Set the Default scan destination to Application with the Kodak Home Center software (see Home Center Help). 2 Place your original face down in the right front corner of the scanner glass. 3 Press Scan. The original is scanned into Kodak Home Center where you can open it with the application of your choice. Scan from Control Panel (Macintosh) To scan to a current settings name and location 1 Set the Scan Destination to File with the Kodak Home Center software (see Home Center Help). 2 Place your original face down in the right front corner of the scanner glass. 3 Press Scan. The original is scanned and saved to a file on your computer according to the scan settings in the Kodak Home Center software. To scan and select name and location 1 Set the Scan Destination to Application with the Kodak Home Center software (see Home Center Help). 2 Place your original face down in the right front corner of the scanner glass. 3 Press Scan. 4 Select a destination from the Save dialog on the computer.
-
 1
1 -
2
-
3
-
4
-
5
-
6
-
7
-
8
-
9
-
10
-
11
-
12
-
13
-
14
-
15
-
16
-
17
-
18
-
19
-
20
-
21
-
22
-
23
-
24
-
25
-
26
-
27
-
28
-
29
-
30
-
31
-
32
-
33
-
 34
34 -
 35
35 -
 36
36 -
 37
37 -
 38
38 -
 39
39 -
 40
40 -
 41
41 -
 42
42 -
 43
43 -
 44
44 -
45
-
46
-
47
-
48
-
49
-
50
-
51
-
52
-
53
-
54
-
55
-
56
-
57
-
58
-
59
-
60
-
61
-
62
-
63
-
64
-
65
-
66
-
67
-
68
-
69
-
70
-
71
-
72
-
73
 |
 |
