Kodak ESP 3 User guide - Page 43
Ink Cartridges, Checking Ink Levels, Replacing Ink Cartridges - printhead replacement
 |
UPC - 041771756932
View all Kodak ESP 3 manuals
Add to My Manuals
Save this manual to your list of manuals |
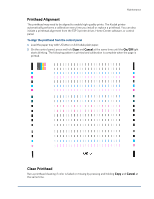
Page 43 highlights
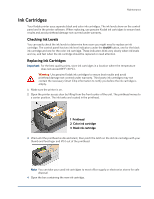
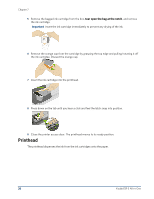
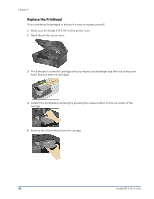
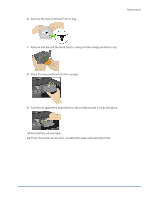
Maintenance Ink Cartridges Your Kodak printer uses separate black and color ink cartridges. The ink levels show on the control panel and in the printer software. When replacing, use genuine Kodak ink cartridges to ensure best results and avoid printhead damage not covered under warranty. Checking Ink Levels You can easily check the ink levels to determine how soon you might need to replace an ink cartridge. The control panel has two ink level indicators under the On/Off button, one for the black ink cartridge and one for the color ink cartridge. These indicators blink very slowly when ink levels are low, and fast when the ink cartridge should be replaced or need attention. Replacing Ink Cartridges Important For the best quality prints, store ink cartridges in a location where the temperature does not exceed 85°F (30°C). Warning Use genuine Kodak ink cartridges to ensure best results and avoid printhead damage not covered under warranty. Third-party ink cartridges may not contain the necessary Smart Chip information to notify you before the ink cartridge is empty. 1 Make sure the printer is on. 2 Open the printer access door by lifting from the front center of the unit. The printhead moves to a center position. The ink tanks are located in the printhead. 1 Printhead 2 Color ink cartridge 3 Black ink cartridge 3 Wait until the printhead is idle and silent, then pinch the latch on the old ink cartridge with your thumb and forefinger and lift it out of the printhead. Note You can take your used ink cartridges to most office supply or electronics stores for safe disposal. 4 Open the box containing the new ink cartridge.
-
 1
1 -
2
-
3
-
4
-
5
-
6
-
7
-
8
-
9
-
10
-
11
-
12
-
13
-
14
-
15
-
16
-
17
-
18
-
19
-
20
-
21
-
22
-
23
-
24
-
25
-
26
-
27
-
28
-
29
-
30
-
31
-
32
-
33
-
34
-
35
-
36
-
37
-
 38
38 -
 39
39 -
 40
40 -
 41
41 -
 42
42 -
 43
43 -
 44
44 -
 45
45 -
 46
46 -
 47
47 -
 48
48 -
49
-
50
-
51
-
52
-
53
-
54
-
55
-
56
-
57
-
58
-
59
-
60
-
61
-
62
-
63
-
64
-
65
-
66
-
67
-
68
-
69
-
70
-
71
-
72
-
73
 |
 |
