Kodak ESP 5250 User Manual
Kodak ESP 5250 - All-in-one Printer Manual
 |
View all Kodak ESP 5250 manuals
Add to My Manuals
Save this manual to your list of manuals |
Kodak ESP 5250 manual content summary:
- Kodak ESP 5250 | User Manual - Page 1
Start Here 5200 Series All-in-One Printer Rotate Back Home MS SD/HC MMC Print Copy Scan Includes Information on the: ESP 5250 All-in-One Printer ESP 5260 All-in-One Printer Note: A USB 2.0 cable is required to connect your KODAK All-in-One Printer to your WINDOWS or MACINTOSH OS Computer. - Kodak ESP 5250 | User Manual - Page 2
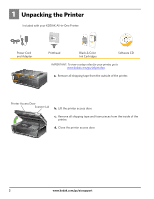
1 Unpacking the Printer Included with your KODAK All-in-One Printer: Inkjet Printer Software FOR WINDOWS & MACINTOSH Power Cord and Adapter Back Home MS SD/HC MMC Printhead Black & Color Ink Cartridges Software CD IMPORTANT: To view a setup video for your printer, go to www.kodak.com/go/ - Kodak ESP 5250 | User Manual - Page 3
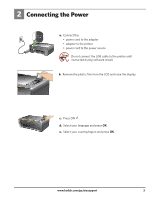
Rotate Back Home MS SD/HC MMC a. Connect the: • power cord to the adapter • adapter to the printer • power cord to the power source USB Do not connect the USB cable to the printer until instructed during software install. b. Remove the plastic film from the LCD and raise the display. Rotate - Kodak ESP 5250 | User Manual - Page 4
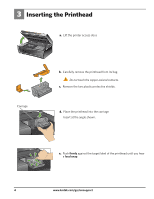
3 Inserting the Printhead MS SD/HC MMC a. Lift the printer access door. Carriage b. Carefully remove the printhead from its bag. Do not touch the copper-colored contacts. c. . e. Push firmly against the target label of the printhead until you hear a loud snap. 4 www.kodak.com/go/aiosupport - Kodak ESP 5250 | User Manual - Page 5
. c. Insert the black ink cartridge into the printhead. d. Press down on the ink cartridge until you hear it click into position. e. Repeat steps 4a - 4d with the color ink cartridge. Rotate Back Home MS SD/HC MMC f. Close the printer access door and press OK. www.kodak.com/go/aiosupport 5 - Kodak ESP 5250 | User Manual - Page 6
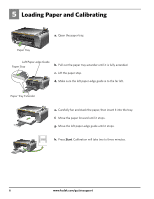
the paper tray. Paper Tray Left Paper-edge Guide Paper Stop b. Pull out the paper tray SD/HC MMC d. Make sure the left paper-edge guide is to the far left. Paper Tray Extender Rotate Back stops. g. Move the left paper-edge guide until it stops. Rotate Back Home MS SD/HC MMC OK - Kodak ESP 5250 | User Manual - Page 7
section in this step or the chapter Setting Up Your Printer in the User Guide for detailed instructions. USB Cable Connection USB CABLE CONNECTION-WAIT TO CONNECT USB Do not connect the USB cable to the printer until instructed during software install. a. Select USB cable from the LCD display and - Kodak ESP 5250 | User Manual - Page 8
router's software). Generate WPS PIN 1. Select Generate WPS Pin on the LCD display. 2. Go to your router's software and connect to your wireless network, go to www.kodak.com/go/inkjetnetworking or refer to the User Guide at www.kodak.com/go/manuals for troubleshooting information. 8 www.kodak - Kodak ESP 5250 | User Manual - Page 9
have a WINDOWS OS computer; continue with step 8 if you have a MACINTOSH Computer. If you are unable to connect to your wireless network, go to www.kodak.com/go/inkjetnetworking or refer to the User Guide at www.kodak.com/go/manuals for troubleshooting information. www.kodak.com/go/aiosupport 9 - Kodak ESP 5250 | User Manual - Page 10
type To change the connection type from Wireless (Wi-Fi) to USB: 1. Connect your USB cable to your printer and computer. The necessary drivers will install automatically. 2. To print to your USB connected printer, choose Kodak 5250 Printer or Kodak 5260 Printer. 10 www.kodak.com/go/aiosupport - Kodak ESP 5250 | User Manual - Page 11
your computer does not have a CD drive, go to www.kodak.com/go/downloads to download the software. b. If instructed, connect the USB cable to the USB port on the printer and to your computer. Continue to follow the on-screen instructions until installation is complete. NOTE: If you are prompted by - Kodak ESP 5250 | User Manual - Page 12
OS a. Connect the USB cable to the USB port on the printer and to your MACINTOSH Computer. b. Load the KODAK All-in-One Printer Software CD into the CD drive. Follow the on-screen instructions. If the installer window does not open, double-click the KODAK All-in-One Printer Software CD icon - Kodak ESP 5250 | User Manual - Page 13
service, misuse, abuse, use with incompatible accessories or attachments (such as third party ink or ink tanks), failure to follow Kodak's operation, maintenance or repacking instructions, failure to use items supplied by Kodak (such as adapters warranty will be one year from the purchase date or - Kodak ESP 5250 | User Manual - Page 14
are followed, unplug your all-in-one printer from the power outlet and contact Kodak at www.kodak.com/go/contact for further instructions. • For added protection from damage during a lightning storm, or any time when your printer and its associated AC adapter will be left unused for long periods - Kodak ESP 5250 | User Manual - Page 15
has its rewards-including a terrific offer. Register your KODAK All-in-One Printer and get great support, expert tips, free software downloads-plus a phenomenal deal on inkjet supplies to get you started. Simply register right away when prompted during software installation or on the web at www - Kodak ESP 5250 | User Manual - Page 16
Thank you for purchasing a KODAK All-in-One Printer. In the unlikely event that your printer does not operate as expected, please do not return it to the store. Do the following steps to begin troubleshooting. 1. Power cycle the printer by unplugging the printer. Wait 5 seconds, and then plug the
-
 1
1 -
 2
2 -
 3
3 -
 4
4 -
 5
5 -
 6
6 -
 7
7 -
8
-
9
-
10
-
11
-
12
-
13
-
14
-
15
-
16
 |
 |
Rotate
Back Home
MS
SD/HC
MMC
Note:
A USB 2.0 cable is required to connect
your KODAK All-in-One Printer to your
WINDOWS or MACINTOSH OS Computer.
Available in the KODAK Store or see
your local retailer.
All-in-One Printer
Start Here
5200 Series
Print
Copy
Scan
Includes Information on the:
ESP 5250 All-in-One Printer
ESP 5260 All-in-One Printer