Kodak ESP5 User Manual
Kodak ESP5 - ESP 5 All-in-One Color Inkjet Manual
 |
UPC - 041778509401
View all Kodak ESP5 manuals
Add to My Manuals
Save this manual to your list of manuals |
Kodak ESP5 manual content summary:
- Kodak ESP5 | User Manual - Page 1
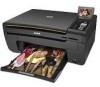
KODAK ESP 5200 Series All-in-One Printer Rotate Back Home MS SD/HC MMC Includes Information for the: ESP 5250 All-in-One Printer ESP 5260 All-in-One Printer Extended User Guide - Kodak ESP5 | User Manual - Page 2
Eastman Kodak Company Rochester, NY 14650 © Eastman Kodak Company, 2009 Kodak, EasyShare, and Perfect Touch are trademarks of Eastman Kodak Company. Specifications subject to change without notice. P/N 1K5831 September 2009 - Kodak ESP5 | User Manual - Page 3
another KODAK All-in-One Printer 10 Adding a network connection to a USB-connected computer 11 For WINDOWS OS-based computers...11 For MACINTOSH Computers ...11 3 Handling Paper Paper types...12 Paper sizes...12 Envelope sizes...13 Loading paper ...13 Loading plain paper...13 Loading photo paper - Kodak ESP5 | User Manual - Page 4
on a WINDOWS OS-based computer 39 Upgrading software and firmware on a MACINTOSH Computer 39 Monitoring and adjusting printer performance ...40 Checking ink levels...40 Resetting factory defaults ...40 8 Troubleshooting Basic troubleshooting ...41 Status lights...43 Power status light...43 - Kodak ESP5 | User Manual - Page 5
KODAK ESP 5200 Series All-in-One Printer Connectivity ...46 Software support ...46 Physical specifications ...47 Warranty...47 System requirements...47 Safety information ...49 Regulatory compliance...51 FCC statement ...51 Canadian statements ...51 German compliance statement ...52 - Kodak ESP5 | User Manual - Page 6
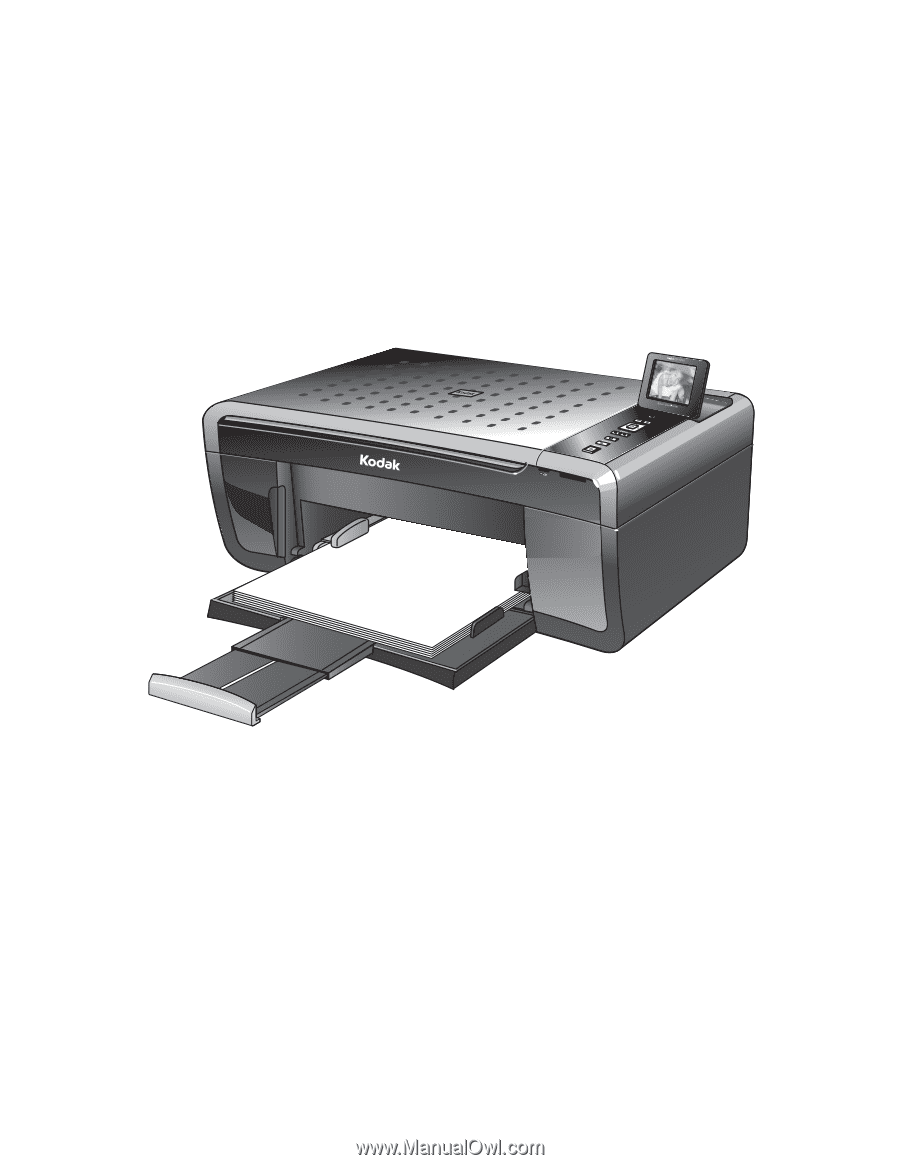
scan pictures and documents. In addition, this printer supports networking, letting you access the printer over a wireless (Wi-Fi) network. 7 Rear-access cleanout area 8 Printer access door 9 Printhead with ink cartridges installed 10 Right paper-edge guide 11 Paper tray 12 Paper tray extender - Kodak ESP5 | User Manual - Page 7
Control panel KODAK ESP 5200 Series All-in-One Printer ESP 5250 1 All-in-One-Printer 2 Back Home 10 3 9 OK 4 Rotate Back Home MS SD/ Displays pictures, messages, and menus; lifts for easy viewing Turns the printer on or off Displays the main menu, and toggles between screens Used to - Kodak ESP5 | User Manual - Page 8
, print, copy, scan, order supplies, access the Extended User Guide, and configure your all-in-one printer from your computer. You can also access the KODAK Tips and Projects Center Web site or upgrade your printer with a newer version of software and/or firmware. Clicking one of the three icons - Kodak ESP5 | User Manual - Page 9
Off. If you select On, when you are printing pictures, the printer LCD prompts you to verify that you want to print pictures that were tagged (or marked) using your camera. Different cameras use different terminology; KODAK Digital Cameras use "marked" images; others use either tagged images or DPOF - Kodak ESP5 | User Manual - Page 10
, information, and network troubleshooting are available at www.kodak.com/go/inkjetnetworking. If you are unsure of how your network is configured, contact your Internet service provider or your network administrator for assistance. Configuring a If you did not do so during printer setup, you can - Kodak ESP5 | User Manual - Page 11
support. • A working 802.11 wireless network. Kodak recommends that you use a wireless access point/router that uses Dynamic Host Configuration Protocol (DHCP). • Your network name (SSID - Service select WiFi Setup Wizard. The printer searches for available wireless networks within range, then displays - Kodak ESP5 | User Manual - Page 12
7. If you haven't yet installed the printer software, insert the software CD that came with your printer and follow the on-screen instructions to install the software. To connect to an unlisted network using the security information is entered, select DONE, then press OK. www.kodak.com/go/aiosupport - Kodak ESP5 | User Manual - Page 13
KODAK ESP 5200 Series All-in-One Printer Using WPS to connect to a Wi-Fi network 8. When the confirmation message appears, press OK. 9. If you haven't yet installed the printer software, insert the CD that came with your printer, and install the software. If your router supports Internet service - Kodak ESP5 | User Manual - Page 14
printer if you are having a problem Manual (Static), you are prompted to enter an IP address, a Subnet Mask, a Gateway Address, and a DNS Server address. Press OK after each entry. Use the navigation buttons to enter each digit of the numbers. Consult your network administrator or Internet service - Kodak ESP5 | User Manual - Page 15
the network configuration. Installing your To add your printer to another computer(s) on your network, install the KODAK printer on additional All-in-One Printer Software that came with your printer on each computer. Follow the on-screen instructions. computers on the network Connecting to If - Kodak ESP5 | User Manual - Page 16
listed: a. Highlight the all-in-one printer that is connected to your network. b. Select Yes, my printer is listed, then click Next. When your printer is detected, driver installation begins. 9. When driver installation is complete, click Done. The printer with a wireless connection is listed as the - Kodak ESP5 | User Manual - Page 17
3 Handling Paper Paper types Paper sizes For the best photo printing results, use KODAK Photo Papers, which are optimized to work with KODAK All-in-One Printers. For the best document printing results, use KODAK Document Papers or a paper with the COLORLOK Technology logo on the package. Use only - Kodak ESP5 | User Manual - Page 18
Handling Paper Envelope sizes The printer accepts the following envelope sizes: • C5 (6.38 x 9 in. / 162 x 229 mm) • C6 (4.5 x 6. Lift the paper stop. 4. Make sure the left paper-edge guide is to the far left. left paper-edge guide Rotate Back Home MS SD/HC MMC paper stop paper tray extender - Kodak ESP5 | User Manual - Page 19
KODAK ESP 5200 Series All-in-One Printer 7. Move the left paper-edge guide until it touches the paper. left paper-edge guide Rotate Back Home MS SD/HC MMC Loading photo paper The paper tray capacity is 20 sheets of photo paper. To load photo paper: 1. Remove any paper from the tray. 2. - Kodak ESP5 | User Manual - Page 20
the tray. 2. Insert the envelope(s) into the tray with the flap up and against the right side of the tray. 3. Move the left paper-edge guide until it touches the envelope(s). left paper-edge guide 15 www.kodak.com/go/aiosupport - Kodak ESP5 | User Manual - Page 21
instructions. If you have a MACINTOSH Computer, print your pictures using KODAK EASYSHARE Software, iPhoto, or another picture-editing program. Changing Print Photos Options / Defaults You can change the print photos computer, press OK then Start. (Your printer and computer must be connected with a - Kodak ESP5 | User Manual - Page 22
a unit; do not remove the memory card while leaving the adapter in the printer. Printing a picture If you use the default settings, one 4 x 6 in photo paper with the logo side facing up (see Loading photo paper, page 14), and move the left paper-edge guide until it touches the paper. 17 www.kodak - Kodak ESP5 | User Manual - Page 23
(see Loading photo paper, page 14), and move the left paper-edge guide until it touches the paper. left paper-edge guide Rotate Back Home MS SD/HC MMC memory card slot 2. Press Back. 3. If necessary, use the navigation buttons to select View and Print Photos. 4. Press OK. www.kodak.com/go - Kodak ESP5 | User Manual - Page 24
it from the printer while printing. Some digital cameras let you tag printer (unless otherwise specified by the tag from the camera). NOTE: Refer to your camera user guide to determine whether your camera supports tagged (also "marked" or "DPOF") functionality. To print tagged pictures: 1. Load photo - Kodak ESP5 | User Manual - Page 25
KODAK ESP 5200 Series All-in-One Printer 2. Insert the memory card into the memory card slot. left paper-edge guide Rotate Back Home crop a picture: 1. Load photo paper with the logo side facing up (see Loading photo paper, page 14), and move the left paper-edge guide until it touches the paper - Kodak ESP5 | User Manual - Page 26
View and Print Photos. 4. Press OK. 5. Press to select Transfer All to PC, then press OK. 6. Press Start. 7. If your computer is connected to a wireless network and with a USB cable, select the USB-connected printer (no number after the printer name). 8. Follow the on-screen instructions on your - Kodak ESP5 | User Manual - Page 27
one printer. The printer produces the printer has been idle or when it is turned on; the printer automatically goes to Copy Document mode. 3. Press Home. 4. If needed, press or to select Copy Document or Copy Photo for copying documents or copying photos, and save them as the - Kodak ESP5 | User Manual - Page 28
printing Draft or Normal. The fastest print speed, but the lowest quality. The printer detects when you load photo paper and sets Best quality automatically. Prints full color. Prints black and white ( settings as the new default: press OK, select Yes, then press OK. 23 www.kodak.com/go/aiosupport - Kodak ESP5 | User Manual - Page 29
KODAK ESP 5200 Series All-in-One Printer Changing copy photo options To change the copy photo options: 1. Press Home. 2. If necessary, press 3. Press OK. to select Copy Photo. 4. Press to view the options, and press or below: as needed to change the settings Copy Photo Option Settings - Kodak ESP5 | User Manual - Page 30
the printer detects photo To enlarge or reduce the size of your copy: 1. Lift the scanner lid, and place the photo face down on the glass. 2. Close the lid. 3. Press Home. 4. If needed, press or to select Copy Photo. 5. Press OK. 6. Press to select Copy Size. 7. Press or to select the photo - Kodak ESP5 | User Manual - Page 31
KODAK ESP 5200 Series All-in-One Printer Darkening or If the original document or picture SD/HC MMC 2. Close the lid. 3. Press Home. 4. If needed, press or to select Copy Document or Copy Photo. 5. Press OK. 6. Press to select Brightness. 7. Press to select a number below zero for a darker copy, - Kodak ESP5 | User Manual - Page 32
scan with your all-in-one printer, it must be connected to a printer. Before you begin scanning Change the default scan settings in the Home Center Software. (Click the Tool icon, then select Printer Software, and crop the output as desired. See the Home Center Software Help (? icon) for instructions - Kodak ESP5 | User Manual - Page 33
KODAK ESP 5200 Series All-in-One Printer Scanning multiple pictures simultaneously Using Home Center Software, you can scan multiple pictures simultaneously and save them as separate files. NOTE: For Home Center Software screen instructions. NOTE: Click the Help icon for additional instructions. - Kodak ESP5 | User Manual - Page 34
, such as suntan lotion, to come into contact with the painted surface of the printer. • If the printer has been exposed to bad weather or has water inside it, turn it off and let it dry completely. If this does not solve the problem, contact Kodak Service & Support. 29 www.kodak.com/go/aiosupport - Kodak ESP5 | User Manual - Page 35
To clean the scanner glass: 1. Unplug the printer and raise the scanner lid. 2. Wipe the glass with a soft cloth or sponge, slightly moistened with a nonabrasive glass cleaner. 3. Dry the glass with a lint-free cloth. 4. When finished cleaning, plug in the printer. www.kodak.com/go/aiosupport 30 - Kodak ESP5 | User Manual - Page 36
isopropyl (rubbing) alcohol on a soft cloth, then wipe thoroughly with a cloth damped with water to remove any residual alcohol. 5. When finished cleaning, plug in the printer. 31 www.kodak.com/go/aiosupport - Kodak ESP5 | User Manual - Page 37
(see Checking ink levels, page 40) or in Home Center Software. When an ink cartridge is out of ink, the printer LCD displays a message stating that the black or color ink cartridge needs replacing. IMPORTANT: Do not use non-Kodak brand or refilled ink cartridges. To replace an ink cartridge: 1. Make - Kodak ESP5 | User Manual - Page 38
Printer 3. Pinch the latch on the ink cartridge and lift it out of the printhead. 4. Remove the ink cartridge from its bag. IMPORTANT: Insert the ink cartridge into the printhead immediately to prevent the printhead from drying out. 5. Remove the protective cap from the cartridge. 10 33 www.kodak - Kodak ESP5 | User Manual - Page 39
KODAK ESP 5200 Series All-in-One Printer 6. Insert the ink cartridge into the printhead. 7. Press down on the tab until you hear a click. 8. Close the printer access door. www.kodak.com/go/aiosupport 34 - Kodak ESP5 | User Manual - Page 40
the printhead is not a regular maintenance procedure. Replace the printhead only if you receive a new printhead from Kodak. To replace the printhead: 1. Make sure your printer is on. 2. Lift the printer access door, and wait for the carriage to move to the access position. 3. Remove any paper that - Kodak ESP5 | User Manual - Page 41
All-in-One Printer 5. Unlatch the used printhead by lifting the button in the center of the carriage. 6. Lift the used printhead out of the carriage. 7. Remove the new printhead from its bag. CAUTION: Do not touch the copper contacts on the printhead, as this may damage it. www.kodak.com/go - Kodak ESP5 | User Manual - Page 42
Maintaining Your Printer 8. Remove the two plastic protective shields. 9. Place the new printhead into the carriage. Insert it at the angle shown. 37 www.kodak.com/go/aiosupport - Kodak ESP5 | User Manual - Page 43
until you hear it click into position. Cartouche d'encre noire 10 10 13. Repeat steps 11 - 12 for the color ink cartridge. 14. Close the printer access door. The printer detects the new printhead. Follow the instructions on the LCD to calibrate your printer. www.kodak.com/go/aiosupport 38 - Kodak ESP5 | User Manual - Page 44
want to upgrade manually. Upgrading software and firmware on a WINDOWS OS-based computer NOTE: Your printer must be connected software updates, follow the on-screen instructions for upgrading your software. To upgrade the firmware: 1. Go to www.kodak.com/go/esp5250downloads. 2. Connect the printer - Kodak ESP5 | User Manual - Page 45
KODAK ESP 5200 Series All-in-One Printer Monitoring and adjusting printer performance From the control panel, you can perform many tasks to help you keep the printer functioning well. Checking ink levels To check the ink levels: 1. Press Home. 2. Press to select Maintenance. 3. With Check Ink - Kodak ESP5 | User Manual - Page 46
help troubleshoot problems with your printer. For more troubleshooting information, go to: • www.kodak.com/go/itg to use our Step-by-Step Solutions and Repair tool for help with problems such as paper jams and image quality. • www.kodak.com/go/esp5250support for FAQs and links to other support for - Kodak ESP5 | User Manual - Page 47
• Kodak Service Number (located inside or on the outside of the printer) • Printer model number (located on the back of the printer) • Computer model, operating system, and version of Home Center Software • Exact wording of any error message(s) For more troubleshooting information, go to www.kodak - Kodak ESP5 | User Manual - Page 48
Troubleshooting Status lights The status lights indicate the condition of the printer. There are two status lights on the printer, one that indicates power, the other indicates Wi-Fi status. Power status light Power light Off Blinking On What it means • The printer is turned off. - Press the on/ - Kodak ESP5 | User Manual - Page 49
Add Dates to Prints Color Scene Balance Photo Printing Features Up to 99 (may vary for different models of the 5200 series printers) 2 x 3 in. (5 x , photo paper, and transparency Optimize image quality for KODAK Photo Papers with barcode KODAK PERFECT TOUCH Technology with Home Center Software Yes - Kodak ESP5 | User Manual - Page 50
of the 5200 series printers) Same Size, Fit-to-Page, 20% to 500% (may vary for different models of the 5200 series printers) Best, Normal, Draft - 3 to + 3 Copy Photo Features Black-and-white x 11.7 in. (21.6 x 29.7 cm) Segmentation scanning Auto-destination OCR 45 www.kodak.com/go/aiosupport - Kodak ESP5 | User Manual - Page 51
KODAK ESP 5200 Series All-in-One Printer Paper tray features Paper Capacity Tray Size Paper Tray Features 100 sheets of 20 lb plain paper 20 sheets of photo paper, Software support Application Support Media Support Scanner Support Update Support Software Support KODAK EASYSHARE Software for photos - Kodak ESP5 | User Manual - Page 52
Recommended MICROSOFT WINDOWS VISTA OS 32- or 64-bit processor 2 GHz 1024 MB RAM 500 MB available USB 2.0 CD-ROM Internet access capability 47 www.kodak.com/go/aiosupport - Kodak ESP5 | User Manual - Page 53
KODAK ESP 5200 Series All-in-One Printer MACINTOSH Computers MACINTOSH Computers Operating High Speed CD-ROM Internet access capability Paper types supported Plain Paper Photo Paper Card Stock Envelopes Transparencies Labels Iron-on Transfers Paper Types Supported 20 to 24 lb (60 to 90 gsm) Up - Kodak ESP5 | User Manual - Page 54
Stock Transparency Iron-on Transfer Label Sizes Photo Greeting card Paper Sizes Supported Size A4 (210 x 297 mm) in. (101 x 203 mm) Safety information • Always follow all warnings and instructions marked on the product. • Use only the power source indicated on the product kodak.com/go/aiosupport - Kodak ESP5 | User Manual - Page 55
KODAK ESP 5200 Series All-in-One Printer • If you do not use this product for a long period of time or around this product. • Do not spill any liquid on this product. • Do not attempt to repair or service this product. • If the power cord or plug is damaged, if any liquid has been spilled onto the - Kodak ESP5 | User Manual - Page 56
installed and used in accordance with the instructions, may cause harmful interference to radio minimized. This product and any attached external antenna, if supported, shall be placed in such a manner to minimize digital apparatus complies with Canadian ICES-003. 51 www.kodak.com/go/aiosupport - Kodak ESP5 | User Manual - Page 57
KODAK ESP 5200 Series All-in-One Printer Industry Canada (IC) Radiation Exposure Statement This equipment Qualified ENERGY STAR and the ENERGY STAR mark are registered U.S. service marks. As an ENERGY STAR partner, KODAK has determined that this product meets ENERGY STAR Guidelines for energy - Kodak ESP5 | User Manual - Page 58
, accident, alteration, modification, unauthorized service, misuse, abuse, use with incompatible accessories or attachments (such as third party ink or ink tanks), failure to follow Kodak's operation, maintenance or repacking instructions, failure to use items supplied by Kodak (such as adapters and - Kodak ESP5 | User Manual - Page 59
Drive San Diego, CA 92127, USA Declares our sole responsibility that the product Product Name: Power adapters: Radio Module Number: KODAK ESP 5250 All-in-One Printer HP-A0601R3, VP-09500084-000 US101 conforms to the following Product Specifications: Safety: EMC: Radio: IEC 60950-1:2001 EN - Kodak ESP5 | User Manual - Page 60
supported, 46 Index card stock sizes, 49 Ink cartridge replacing, 32 Ink levels, 32 Installing printer on additonal computers on network, 10 IP Address, format for entering, 9 iPhoto software, 21 Iron-on transfers, 49 K Keyboard on LCD, using, 7 KODAK Home Center Software. See Home Center Software - Kodak ESP5 | User Manual - Page 61
Replacing ink cartridges, 32 Right paper-edge guide, 1 Rotate button, 2, 21 S Scanner glass, 1 lid, 1 Scanning, 27 changing settings in Home Center Software, 27 multiple pictures simultaneously, 28 Service agreements, 29 Settings basic printer, 4 wireless network, 5 www.kodak.com/go/aiosupport 56 - Kodak ESP5 | User Manual - Page 62
, troubleshooting, 29 Web support www.kodak.com/go/esp5250downloads, 41 www.kodak.com/go/esp5250specs, 41 www.kodak.com/go/esp5250support, 41 www.kodak.com/go/inkjetnetworking, 41 www.kodak.com/go/itg, 41 www.kodak.com/go/recycle, 29 WEP key, 6 Wi-Fi connectivity LED, 1 WiFi Setup Wizard, on printer
-
 1
1 -
 2
2 -
 3
3 -
 4
4 -
 5
5 -
 6
6 -
 7
7 -
8
-
9
-
10
-
11
-
12
-
13
-
14
-
15
-
16
-
17
-
18
-
19
-
20
-
21
-
22
-
23
-
24
-
25
-
26
-
27
-
28
-
29
-
30
-
31
-
32
-
33
-
34
-
35
-
36
-
37
-
38
-
39
-
40
-
41
-
42
-
43
-
44
-
45
-
46
-
47
-
48
-
49
-
50
-
51
-
52
-
53
-
54
-
55
-
56
-
57
-
58
-
59
-
60
-
61
-
62
 |
 |
KODAK ESP 5200 Series
All-in-One Printer
Includes Information for the:
ESP 5250 All-in-One Printer
ESP 5260 All-in-One Printer
Extended User Guide
MS
SD/HC
MMC
Rotate
Back Home