Kodak G600 User Manual
Kodak G600 - EasyShare Printer Dock Manual
 |
UPC - 041771633370
View all Kodak G600 manuals
Add to My Manuals
Save this manual to your list of manuals |
Kodak G600 manual content summary:
- Kodak G600 | User Manual - Page 1
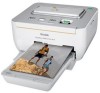
13 14 2 3 4 12 11 10 9 8 7 6 5 1 Power button/light 8 Print layout button 2 Camera connector (for Kodak EasyShare camera 9 Transfer button/light or ImageLink print system compatible camera) 10 Pull-out handle 3 Cartridge status indicator light 11 Paper status indicator light 4 (4-way button - Kodak G600 | User Manual - Page 2
ENGLISH ᕡ Install the software IMPORTANT: Before connecting any cables, install the software that was included with your printer. Follow the on-screen instructions. After installing the software, return to this Getting Started Guide. 2 www.kodak.com/go/easysharecenter - Kodak G600 | User Manual - Page 3
ENGLISH ᕢ Load cartridge and paper Use only Kodak color cartridge & paper kits with symbol: 4 1 Remove ribbon slack. 2 Insert cartridge. 5 Glossy side up. Do not fill above fill line (maximum 30 sheets). 3 Fan paper 6 7 www.kodak.com/go/g600support 3 - Kodak G600 | User Manual - Page 4
ENGLISH ᕣ Connect power and camera insert 1 3 2 4 Your AC power adapter may not require assembly Custom camera insert included with your camera 4 www.kodak.com/go/easysharecenter - Kodak G600 | User Manual - Page 5
user's guide.) 1 2 Select pictures to print: Press to locate a picture. Press to select print quantity. Repeat for each picture. 5 in. 12.7 cm Allow space for printing. 3 Press Print. (Each picture makes 4 passes through the printer.) Important: Do not pull out the print. The printer dock - Kodak G600 | User Manual - Page 6
so you can print and share your best pictures! Visit www.kodak.com/go/g600support and www.kodak.com/go/easysharecenter for: • the extended user's guide • interactive troubleshooting and repairs • interactive tutorials • FAQs • downloads • accessories • projects, printing tips • product registration - Kodak G600 | User Manual - Page 7
locate a picture. 3 Highlight Print, then press OK. Repeat steps 2-4 to tag more pictures. 5 Dock camera, then press Print. Selected pictures are printed. * For Kodak EasyShare cameras only. For other brands of ImageLink system compatible cameras, see your camera user's guide. www.kodak.com/go - Kodak G600 | User Manual - Page 8
ENGLISH Take the printer dock with you 1 2 Slide tray into grooves. 3 click click Optional battery installation www.kodak.com/go/accessories 1 2 Battery charges when printer dock is plugged in. Blinking green = Battery charging Steady green = Charging complete 8 www.kodak.com/go/ - Kodak G600 | User Manual - Page 9
buttons (on the camera) to size the crop box. Press to move the crop box, then press OK. 4 Follow the screen prompts. Note: The original picture is saved. * For Kodak EasyShare cameras only. For other brands of ImageLink system compatible cameras, see your camera user's guide. www.kodak.com/go - Kodak G600 | User Manual - Page 10
ENGLISH Transfer pictures, print from a computer 1 Remember to load software. 4 Transfer pictures to your computer. 2 5 Print using EasyShare software or other application. 3 10 www.kodak.com/go/easysharecenter - Kodak G600 | User Manual - Page 11
USB flash drive: 1 You must dock your camera to review and print pictures from a USB flash drive. 2 To print, see page 5. PictBridge compatible device: To print, see your device user's guide. Transfer pictures to a USB flash drive Copy one or all the pictures from your camera to a USB flash drive - Kodak G600 | User Manual - Page 12
until the green charging light stops blinking. Leave the camera docked to keep camera batteries charged. Note: Not all cameras are compatible for charging on the G600 printer dock. See your camera user's guide for dock compatibility. Your printer dock charges only Kodak Ni-MH and Li-Ion rechargeable - Kodak G600 | User Manual - Page 13
to four 2 x 3 in. (51 x 76 mm) pictures 9-up (mini photo) Up to nine 1.3 x 2 in. (34 x 51 mm) pictures 3 Press the Print button to begin printing. IMPORTANT: The printer dock automatically ejects the finished print after the fourth pass. Do not pull out a print. www.kodak.com/go/g600support 13 - Kodak G600 | User Manual - Page 14
in Step 3. 2 Place the camera on the printer dock. If your camera is docked, a message appears on the camera screen indicating that tagged pictures are found. 3 Press the Picture Layout button repeatedly to select: 2-up 4-up 9-up 4 Press to begin printing. 14 www.kodak.com/go/easysharecenter - Kodak G600 | User Manual - Page 15
button/light glows green. • The Red-eye reduction button is disabled when printing from a computer. If printing from a computer (see page 10), make sure Kodak EasyShare software is installed on the computer. • Your printer dock may apply red-eye reduction to an area such as a sunburn, which - Kodak G600 | User Manual - Page 16
6Appendix Important Safety Instructions CAUTION: Do not disassemble this product; there are no user-serviceable parts inside. Refer servicing to qualified service personnel. Do not expose this product to liquid, moisture, or extreme temperatures. Kodak AC adapters and battery chargers are intended - Kodak G600 | User Manual - Page 17
does not apply to the battery(s) used in digital cameras or accessories. This warranty does not cover circumstances beyond Kodak's control, nor problems caused by failure to follow the operating instructions in the Kodak EasyShare digital cameras and accessories User's Guides. This warranty does not - Kodak G600 | User Manual - Page 18
and advisory Kodak EasyShare G600 printer dock This equipment has been tested and found to comply with the limits for a Class B digital device, pursuant to Part 15 of the FCC Rules. These limits are designed to provide reasonable protection against harmful interference in a residential installation - Kodak G600 | User Manual - Page 19
to the instruction manual. Korean Class B ITE English translation: As this equipment has obtained EMC registration for household use, it can be used in any area including residential areas. Eastman Kodak Company Rochester, New York 14650 © Eastman Kodak Company, 2006 Kodak, EasyShare, ImageLink
-
 1
1 -
 2
2 -
 3
3 -
 4
4 -
 5
5 -
 6
6 -
 7
7 -
8
-
9
-
10
-
11
-
12
-
13
-
14
-
15
-
16
-
17
-
18
-
19
 |
 |

www.kodak.com/go/g600support
1
ENGLISH
Overview
1
Power button/light
8
Print layout button
2
Camera connector (for Kodak EasyShare camera
or ImageLink print system compatible camera)
9
10
Transfer button/light
Pull-out handle
3
Cartridge status indicator light
11
Paper status indicator light
4
(4-way button)
12
USB device connector
5
Print button/light
13
USB connector (to computer)
6
Red-eye reduction button/light
14
Power connector (DC-in)
7
Camera battery status light
15
Connector cover for optional battery
2
4
7
6
5
9
14
1
13
8
3
12
15
11
10